In this article
Customer Order Status and payment request
Before starting to use Commerce Service with a new LS Central Company, general data must be set up in LS Central.
This may include:
- Web Service
- Inventory setup in general
- Retail items with prices, images and HTML text
- Offers and publish offers
- Member management
- Stores and terminals
- Including web store and web terminal for eCommerce
- Customer Order setup
The LS Central Demo company has item, offers, coupons, images, member contacts, and basic data needed to demo the Commerce solutions.
The Demo company data includes member contact Tom, login tom password tom.1 that you can use to log in without the need to create a new user. For Mobile POS and Inventory Apps, use the login 150 with no password.
Web Service
Commerce Service needs LS Central Web Services to be set up. It uses version 1.0 and 2.0 both when communicating with LS Central.
To import Web Services to a new Company, see Export and Import LS Central Web Services to a New Company.
See Web Services for more details depending on the environment it will be connecting to.
Scheduler Jobs
Generally, Commerce Service reads information from standard tables, but there are a few data that have to be prepared in special tables for replication to work. Run those jobs on a regular basis in LS Central Scheduler to keep the data up-to-date.
COMMERCE_INIT & UPDATE jobs are used to generate prices, discounts, and store hours for Commerce, and the two jobs below are the main jobs that are needed to prepare data for Commerce. Both jobs run code unit 10012870.
- COMMERCE_INIT needs to be run first time and when a new store has been added to the setup to prepare startup data for the new store. The job does not need to be scheduled.
- COMMERCE_UPDATE should be run on a regular schedule during the day to update data that has been changed since the previous update.
COMMERCE_INVENTORY job runs code unit 10012871 that calculates the inventory status for items in Retail Product Groups that were marked with POS Inventory Lookup feature and Store is marked as Web Store. It should be run on a regular schedule during the day to trigger calculation. First time when running the Job or to Initialize the inventory data again, the Scheduler Job should be run once with Boolean flag in the Object Setup section selected.
To prepare product groups for Inventory update, open the Retail Product Groups page, select the Item Categories to be included, and select the POS Inventory Lookup check box. Run the Update POS Inventory Lookup command from the menu bar, and select Update for all Product Groups. If a new Product Group or Item Category is added later, this must be executed again, or it can be done by running Scheduler Job INVLOOKUP.
Member Management
If you are using Member Management, make sure that you have set up the Member Management features in LS Central, such as member clubs and schemes, discounts, and published offers. See the Member Management section for more details.
Store Card

The Omni FastTab in the Store Card holds the specific settings needed for Commerce.
- Select the Web Store and Loyalty check boxes if you are using Loyalty and eCommerce.
- Select the Mobile check box if you are using Mobile POS.
- Set the Web Store POS Terminal field to assign a default POS terminal for Loyalty and eCommerce transactions.
- Set Web Store Staff ID and Web Store Customer No. to assign a default staff and customer for Loyalty and eCommerce transactions.
- The Web Store Shipping Cost Item field is used to set the item that handles shipping cost.
Customer Order Status and payment request
If eCommerce will be used to send emails, monitor order status updates, or handle final payment processes, a Web Hook must be implemented so Commerce Service can send messages and requests from LS Central to the eCommerce platform.
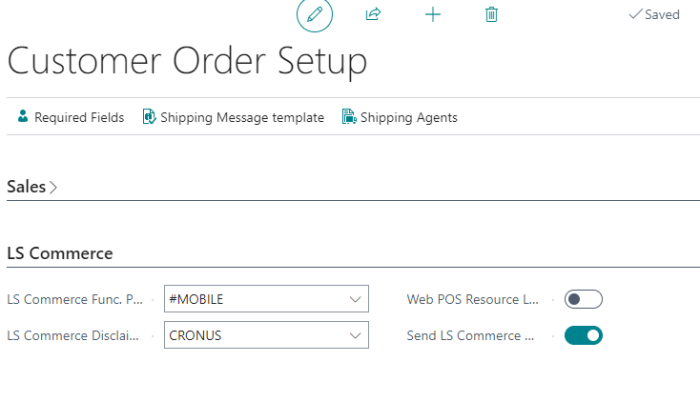
- To activate communication from LS Central to Commerce Service, go to the Customer Order Setup page.
- In the Omni FastTab, select the Send Omni Messages check box, and in the Omni Func. Profile IDfield, select the Functionality Profile that includes the URL to Commerce Service.
- Set the Sales Order Store No and Sales Order Terminal to be assigned to Sales order.

-
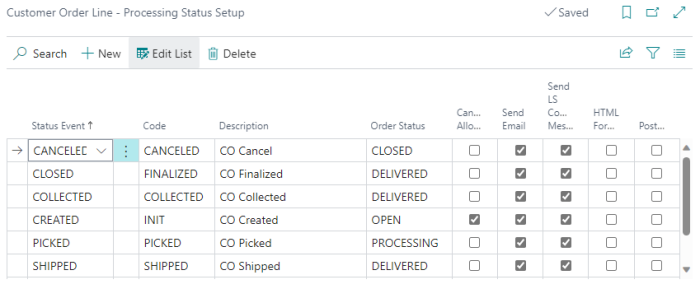
Go to the Customer Order Line - Processing Status Setup page, and select the Send Omni Message check boxes for statues that should be broadcast back to eCommerce.

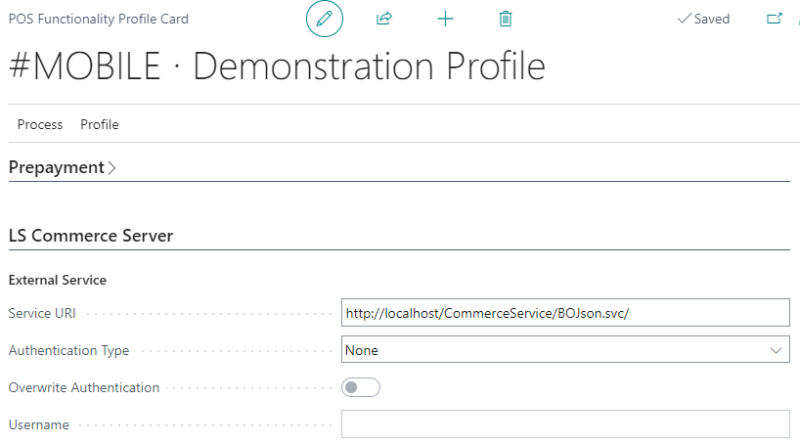
- Open the POS Functionality Profile that is set as Omni Func. Profile in the Customer Order Setup page (in the page's Omni FastTab).

- Set URI that points to the Commerce Service that should receive the messages.
- Set the URL to the Web Hook for the eCommerce site in the Appsetting.config file where Commerce Service is installed:
<add key="ECom.Url" value="" />
Tip: For demo purposes, you can set Demo as URL value and Commerce Service will always reply to LS Central with an OK without trying to communicate with the eCommerce platform.