In this article
To insert option values for Value Type Option Value and Weighted Option
To link the attribute to tables
To create an attribute from another attribute
To automatically link an attribute to records and/or assigning default valuesTo assign attribute values to records
To manually link attributes to a record
Attributes can be used to characterize the following:
- items
- variants
- dim. base values (variant framework base values)
- stores and restaurants
- customers
- deals
- dining preferences
Attributes can be used as pre-defined comments.
Attributes can be shown on the POS for one line in the journal (a line and its related lines) and for all lines in the journal.
Attributes can be used for filtering for example in search functions and for selecting and sorting items and deals in dynamic menus.
Attributes can be used to show Allergens Information on the POS.
Linking and assignment
By setting up Attribute Linking, you specify to which tables and table records the attributes should be linked to.
Attribute linking to stores and restaurants, customers and deals can be
- To all stores and restaurants, customers and deals
- To specific stores, customers and deals
Attribute linking to items and variants can be
- To all items and variants
- To item divisions
- To item categories
- To item retail product groups
- To specific items
Attribute linking to variant framework base values is to all values.
Attribute values
Attributes have values of type:
- Text
- Numeric
- Amount
- Date
- File
- Option Value
- Table Link
- Weighted Option
To speed up assigning attribute values to records, default values can be defined for attributes and also per attribute linking. With a simple setup you can for example specify that a retail product group should be assigned the No value for the Nuts attribute while one item in the retail product group should be assigned the Yes value.
Attribute values for recipes can be calculated, based on the recipe ingredients.
See also Setting up Attributes with Options.
To set up attributes
-
 icon, enter Attributesand select the relevant link.
 - Click the New action to create a new attribute.
- Fill in the fields on the General FastTab according to these guidelines:
| Field | Description |
|---|---|
| Code | This field contains the code that identifies the attribute. You can use up to 20 characters. |
| Description | The description of the attribute. You can use up to 50 characters. |
| Linking | This field indicates whether the attribute is linked automatically or manually to a record. When the Attribute Value page is opened up for a record (an item, a store and so on), you can click Refresh Autom. Linked Attributes to link to the record attributes with Automatic Linking. For a manually linked attribute, you need to press Link Attribute in the page, select the attribute from the list of possible attributes and click OK. The Link/Assign Default Values function in the Attribute Card page can be used if Linking of the attribute is Automatic. |
| Instances | This field indicates how many values of the attribute can be assigned to a record. For example, two instances are allowed for a fabric attribute. Any item can be assigned up to two fabric attribute values, such as wool and leather. |
| Display on POS | This field indicates whether the attribute is displayed on the POS. The options are:
|
| Value Type | This field indicates of which type the attributes values are. The options are:
|
| Value Required | This field indicates whether the attribute requires a value for the record the attribute is linked to. If an attribute value has been assigned to a record, the value cannot be blank. |
| Default Value | This field contains the default value for the attribute. The program uses it when it links the attribute to records. It assigns the default value to the attribute value for the record. Note: By default, the default value for attribute linking lines, is the same as the default value for the attribute. If you want to have some attribute linking lines with a default value and then one or more with no default value (blank), you have to have no default value for the attribute itself. The program will then insert a blank default value for those lines with no default value. |
| Min. Value | This field contains a minimum value for the attribute when the value type is Numeric or Amount. |
| Max. Value | This field contains a maximum value for the attribute when the value type is Numeric or Amount. |
| Option Value Table Link | This field contains the number of the database table that is used for values for the attribute. The Option Value Field Link field specifies the field that holds the option values. |
| Option Value Field Link | This field is valid only if the Option Value Table Link is filled in. It specifies which field in the Option Value Table Link table is selected as an option value for the attribute. |
| Value for Recipe |
This field indicates whether values for this attribute are assigned directly to recipes or whether they are calculated from ingredients.
The options are:
|
To insert option values for Value Type Option Value and Weighted Option
See Setting up Attributes with Options
To link the attribute to tables
When you create an attribute, the program automatically creates one linking line for the attribute with Link Type Item. This is to make editing easier. The Link Type should be changed as necessary.
- On the Linking FastTab, select the appropriate option in the Link Type field. The options are:
- Item
- Variant
- Dim Base Value (Variant Framework base values)
- Customer
- Store
- Deal
You may need to add more lines if the attribute is linked to more than one table or to more than one specific table records.
You can also add more lines to assign default values to appropriate records, see Default Values per Linking Line below.
You can add as many lines as you want to as long as they are not the same.
To restrict the linking to specific records
You can restrict to which records the attribute is linked to for all link types except Dim Base Value. You do this by selecting an item number, customer number, store number or deal number in the No. field.
For variants and items, you can restrict the linking to items that are members of specific divisions, item categories and retail product groups.
Note: To find if an item or a variant is linked to the attribute, the program finds the most generic linking line: First it tries to find a line with Link Type Item only. If no such line, it tries to find one with the division code of the item (or item of the variant). It not found, it tries the item category and then the retail product group of the item. At last it checks if there is a linking line with No. the same as the item number. If a line is found, the item or variant is linked to the attribute.
Default values per linking line
You can use the linking lines to assign a default value based on specific retail product groups, item categories or divisions or specific items, customers, deals and stores. The program assigns a default value if specified when linking an attribute to a record.
As an example, consider the following case:
The MILK attribute has as default value No.
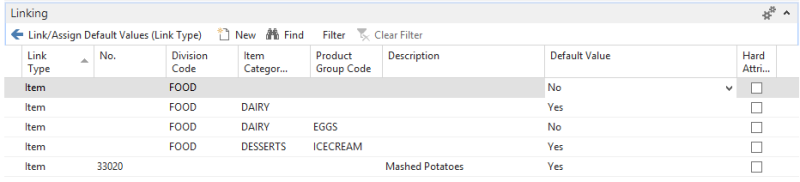
It has one linking line of type Item with the FOOD division. The attribute is therefore linked to all items in the FOOD division. The default value is NO, the same as for the attribute itself.
It has several other linking lines with the FOOD division, but also with specific item categories and retail product group defined. The purpose of those lines is to have a different default value.
The DAIRY item category has default value Yes, while retail product group EGGS under DAIRY has No.
The DESSERTS item category, ICECREAM retail product group has Yes.
Mashed Potatoes are defined specifically as Yes.
This case is very detailed. Instead of specifying the default values for the linking in such detail, it could be simpler just to create a very basic linking with the categories and groups you know the value for and then edit the values in the Attribute Assignments page were you have description of each item in question.
Note: To find the default value for an attribute linked to an item or a variant, the program finds the most specific linking line: First it tries to find a line with the No. field the same as the item number. Then it tries to find a line with the division code, item category and retail product group of the item. If not found, it tries to find with the division code and item category and so on, until a line is found. The default value registered for the line it found is assigned to the item for this attribute.
Note: If you want to have some attribute linking lines with a default value and then one or more with no default value (blank), you have to have no default value for the attribute itself. The program will then insert a blank default value for those lines with no default value.
To create an attribute from another attribute
You can create a new attribute directly from an existing attribute. The program copies the attribute fields, option values, linking lines and attribute group assignments to the new attribute.
- On the Attribute Card, click the Process action, then click Create New From.
- Enter the code of the attribute you want to create.
- Select the Edit Attribute after Creating/Copying To check box if you want the Attribute Card to open up with the new attribute.
- Click OK.
To automatically link an attribute to records and/or assigning default values
Once you have created an attribute with Automatic linking, you can link the attribute to records according to its attribute linking lines on the Attribute Card.
Note: Automatic linking is not possible for the Dim. Base Value link type.
Link/assign default values for all link types
- On the Attribute Card, click the page, click Actions - Link/Assign Default Values.
- If the attribute has a default value and the attribute is already linked to records, confirm whether or not you want the program to override existing values with default values. This is useful if you selected a wrong default value for the attribute or you extended the linking to set default values by item category and retail product group after you ran this function.
- The next confirmation tells you exactly how many records will be affected by running the function. Confirm the question.
- Click OK for the final message.
Link/assign default values for one link type
You can link and assign default values for one link type at a time:
- On the Linking FastTab, click Manage - Link/Assign Default Values (Link Type).
- If the attribute has a default value and the attribute is already linked to records, confirm whether or not you want the program to override existing values with default values. This is useful if you selected a wrong default value for the attribute or you extended the linking to set default values by item category and retail product group after you ran this function.
- The next confirmation tells you exactly how many records will be affected by running the function. Confirm the question.
- Click OK for the final message.
To assign attribute values to records
It is very easy to assign attribute values to multiple records from the Attribute Assignments page.
-
On the Attribute Card, click the Attribute action, then click Assignments.
In the Attribute Assignments page you can:
- You can edit the Attribute Value field as is allowed for the attribute.
- You can filter on the grouping fields for item and variant link types.
- You can also edit hard attributes in this page. The Item, Store, and Extended Variant Values tables will be updated accordingly.
- You can view the page for the record that is linked to the entry by clicking the Links action, then View Linked Record.
Note: Hard attributes on items, stores and variant framework base values can be edited like other attributes. In addition, values can be edited on the Attributes FastTab of the Retail Item Card, Hospitality Card, Recipe Card, Store Card, Restaurant Card and Variant Framework Base Values page.
To manually link attributes to a record
When you open up the Attribute Values page from an item, variant, customer, store and deal, you can press the Refresh Autom. Linked Attributes to link automatically linked attributes to the record if missing. Attributes with manual linking need to be manually picked from a list and linked to the record. See the following for more information:
- items
- variants
- dim. base values (variant framework base values)
- stores and restaurants
- customers
- deals