POS Dynamic Menus
In this article
To set up the DYNMENU command on a POS menu line
Examples of Dynamic Menu usage
POS Dynamic Menus appear on the POS like POS Menus, consisting of items and deals. Instead of adding the exact items or deals into the menu as you do with POS menus, you can add to a dynamic menu a selection of product groups, item categories and special groups along with items or deals with certain attributes. You can select how the system sorts the items and deals included in the selection.
By using POS Dynamic Menus maintenance becomes much easier. For a menu showing items with a certain product group, new items appear on the menu just by assigning the items to the product group. For a menu showing items with certain attributes, new items appear on the menu when you assign these attributes to them.
POS dynamic menus can appear as pop-up menus or they can appear in the Main menu and Additional menu sections on the Sales POS.
When you press a POS menu button with the POS command DYNMENU that has a POS dynamic menu as parameter, the system builds the dynamic menu using the selection and sorting criteria of the POS dynamic menu. The menu is created automatically each time it is used.
Note: Dynamic menus only include items and deals that have distribution in the active store.
Items can be sorted by Product Group, Item Category, Division, Attribute, Description, or Search Description.
Deals can be sorted by a sorting attribute.
Note: When you upgrade to a newer version (a version with the DYNMENU command that includes POS parameter setup to a version with the DYNMENU command that includes POS dynamic menu as parameter), you must run Tools/Data Upgrade to create the new POS Dynamic Menus.
The upgrade adds new records into the POS Dynamic Menu table for each DYNMENU command found in the POS menu lines. The POS dynamic menu selection and sorting lines correspond to the parameters defined for the specific DYNMENU command. The ID for the POS Dynamic Menu is the Description taken from POS Menu Line and Key No. of the POS Menu.
If there are many dynamic menus with the same ID, a running number is added.
To create a POS Dynamic Menu
-
 icon, enter POS Dynamic Menus, and select the relevant link.
 - Click the New action.
- On the General FastTab, fill in the fields according to these guidelines:
| Field | Description |
|---|---|
| ID | Enter an ID for the dynamic menu. It can be up to 20 characters. |
| Description | Enter a description for the dynamic menu. It can be up to 30 characters. |
| Display Type | This field indicates how the dynamic menu appears. The options are:
|
| Display Section | This field indicates in which section of the Sales POS the dynamic menu appears. The options are:
For display type Pop-up, the pop-up menu appears near the location of the button pressed. |
| Button Display | This field indicates what information is displayed on the buttons in the dynamic menu. The options are:
|
| Menu Exit | This field indicates how the menu is closed. You need to select an option other than None for a menu with display type On Top of Menu. The options are:
|
| Base POS Menu | This field contains the ID of the POS menu used as basis for the POS dynamic menu. The POS menu controls aspects such as button spacing, sliding and scrolling and pop-up width and height. Only menus with menu type Dyn. Menu Base can be selected as base POS menus for dynamic menus. |
| Rows | This field contains the number of rows used by the dynamic menu on one page. If this field is 0, program uses the rows defined for the Base POS Menu. |
| Columns | This field contains the number of columns used by the dynamic menu on one page. If this field is 0, program uses the columns defined for the Base POS Menu. |
To set up selection lines
- On the Selection FastTab, enter as many selection lines as you want for this dynamic menu. The items and/or deals that this line selects are either included when building the dynamic menu or excluded (the Exclude field is then marked with a check mark).
- Fill in the fields according to these guidelines:
| Field | Description |
|---|---|
| Selection Type | This field indicates the type of selection for the line. The options are:
|
|
Filter Value |
This field contains the exact value selected for the line. The value depends on the line's selection type:
|
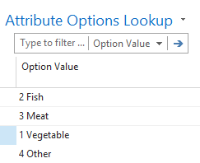
| Attribute Option | This field contains an exact option value for the attribute selected on the line. It is used to narrow down an attribute selection line even further. |
|
Validation Period ID |
This field contains the ID of the validation period for the line. This field is optional. If the line is not valid on the current day and/or time, this selection line is ignored when building the dynamic menu. |
| Exclude | This field indicates whether the line excludes the selection from the dynamic menu. If marked, the items and/or deals that this line has selected are not shown in the dynamic menu. The dynamic menu must have at least one line that includes items or deals, rather than excludes them. |
| Comment | This field contains free text describing the selection on the line. You can enter up to 50 characters. |
To set up sorting lines
On the Sorting FastTab, you can enter lines that define how the items and deals selected in the dynamic menu are sorted. The following applies to the sorting of dynamic menus:
- If there are no sorting lines defined, then the sorting is done by Item No. and Deal No.
- Items are sorted by Item No. by default and deals by Deal No.
- The sorting is done in the same order as the order of the sorting lines.
- The order of sorting lines can be changed by using the Up and Down actions.
Fill in the fields according to these guidelines:
| Field | Description |
|---|---|
| Sorted By |
This field indicates by which feature the sorting is done. The options are:
|
| Attribute Code | This field indicates by which attribute the sorting should be done. This field is only enabled if the field Sorted By has the value Attribute. It must be filled in for an attribute line. |
| Group Sorting By | This field indicates if the sorting should be done by record ID (primary key) or description. The options are:
The Group Sorting By is only used with Sorted By values Product Group, Item Category and Division. |
Example
The selection of a dynamic menu includes these items:
| Item Description | Prod. Group Descr. | Item Category Code | Attribute (Fabric) |
|---|---|---|---|
| A coat | Coats | Outdoor | Wool |
| B coat | Coats | Outdoor | Leather |
| C coat | Coats | Outdoor | Cotton |
| D coat | Coats | Outdoor | Wool |
| S gloves | Gloves | Outdoor | Leather |
| T gloves | Gloves | Outdoor | Wool |
| U gloves | Gloves | Outdoor | Leather |
| V gloves | Gloves | Outdoor | Cotton |
| HH Sneakers | Sneakers | Sports | |
| II Sneakers | Sneakers | Sports | |
| JJ Sneakers | Sneakers | Sports | |
| 111 Shirt | Shirts | Sports | |
| 222 Shirt | Shirts | Sports | |
| 333 Shirt | Shirts | Sports | |
| XX Pants | Pants | Ladies | Wool |
| YY Pants | Pants | Ladies | Cotton |
| ZZ Pants | Pants | Ladies | Leather |
| 55 Dress | Dresses | Ladies | Silk |
| 66 Dress | Dresses | Ladies | Cotton |
| 77 Dress | Dresses | Ladies | Wool |
The sorting of the dynamic menu is the following:
| Sorted By | Attribute Code | Group Sorting By |
|---|---|---|
| Attribute | Fabric | |
| Item Category | Record ID | |
| Product Group | Description | |
| Description |
The sorting mechanism first sorts the items by the Fabric attribute (no attribute, cotton, leather, silk, wool in alphabetical order).
For each attribute value, the sorting first by item category (Code) and within each item category by product group description. At last, the items are sorted by their Description. The sorting result is the following;
| Item Description | Prod. Group Descr. | Item Category Code | Attribute (Fabric) |
|---|---|---|---|
| 111 Shirt | Shirts | Sports | |
| 222 Shirt | Shirts | Sports | |
| 333 Shirt | Shirts | Sports | |
| HH Sneakers | Sneakers | Sports | |
| II Sneakers | Sneakers | Sports | |
| JJ Sneakers | Sneakers | Sports | |
| 66 Dress | Dresses | Ladies | Cotton |
| YY Pants | Pants | Ladies | Cotton |
| C coat | Coats | Outdoor | Cotton |
| V gloves | Gloves | Outdoor | Cotton |
| ZZ Pants | Pants | Ladies | Leather |
| B coat | Coats | Outdoor | Leather |
| S gloves | Gloves | Outdoor | Leather |
| U gloves | Gloves | Outdoor | Leather |
| 55 Dress | Dresses | Ladies | Silk |
| 77 Dress | Dresses | Ladies | Wool |
| XX Pants | Pants | Ladies | Wool |
| A coat | Coats | Outdoor | Wool |
| D coat | Coats | Outdoor | Wool |
| T gloves | Gloves | Outdoor | Wool |
To set up the DYNMENU command on a POS menu line
To set up a button with command DYNMENU:
- Open the POS menu this button is going to be in.
- Go to Button Properties for the button.
- Enter DYNMENU into the Command field.
- In the Parameter field, click the lookup arrow. The page POS Dynamic Menus opens.
- Select the desired dynamic menu.
Examples of Dynamic Menu usage
Fashion POS – profile FASHION2
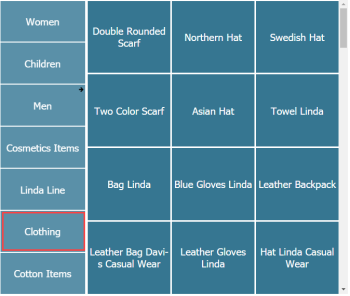
This POS is an example of a POS that sell general fashion items. Menu item Linda Line, Clothing and Cotton Items are setup with DYNMENU command.
Example Button Clothing:
- In the #FASHION2 POS; look at button Clothing:
- Button Properties for button CLOTHING:
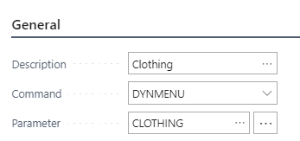
- The CLOTHING parameter is a Dynamic menu CLOTHING.
-
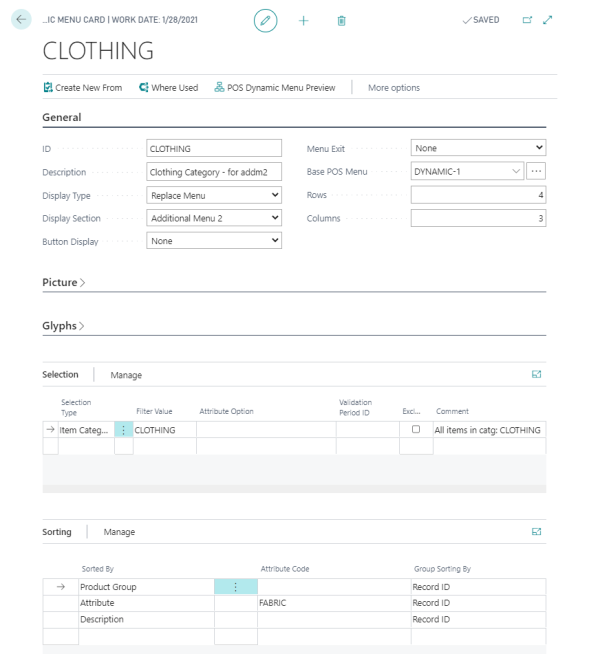
Setup for Dynamic Menu Clothing:
Example Fine Dining
- Add a button for Meals into the fine dining setup.
-
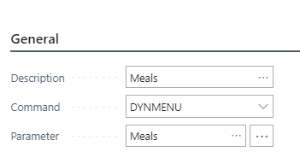
Button properties for button Meals in menu #HOSP-FINE:
-
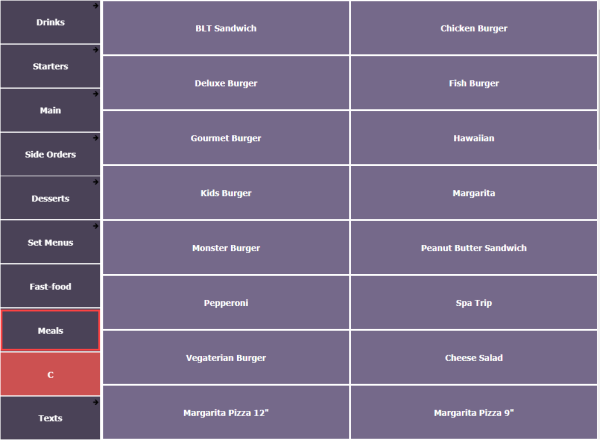
Then in POS the button looks like this:
- The MEALS parameter is a dynamic menu MEALS.
-
Setup for Dynamic Menu MEALS:
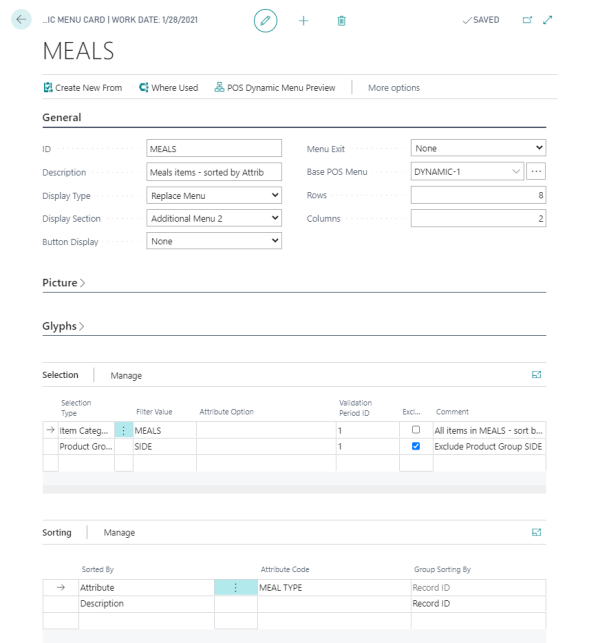
- This dynamic menu includes
- All items in item category Meals excluding those in product group SIDE.
- And when the items are displayed in the menu, they are sorted by attribute MEAL TYPE.
- When more than one item have the same meal type, they are sorted by description of the item.
- Attribute Meal type has a few options. The settings for items in category MEALS have one of these values: