In this article
This article is an overview of the three stages to follow during the preparation and installation of the Offline POS.
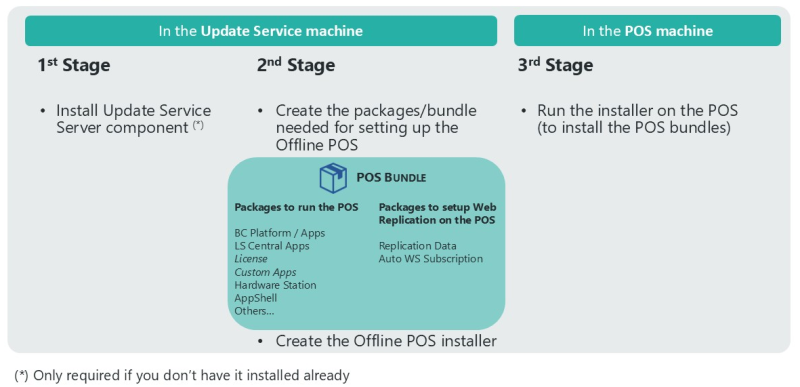
Stage 1
Install and set up an Update Service Server, if you have not used one yet:
- Run the Offline POS using Web Replication with Azure Storage - Preparing installation project installer to install the Update Service Server component.
See Step 1 – Installing Update Service Server for more information.
Stage 2
Create and import the packages/bundle into the Update Service Server that are required for installing and setting up the Offline POS using Web Replication with Azure Storage.
- Run again the Offline POS using Web Replication with Azure Storage - Installation preparation project installer as Administrator, and install the Offline POS using Web Replication with Azure Storage – Installation preparation project component
- Create and import the license package.
- Create the offline POS bundle:
The purpose of this bundle is to set up a regular new POS. The bundle includes:
-
Packages for regular POS creation
- SQL Server Express (optional)
- Business Central platform
- Business Central System and Base apps
- LS Central apps
- License package
- Can also contain additional customized apps, Windows apps like the AppShell and Hardware Station or OPOS drivers for printers (see below).
-
Additional packages to handle the basic setup on the POS for the replication and the automatic web services subscriptions step.
-
ls-central-web-replication-azure-storage-data:
This package is responsible for injecting the minimum required setup to run the scheduler job on the POS to communicate to the Headoffice/Azure Storage for the replication.
-
ls-central-pos-webservice-auto-subscription:
This package is responsible for triggering the web services subscription in the POS, so the user does not need to do it manually after the installation.
-
- Create the installer that will include the bundle mentioned before.
See Step 2 – Running the Preparation Project and Step 3 – Preparing the Packages for more information.
Stage 3
Run the installer on the POS machine to install the Business Central instance with LS Central, any custom extensions, and Hardware Stations and AppShell (or other third-party apps included in the bundle).
See Step 4 - Setting Up an Offline POS for more information.