In this article
Retail Messages button in the POS
Retail Message Identifier (the envelope icon)
Retail Message Recipient Groups
To set up Retail Messages
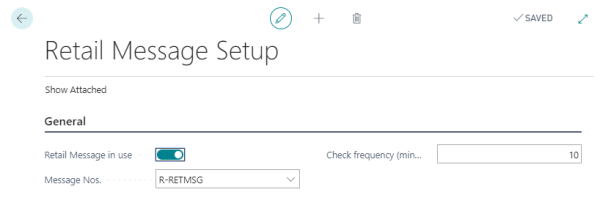
- Open the Retail Message Setup page to define values in the fields that are required for the Retail Message functionality.

| Field | Description |
|---|---|
| Retail Message in use | Specifies whether Retail Messages are in use or not. On/Off switch. |
| Message Nos. | Number series value that defines the Retail Message numbers. The number series are used as a unique key for the Retail Message Header. |
| Check frequency (min) | Value in minutes of how often the POS checks for changes in retail messages |
Note: Users using Retail Messages must exist as entries in the User Table.
Retail Messages button in the POS
In order to view Retail Messages in the POS, you must set up a POS button:
- In your POS, locate an unused button.
- Right-click the button and open Button Properties.
- In the Description field enter Retail Messages.
- In the Command field, enter SHOWPANEL.
- In the Parameter, enter #RETAIL-MSG-LIST, or the name of the panel that displays Retail Messages.
Note: Panel #RETAIL-MSG-LIST displays all Retail Messages that are available for the store, POS, or user when you open the panel.
Button notification identifier
You can add a notification identifier, or an icon, to the Retail Messages POS button to be able to see if there are Retail Messages awaiting your attention.
Example:
An envelope icon in the button's top right corner:

Follow the steps below to activate the Retail Message notification identifier.
Step 1: The POS Tag List
- In LS Central, open the POS Tag List and make sure that the <#Retail_Message> tag is present in the list.
- If it is not, you must add a new line:
- Click the New action, and insert the exact same values in the fields as shown in the image:

- Click the New action, and insert the exact same values in the fields as shown in the image:
Step 2: Add the <#Retail_Message> POS tag to the Retail Messages button
- In the POS, right-click your Retail Messages button, and open Button Properties.
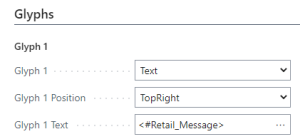
- Enter the <#Retail_Message> POS tag in the Description field, or in one of the button’s Glyph fields:

Step 3: Check the frequency value
- In LS Central, open the Retail Message Setup page, and check the value in the Check frequency (min) field. Make sure this value is at least 1 or higher. Value 0 means that there are no checks.
Step 4: Check for new messages on an idle POS (CHECK_NEW_MSG)
You can set the POS up to check for new messages, even when the POS is idle. When the system finds new messages, the POS can display the Retail Message notification identifier on Retail Messages button, if you set it up correctly.
Note: For this to work, the CHECK_NEW_MSG POS command must be present in the POS Commands list.
To check for new messages, the Idle Action must be enabled:
- In LS Central, open the POS Actions page.
- Create a new line, if it does not exist, according to this image:

Note: When the POS is idle, the refresh rate of the Retail Messages button is the rate you specified in the Check Frequency (minutes) field in the Retail Message Setup page, and not the POS-Idle timer interval.
Retail Messages web requests
The Retail Message system uses three web requests:
- RetailMessageGetActiveList
- RetailMessageRead
- RetailMessageUpdRcpStatus

Retail Message Action Codes
Retail Message Action Codes let you create custom actions and link them to Retail Messages.
Action codes are linked to a codeunit. When a message containing an action code is processed, this codeunit is run, and the Retail Message Header record is passed to the codeunit. You can use the general fields in the Retail Message Header record to pass parameters to the codeunit.

In the CRONUS Demo Data Company, there is a sample codeunit that uses information in the Retail Message Header and runs a specific report. The sample codeunit is there to demonstrate how a custom codeunit, which uses data from the Retail Message Header, can be written. This codeunit calls a function that prints report 705 Inventory Availability for items with a number starting with 10 (the filter on Item No. is ‘10*’), and then sets the field Action Processed (Internal) to TRUE. This tells the system that the message has been processed, the status of the Recipient running it is changed to Processed by Recipient, and the Retail Message is marked as Processed.
Retail Message Recipient Groups
The purpose of Recipient Groups is to make it quicker for the user to select multiple recipients, one group can include one or many recipients.
- Open the Retail Message Recipient Group list to work with Recipient Groups:

- You can add a new group directly at the bottom of the list, or by clicking the New action.
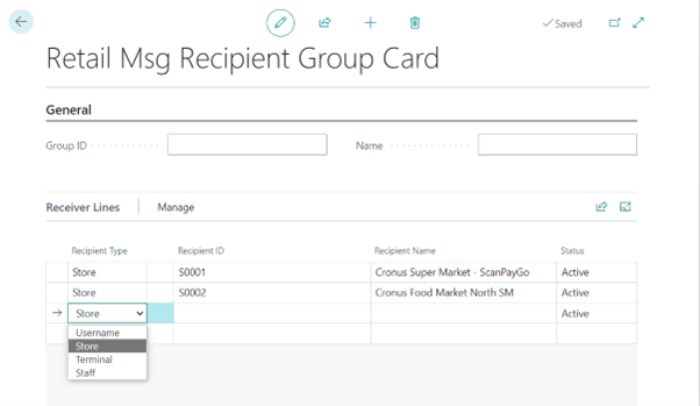
- The Edit action opens the Retail Msg Recipient Group Card:

-
The Recipient Type field has four options: Username, Store, Terminal, and Staff.
You can use Recipient Groups when you create Retail Messages to make sure that every intended receiver within the group will receive your message.
You can use the Status field to specify either Active or Inactive status for recipients. If the status is Inactive when a Retail Message is activated, the recipient is not made active for the message and will not be on the recipient list.
See also
How to: Work With Retail Messages