In this article
Browser Control #POSHTML – HTML information for items
Media and Browser Control (Web Service) authentication
Browser Controls are controls which make it possible to view data directly from the Internet or via web services. Browser controls make up a section of a POS panel.
- To open Browser Controls, click the
 icon, enter POS Interface Profile List, and select the relevant link.
 - Locate your Interface Profile.
- Click Lists - Browser Control List (or Related - Browser Control List).
Tip: A quicker way is to open the POS Browser Control List directly, but then for a new profile you have to enter the Interface Profile ID manually.
The URL field contains a link to a web template that the control uses.
The Demo Data Company has a few browser controls that are used by the POS.
Browser Control #POSHTML – HTML information for items
For the Retail Item, you can define extended item information as Item HTML, with formatted HTML text and images. The information is stored as a blob in the database, and the images can be stored internally in the blob or externally with a reference. The extended item information can be displayed externally ( for example in Web Stores) or on the POS.
To display HTML information for items in the POS the following must be defined:
-
Retail Items must have HTML information specified.
- Open your item's Retail Item Card.
- Click Related- Master Data - Item HTML.
- Enter your HTML information for the item.
Note: You have a preview of the data at the bottom of this page.
-
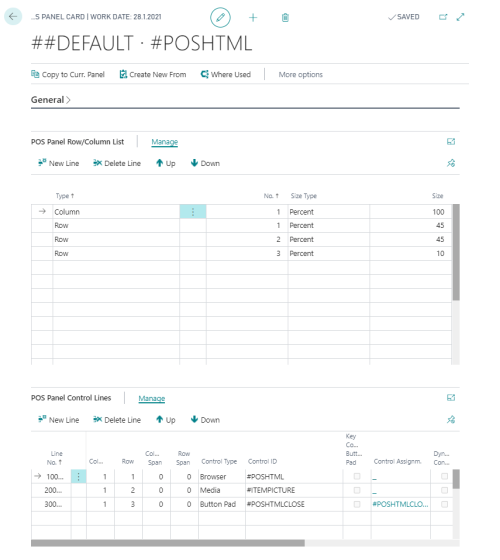
Next step is to have a POS Panel with ID #POSHTML:
- Note: This Panel ID is a fixed name.
- You must set the Browser Control ID #POSHTML as one line on this panel to display the HTML information.
- Media Control is here to display the retail item's image. This is optional.
- Button Pad #POSHTML CLOSE is here to have the CLOSE button in the window.
- The following is an example of panel #POSHTML:
- On the POS Terminal Card, the General Fast tab, select the Show Item Html check box.
-
The Data Grid #JOURNALGRID for your POS must have the following setting:
- Select the Notify Data Row Double Click and Notify Data Row Selected check boxes in the General Fast Tab:
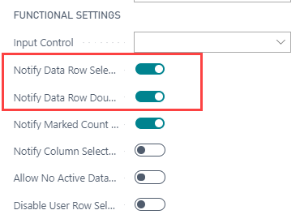
- Select the Notify Data Row Double Click and Notify Data Row Selected check boxes in the General Fast Tab:
-
When all the setup has been done, you can view the extra description on the POS for items that have HTML information:
-
In the POS, sell some items, and when required, select (double-click) the Item line and the panel #POSHTML opens automatically:

Note: Remember that if the selected retail item does not have any information in Item HTML, the panel will not open, nothing happens in the POS.
-
Media and Browser Control (Web Service) authentication
An additional step is required if the service tier is being accessed with NavUserPassword authentication.
You must specify a user name and password in the Distribution Location page for each terminal that has item pictures or item HMTL enabled:
- Open the POS Terminal Card.
- Click Related - Distribution Location for the terminal.
- In the Web Server FastTab, enter the user name and password:

See also
How to: Set Hierarchy for Web Store
How to: Use Web Templates as POS Menus