In this article
To set up or edit an Interface profile
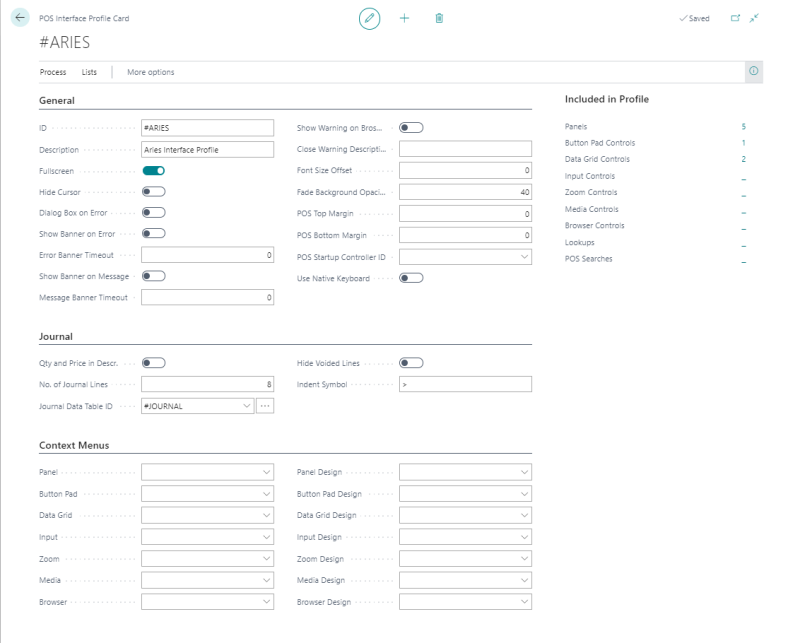
The POS Interface Profile controls the graphical layout of the POS interface, namely the position of various objects (for example the Total button, journal lines, various menu forms), and overall how the POS presents the sale interface to the user.
The POS Interface Profile Card contains basic information for the setup of the visual appearance of the POS terminals. You use the profile to select menus that appear on the POS terminal screen, as well as to define colors and visible bars.
You can have several POS Interface Profiles in your business. You can select which profile to run on specific POS terminals in the Interface Profile field in the POS Terminal Card.
To set up or edit an Interface profile
- Click the
 icon, enter POS Interface Profile List, and select the relevant link.
 - Click the New action, if you want to create a new interface profile.
- If you want to edit your interface profile, double-click the profile you want to work with and edit it.
The Interface Profile Card
Tip: All the basic setup for the Interface Profile is included in the ##DEFAULT Interface Profile. This profile is in the Demo Data Company. With the Import Export Worksheet it is easy to export and import the data into another company.
The Interface Profile and the Menu Profile work very closely together, in other words, parts of the Interface Profile call for menus in the active Menu Profile.
Note: Some of the data in the ##DEFAULT interface profile is fixed data; data that should be included in every setup. All the fixed data ID names start with #. Lookups and data tables for Demo Data Interface Profile ##Default can be fixed data as well.
Tip: If you want to change some of the setup data, consider copying it to your profile and changing it there to keep the ##DEFAULT data as it is.
The Interface Profile parts
In the tables below you can find information on the different Interface Profile parts.
General FastTab
| Part | Description |
|---|---|
| ID | Specifies the identification code of the interface profile. The ID should be unique, you cannot use the same ID twice in one table. You can create as many IDs as you like. |
| Description | Specifies a text description of the interface profile. You can enter a maximum of 30 characters. |
| Hide Cursor | Specifies whether the mouse cursor should be hidden. |
| Dialog Box on Error | Specifies whether the POS should pop up a dialog when error messages are displayed. |
| Show Banner on Error | If selected, a banner will pop up on POS errors. |
| Error Banner Timeout | Specifies after how many seconds the error banner closes automatically. If the value is set to 0, the default timeout will be 5 seconds. |
| Show Banner on Message | If selected, a banner will pop up on POS messages. |
| Message Banner Timeout | Specifies after how many seconds the message banner closes automatically. If the value is set to 0, the default timeout will be 3 seconds. |
| Font Size Offset | Specifies how much the font sizes should change from their given value. If you set a value of -2, all font sizes will be offset down by 2 points: fonts declared as size 12 become size 10 and so on. This is a quick way to adjust a design to a new display (different display resolutions can cause all of the fonts to become too big or too small). |
| POS Startup Controller ID | Specifies the ID of the POS startup controller that is active for this interface profile. If blank, the default EPOS controller is active and runs the functions for the startup #Offline panel. If not blank, the codeunit registered for the startup controller runs the functions for the startup #Offline panel. |
Journal FastTab
| Part | Description |
|---|---|
| Qty and Price in Descr. | If selected, the quantity and price will be visible in the description of the item in POS journal lines. |
| No. of Journal Lines | Specifies how many lines are visible in the POS journal lines. |
| Hide Voided Lines | If selected, all voided lines in the POS journal will be hidden. If not selected, all voided lines in the POS journal will be visible and marked with a strike-through. |
| Indent Symbol | Specifies the indent symbol to show the relation between parent and child in the journal lines. You can have up to 3 characters. Typical value can be ">" or " > ". There can be spaces in the field. |
Context Menus FastTab
| Part | Description |
|---|---|
| Panel | A panel is an area in the POS to which you can assign different controls. The POS screen is one panel with the ID #POS, and you define all the different parts to it, for example the Journal, the Total menu, the Main menu, and Input fields. There are many different panels in the POS setup, the main panel is the #POS panel. There are many fixed panel names in the #DEFAULT Interface Profile, all of which start with the # character. |
| Button Pad | Button pad controls are linked to Menu IDs. Menus are not set up directly on the panels. An option in the Button Pad Control Card page is to specify them as Dynamic and then no menu is dynamically assigned on the panel. This makes it possible to use the same button pad for different menus. There are many fixed Button Pad Controls in the default Interface Profile, and you can add more. Button Pad Controls are defined on the Panels. |
| Data Grid | Data Grid Controls are used to display different information for the POS. The #JOURNALGRID is one of these Data Grid Controls. Another example is the Data Grid #LOOKUPGRID. The grid is used to display the items when the POS command LOOKUP is used. The Data Grid Controls have their own setup. Data Grid Controls are defined on the Panels. |
| Input | Input Controls are used for panels where input is required from the user. These input controls are for example for #STAFFID, #INPUT, and #KEYBOARDINPUT. Input Controls are defined on the Panels. |
| Zoom | Zoom Controls are used to display data as records for the data, for example the #MCONTACTZOOM. By using Record Zoom controls it is possible to edit and view the data. Record Zoom Controls are defined on the Panels. |
| Lookup | This includes all the lookups used by the POS. The Lookup ID line includes the connected data table ID. |
| Media | Media controls are used to display media in the POS, such as videos, images, or playlists. It supports the most common media types (for example png, jpg, wmv, avi, and more). |
| Browser | Browser controls are used to display information from the internet by displaying external web pages. |