Verify creation of Azure Data Factory in Azure
- Open and log into Azure portal.
- Under Resources you will find the Azure Data Factory created with the deployment script.
Set up the Integration Runtime management gateway
It is now time for you to set up the Integration Runtime gateway that allows you to access the on-premises database(s) from Azure:
- In Azure Portal, open the Azure Data Factory that was created by the Deployment script.
- In the main window, open the Author & Monitor link.
- Open the Manage option, the toolbox icon on the left navigation menu.
- Open the Integration runtimes option from the left menu Connections section.
- Open the LSInsight-integrationRuntime from the list.
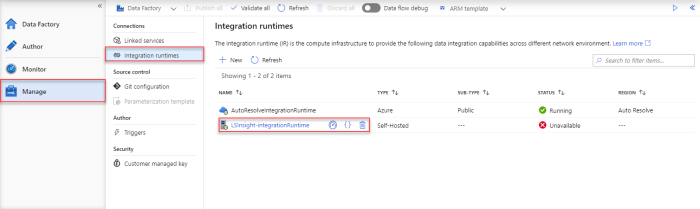
- From the integration runtime you have two options to set up the Integration runtime (Gateway).
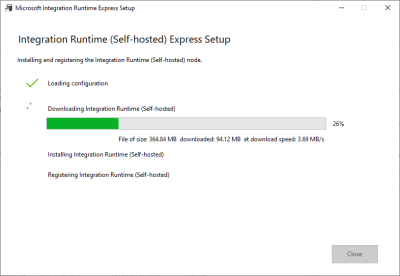
Option 1: Express setup
When you select this option, an .exe file starts to download, and once you run it the gateway is set up locally on your machine, without you having to do anything.
Note: As mentioned in the prerequisites, this should be the default option, if you are logged into Azure and are running the script from the same domain server.
Option 2: Manual setup
When you select this option, you will download an .exe file to install integration runtime (Gateway) on a different machine. You can then copy the .exe file to any machine and use either key1 or key2 in the setup steps to register the gateway with this Azure data factory.
- Once you have setup the Gateway, go back to Azure and click Cancel in the Integration runtime panel to close it.
- Then click Refresh in the Integration runtimes overview window to view the status for LSInsight-integrationRuntime. After you refresh, the status should be Running.
Run Initial load pipeline
Now that the connection to the LS Central source database is ready you can start running the pipelines.
First, you need to trigger a run of the Initial load pipeline. This pipeline triggers two other pipelines, one after the other. First, the PopulateQueryBase pipeline, which generates the queries to create and populate the staging tables, is triggered, and once that has finished running, the initial load of the Scheduled Run pipeline is run for the first time and performs the initial data load of the data warehouse.
Please follow these steps:
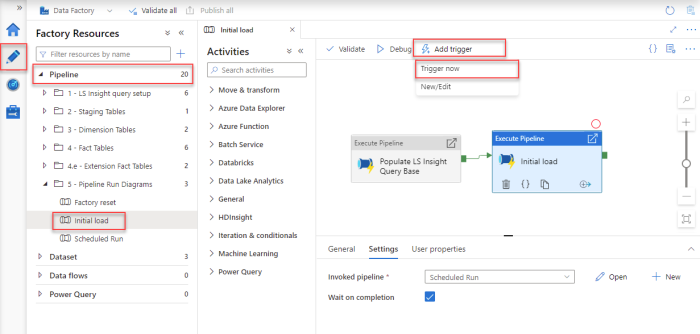
- In the Azure Data Factory, open the Author option, the pencil icon on the left navigation menu. Here you can see the Pipelines section, with all the available pipelines. There should be 15 pipelines.
- Expand the Pipelines section and 5 - Pipeline Run Diagrams folder.
- Select the Initial load pipeline.
- You then need to trigger this pipeline manually by selecting Add Trigger > Trigger now from the top menu.
- The Pipeline run window opens. Click OK to start the run.
- This triggers the pipeline to start running and any notifications will be shown under the notification bell icon in the blue ribbon.
- This run will take a few minutes and you must wait for it to finish before you continue.
To monitor the run of the pipeline, see the pipeline monitoring guideline.
If the initially run pipeline does not complete and has errors, it is always good to inspect the errors to see if you can figure out what went wrong. The most common pipeline errors are connection issues, because the gateways are not working correctly. Solutions to some errors are described in the Troubleshooting Analytics documentation.
If you are unable to find the source of the error, contact Technical Support on the LS Retail Portal to get help solving the problem.
Activate the Scheduled Run pipeline trigger
Now that the initial load of data from LS Central to Analytics is complete, you can activate the scheduled trigger for the Scheduled run pipeline that moves data from your LS Central database to the Azure data warehouse:
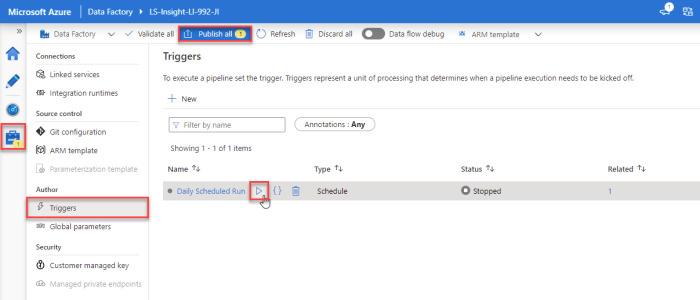
- In the Azure Data Factory (ADF), the Manage section, open Triggers from the left menu Author section.
- When the ADF was created, the Daily Scheduled Run trigger was added and set to start at 1 AM the day after Analytics is set up. To edit the trigger just open it by pressing the Daily Scheduled Run link and changing the start date and time and the timezone, if needed. You can also change the recurrence interval, but be aware that this will affect the cost of the service, shorter interval will increase the cost since more actions are run by the ADF. This is explained in more detail in the cost calculations.
- When you have set the schedule start date and time, you can either activate it by selecting Activated - Yes and then pressing OK, or by just pressing OK to close the Edit trigger window, hover over the Daily Scheduled Run trigger in the list and clicking the Play icon.
- Then select Publish all from the top menu to commit the changes to the server.
Now the setup for Analytics Azure Data Factory and Data Warehouse is done and will run as the trigger schedule settings specify.
In the future, if you do not want to wait for the scheduled run, you can manually run the pipeline trigger, and edit the trigger schedule, if needed.
Tip: If you have data issues when you have connected the Power BI reports to Analytics, it is always a good idea to monitor how the pipeline run went.