In this article
Staff Management User's pre-requirement
Click the ![]() icon, enter Staff Management Setup, and select the relevant link to access this functionality.
icon, enter Staff Management Setup, and select the relevant link to access this functionality.
Staff Management User's pre-requirement
Before going through any setups, start by creating yourself as a Staff Management User and wait with assigning any further settings in the staff management user definition.
Open the Staff Management Setup page. In this setup example you need to define the following fields:
General FastTab
| Field | Description |
|---|---|
| Staff Mgt. Emp. No. Series | Assign a number series to be used when you create new employees. For demo purposes create series EMPLOYEE with Starting No.E00001 and place a check-mark in the Default Nos. field. |
| Salary Cost | Set to Average Cost (Role) |
| Opening Time | Set to 8:00:00 |
| Closing Time | Set to 18:00:00 (or 6 PM when using US format) |
| Starting Weekday | Define the weekday to start the week. The default weekday is Monday which is the ISO standard (and Business Central default). |
Planning FastTab
| Field | Description |
|---|---|
|
Roster No. Series |
Assign a number series to be used when creating new rosters. For the demo create series ROSTER with Starting No. R00001 and place a check-mark in the Default Nos. field. |
| Vacation Code | Create new code VAC and have scheduling sign V |
| Vacation hrs Pr. Day | Set this to 8 |
| Show Roster Totals | Set this to At Bottom |
Time Registration FastTab
| Field | Description |
|---|---|
| Time Registration Panel | #TIMEREGROSTER |
| Greeting Text | Hello |
| Goodbye Text | Goodbye |
| Enter Selection Text | Please select |
Salary Export FastTab
| Field | Description |
|---|---|
| Export File name | C:\temp\salary.txt |
| Delimiter | , |
On the Navigate FastTab, go to the Setup Export Fields and set the following:

Work locations
Employees will always have to be assigned to one default work location, but they can be assigned and planned in multiple locations if needed. A manager can oversee multiple locations and can switch between location views in the role center.
Create one work location:
- Code: LOC1
- Description: Location 1
- Pattern Reference D.: 28.3.2016 (This is used to have a starting reference date for the pattern, which can be different for each location, and then even by employee if needed)
Work regions
The Work Location can belong to a Work Region. A region is a grouping of multiple locations.
The region can be used to filter availability of employees, an employee can be only available within a region. Normally a region is a geographic representation of the stores, but it can also be used to group multiple work locations within one store, the store would then be the region.
Work codes
Work Codes are normally used to identify the cost section of the time registration., They can be used to identify if the hours worked are normal hours or overtime. You might also want to identify vacation hours, sick hours etc. In most cases this split of hours is controlled by the need of the salary system, and is the identification of hours being sent to the salary module.
Create 2 work codes:
- Code : NORMAL
- Description: Normal work hours
- Code: OVERTIME
- Description: Overtime work
Work roles
The Work Roles are used to identify the roles that the employees can handle. This is also used to identify the roles needed at the work location and to setup the Role Budgets which are the core concept in the solution. Each employee can be assigned to multiple roles, depending on what they are capable of handling. It is recommended to have at least the default role assigned on the employee card. The short code is used in combination with shift short code to be able to assign employee quickly to a role & shift. Also in our sample we are using average cost pr. Role to calculate the cost of the roster plan, but it is also possible to use real cost (salary cost) or even retrieve the salary from the salary module.
Create 2 Roles:
- Code: CHEF
- Description: Chef
- Short Code: C
- Avg. Cost Price: 100
- Code: WAITER
- Description: Waiter
- Short Code: W
- Avg. Cost Price: 50
Work arrangement
The Work Arrangement is a core element in the solution to handle the conversion of the time registration to actual salary hours. Every employee must be assigned to a work arrangement which then is controlling the method of conversion, how hours are rounded, what is the recommended number of hours during the planning period and various limits and restriction settings. Also the role of the employee can be used to switch between work arrangements but that’s in extreme cases only.
Create one work arrangement:
- Code: FULLTIME
- Description: Full Time
- Optimal Hours: 40
- Optimal Hours Type: Week
- All Min. Allowance: Set this to 5 (minutes) in all fields to allow 5 minutes early / late arrival and departures.
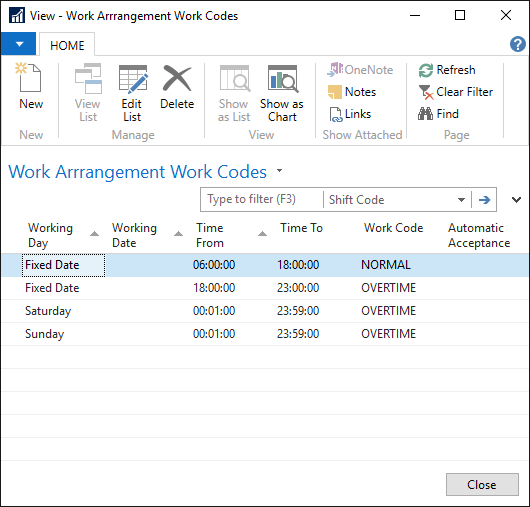
Then click the Work Codes button in the action menu to define how the date / hour of the time registration will be converted to work code.
In our sample we convert the hours worked from 6 in the morning until 6 in the afternoon as normal hours, and from 6 pm to 11 pm (23:00) as overtime. Saturdays and Sundays are treated as overtime. Note: Any hour settings missing here will then be ignored in the conversion. In our sample if the employee would arrive before 6 am, it would be ignored, and anything after 11 pm as well.
This setup can deal with general settings or specific dates, that is when you need to handle public holidays differently.
Work shifts
The shifts are required to be able to assign an employee on a fixed set of hours, or even fixed set of days. The time settings of the shift can either be general or different for each role within the shift, for example in restaurants the chef might arrive earlier than the waiters and leave sooner. Shifts can have predefined break hours (lunch, dinner, and so on), which can either be automatically deducted from the hours or included. Shifts can be general for the whole company or defined per location. The shift settings are also necessary to be able to budget how many people are needed for that particular set of time, even though the employees might be assigned to different hours within the shift, either using manual overwrite of the time settings during assignment, or by using the “sub shifts”, which are as the name indicates just a subset of the related shift.
On the Work Shift card the user can also access Break Settings to set up the break times for the shift. You can define the breaks per weekday and also per role, if needed. If the breaks are to be assigned as salary hours different than the work hours, then it is possible to set up the work code to be used for the break salary hours created. Break settings are also used to determine the resource unavailability in the Bookings module.
Create 2 set of shifts:
- Code: DAYSHIFT
- Description: Day Shift
- Short Code: D
- Code: NIGHTSHIFT
- Description: Night Shift
- Short Code: N
Select the Day Shift line and click the Hour Settings button in the action menu to edit the work shift lines to the following:

Do the same for the night shift, but have the time from 17:00 to 22:00 (5 pm to 10 pm).
Shift patterns
The Shift Patterns are used when you want to automatically assign the employees to certain shifts or a shift pattern. This could be a weekly based pattern (that is one week work certain shifts, and next week on another shift), or day based where you indicate the shifts per day.
Before you setup the shift patterns you must have assigned a default Work Location on your Staff Management User setting, and you must have set the Pattern Reference Date in the setup for the location. This is used to have a starting reference date for the pattern, which can be different for each location, and then even by employee if needed. The pattern is then assigned on the employee and used when a new roster is created to assign the employee automatically to shifts.
Create one pattern: (Note: Default work location must be assigned on your staff mgmt. user settings)
- Code: PATTERN1
- Description: D-D-N-OFF-OFF-D-N
- Pattern Type: Day Pattern
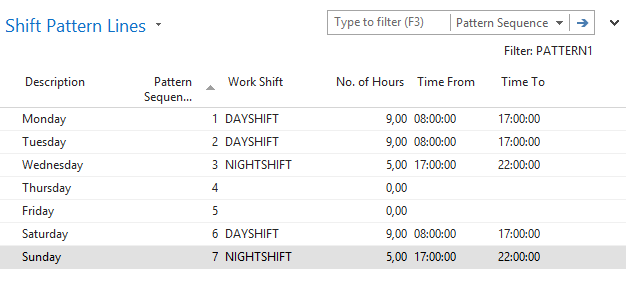
Then setup the Pattern lines:
Staff Management Users
Any Business Central user who needs to be able to access the staff management information, must be created in this setup and have assigned what work locations they can review. Default work location must be assigned, and then you can also assign Other Work Locations which the user can switch between in the role center. In order to start Business Central on the staff management role center, the role center must be assigned to that same Business Central user in the User Personalization setup page in Dynamics Business Central.
Find your staff management user in the setup and assign Work Location as LOC 1.
Unavailability types
These types are used to select what kind of unavailability (sick, vacation etc.) you are referring to when declaring employee not available to work. This can then be assigned on the salary hours to be able to differentiate between normal work hours and hours that are being paid but not actually worked. You can also differentiate by using different work codes for the hours in registration if needed.
Create 2 Unavailability Types:
- Code: VAC
- Description: Vacation
- Scheduling Sign: VAC
- Code: SICK
- Description: Sick Hours
- Scheduling Sign: SCK
Work history setup
This is a very powerful feature to be able to both summarize the planned or actual hours in various ways and present during planning, on the employee card and on the employee portal.
This can also be the basis of a warning mechanism to warn the supervisor when the employee is passing certain reference values or there is a limitation on the hours planned or worked.
Setup the following example:

See also