In this article
To remove an employee from work assignment
To assign an employee on vacation or sick leave
To start planning you need to create a Roster for the planning period. Rosters are set for one month at a time as the planning container.
You can, however, also to do weekly planning, even though the roster placeholder is per month, since analysis views and total views support both weekly and monthly summaries and are not calculated per roster, but rather based on the date period.
To create a new roster
- Click the Rosters menu option in the Staff Management role center, and click New - New Roster. A dialog box opens where you select a month to create a new roster for.
Note: The year is not editable and is set in the Current Work Year field in the Staff Management Setup. -
Select your current month for testing purposes, and after clicking OK you should get a roster page similar to this one:
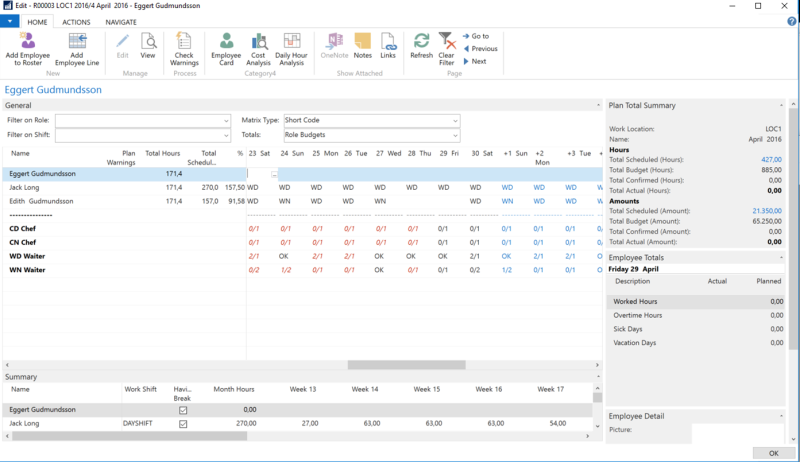
In the above sample Jack Long is assigned to fixed shift (DAYSHIFT) and Edith is assigned on a shift Pattern1, and those two are already automatically scheduled. Eggert, however, does not have any default setup. The short codes for or shift are used to present the information, but you can change the view by changing the Matrix Type setting on the View Settings FastTab. Also, you can use the Period setting to select if the roster should show a full month or one week at a time.
Tip: We recommend that you use the week view when you edit the roster since the week view has better performance and is faster.
Note: In the Process - Prev Period - Next Period selection you can move between scheduling periods, that is between months (rosters) in month view, and between weeks in week view. If the next or previous period belongs to another roster month, the view will open the new roster for editing.
Note: You can only edit days that belong to the currently active roster in view. You can use the Total Section setting to turn off total summary to increase entry performance while you schedule manually.
The Total section in the matrix presents the role budgets, that is how many people are assigned and need to be assigned according to the role budget settings.
To assign an employee to work
- Open a roster plan to assign an employee to work.
- Select the employee (line) you want to assign, and select the date (field) involved.
In the field you have multiple options:
- Enter the Short Code for the role or shift (for example CD for Chef on Day shift).
- Enter the time directly in military time (for example 10-14) and the default role will be used. If there is no default role for the employee, a list of roles is presented.
- Click the Assist Edit action and select the Assign to work option which will lead you through the selection of role and shift.
- Enter the role and sub shift (CD-1 for Cashier Day, sub shift 1). Note: Sub shifts must be defined for the shift.
- Select the Total line for the role or shift , click the Assist Edit action, and select Assign to work. A dialog box is displayed with all employees that are available for the role and shift on the selected date.
- Click and select the employee or employees you want to assign, and click OK to confirm.
Note: If the employee is not listed in the roster, you can add him or her to the list using the Add Employee to Roster action. Also, if you need to have a selection of multiple shifts for one employee in one day, you must use the Add Employee Line action to create a new line for the selected employee where you can have additional assignments for the same date.
Tip: If an employee is not available the first two hours on a specific day, for example from 9-11 am, and you want to assign a day shift to the same employee, you must enter the time directly in the roster field for that date on the employee line (12-18). If you enter the short code for the shift in the field, the system will return an error saying that the employee is not available for a shift on that specific date.
You can also enter a short code as long as the hours of the shift assigned by the short code are outside the scope of the employee's unavailability. If, however, you try to assign with the Assist Edit action, the employee's unavailability of the day would prevent assignment to the same day.
To remove an employee from work assignment
- Simply select the employee line and the matrix field (date) involved, and blank the cell with the Delete key or space bar. You can also use the Assist Edit action and the Clear Entry option.
To assign an employee on vacation or sick leave
-
On the Employee card, click the Non Availability action and there create requests for unavailability:

- You can set up preferences for employees when they wish not to be available: simply leave the Type field empty and make sure you enter the comment text. See example above.
- For certain assignments when the employee is not available for work, fill out the Type field, and specify date and time.
- Finally, click the Confirm action. If there is any work scheduled for the same period, you will be notified with a list of the assignments. If you accepted by clicking OK, those entries will be converted to unavailability (vacation or sick leave, for example).
Note: You can Unconfirm at any time and cancel the entry, if needed. You cannot edit confirmed entries, unless you change them to unconfirmed first.
The entries will be shown in the roster with a notification (the comment) or identified with the unavailability sign (VAC, SCK and so on) in the matrix.
To request employees to work
In the Roster schedule view there are multiple options to make a request to an employee:
- You can select an employee and a date, click the Assist Edit button in the field, and select the Request employee to work option
- You can select a entire line (role/shift) and a date, click the Assist Edit button, and select Send shift request either via email or text message to multiple employees who are able to cover the role and shift.
Note: The employees can accept or deny the requests, either from the clock in/out interface or through the employee portal functionality.
To confirm a roster plan
Before the roster plan can be used as reference for the time registration, you must confirm the roster. This can be done even if the plan is not be 100% ready, and also if the plan might change after the confirmation date.
You must confirm the plan before the month starts, so the employees can be presented with their expected work plan. At that point the cost of the plan is also registered as confirmed cost. You can always, however, modify the roster, but the system starts to log any changes to the roster once it has been confirmed.
- To view the log, go to the Navigate action menu and click Roster Log.
- To confirm, go to the Rosters menu option in the Staff Management role center, and place the selection cursor on the roster involved. Click the Confirm action to confirm.
Now your roster plan can be used as reference and the employees can start registering their hours to the period.
To close a roster plan
In the Roster list, you can select to Close the roster. This will remove it from the roster list and it will only be accessible through the Posted Entries section of the role center.
You cannot edit the roster after it has been posted. You should only use this action when the roster period has passed and it is 100% certain that no further changes are needed. All analysis possibilities of the roster will still be available.