In this article
Section Display Station Mappings
The mapping selection in detail
When you have completed the routing of items to production sections, you need to map the sections to the correct kitchen stations.
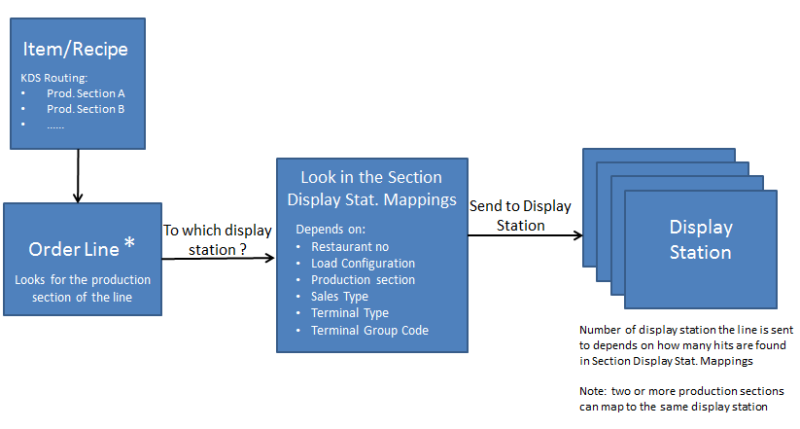
The mapping can depend on
- restaurant number
- load configuration
- sales type
- POS terminal
- group of POS terminals
The mapping defines on which display stations the items of a production section are displayed.
For each criteria (the same restaurant no., load configuration, sales type, POS terminal and POS terminal group) a production section can only be mapped to one display station. Remember that the item can be routed to multiple production sections instead.
You can check the routing and mapping you have set up against test criteria.
Note: One order line can be sent from the Hospitality POS to one or more display stations. When a display station of the type Expeditor is in use, an item is typically sent to one Preparation station and then the Expeditor station. An item such as a hamburger can be produced in many production sections and is therefore sent to many display stations.
In this setup you define all possible mapping setups needed for the company.
Section Display Station Mappings
Refer to the field help for KDS Sect. Displ. Stat. Mapping for more information.
The following needs to be considered when setting up Section Display Station Mappings:
- The Display Station ID field is mandatory.
- If the Prod. Section Code is not filled out, all production sections are mapped to the display station on the line.
- There can be many sales types in each setup.
- There can be many terminals and terminal groups in each setup.
Note: When the Business Central system finds out to which Display Station the order line is sent, it looks for mapping information in the following order: Restaurant No., Load Configuration, Production Section, Sales Type, Terminal Type, Terminal Code. If not found, it tries the same with a blank production section code. Then, if nothing is found, it repeats the search now with a blank restaurant number.
The system always looks for the most specific first. For example, when you set up mapping for a ‘non-default’ load configuration, you only need to set up mappings that are different from the default, the exceptions to the norm.
The mapping selection in detail
For each order line, the system looks for existing mappings for the current restaurant and for each production section the item is routed to. On each try if it finds a mapping, it has found the display station the production section is mapped to and stops trying.
Try 1: Use the active load configuration of the hospitality type if not blank. If blank, use the active load configuration code of the restaurant, if not blank. If blank, go to Try 2.
Try 1a: With a specific production section
- Try 1aA: Use the active sales type
- Try 1aAa: Use the active POS Terminal
- Try 1aAb: Use the active POS Terminal Group
- Try 1aAc: Use neither POS terminal nor POS terminal group
- Try 1aBa: Use the active POS Terminal
- Try 1aBb: Use the active POS Terminal Group
- Try 1aBc: Use neither POS terminal nor POS terminal group (blank in both fields).
Try 1b: With a blank production section
- Try 1bA: Use the active sales type
- Try 1bAa: Use the active POS Terminal
- Try 1bAb: Use the active POS Terminal Group
- Try 1bAc: Use neither POS terminal nor POS terminal group
- Try 1bB: Use no sales type (blank)
- Try 1bBa: Use the active POS Terminal
- Try 1bBb: Use the active POS Terminal Group
- Try 1bBc: Use neither POS terminal nor POS terminal group (blank in both fields)
- Try 3: Use a blank restaurant number and repeat Try1a and/or Try1b and if necessary Try2.
Process: How the system finds out the display station ID for the order line: