The E-Invoice Setup page is the central configuration point for the MY ClearTax e-Invoicing integration. You must complete this setup before any e-Invoices can be generated or uploaded. The page is divided into four FastTabs: General, API Configuration, Default Values, and Invoice Type.
To open E-Invoice Setup:
- Click the
 icon, enter E-Invoice Setup, and select the relevant link.
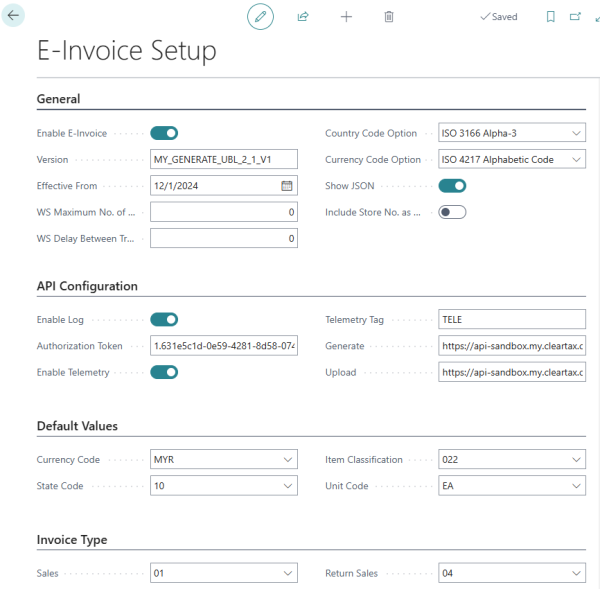
General
Use this FastTab to enable the integration, set the API version, and control how country and currency codes are formatted in the e-Invoice payload.
| Field | Description |
|---|---|
| Enable E-Invoice | Activates the integration. When disabled, no staging entries are created and no API calls are made. Enable this only after all other setup steps are complete. |
| Version | The e-Invoice specification version required by ClearTax. Enter the version string as provided in your ClearTax documentation (for example, 1.0). |
| Effective From | The date from which transactions are included in staging. The Create Staging scheduler job only picks up transactions with a date on or after this value. Set this to your legal e-invoicing compliance start date. |
| WS Maximum No. of Tries | The maximum number of upload attempts per staging entry before the system stops retrying. The Process Staging scheduler skips entries that have reached this count. A value of 0 is treated as 1. |
| WS Delay Between Tries (ms) | The wait time in milliseconds between retry attempts within a single scheduler run. Use this to avoid overwhelming the ClearTax API under high load. |
| Country Code Option | Controls which ISO 3166 format is used when including country codes in the e-Invoice payload. Options: ISO 3166 Alpha-2 (two-letter, e.g. MY), ISO 3166 Alpha-3 (three-letter, e.g. MYS), or ISO 3166 Numeric (numeric code). Select the format required by your ClearTax configuration. |
| Currency Code Option | Controls which ISO 4217 format is used for currency codes in the e-Invoice payload. Options: ISO 4217 Alphabetic Code (e.g. MYR) or ISO 4217 Numeric Code (e.g. 458). Select the format required by your ClearTax configuration. |
| Show JSON | When enabled, a pop-up message displays the full JSON request body and the ClearTax response each time an upload or generate operation is triggered. Use this setting for troubleshooting only — disable it in normal production operation. |
| Include Store No. as Branch | When enabled, the LS Central store number is included as the branch identifier in the e-Invoice payload. Enable this if ClearTax requires a branch code and you use the store number as that identifier. |
API Configuration
Use this FastTab to enter the ClearTax API credentials and endpoint URLs, and to enable logging and telemetry.
| Field | Description |
|---|---|
| Enable Log | When enabled, every API call to ClearTax is recorded in the E-Invoice Logs page. Recommended in production for compliance and troubleshooting. See E-Invoice Log. |
| Authorization Token | The bearer token provided by ClearTax for API authentication. Paste the token exactly as supplied. This value is sent in the HTTP Authorization header of every request. |
| Enable Telemetry | When enabled, integration activity is reported to the Business Central telemetry pipeline using the tag specified in Telemetry Tag. Enable this if your support or monitoring process relies on BC telemetry. |
| Telemetry Tag | A short code (up to 10 characters) used to tag telemetry events emitted by the e-invoicing integration. Required only when Enable Telemetry is on. |
| Generate API Url | The full endpoint URL for the ClearTax Generate API. Used when the Process Staging scheduler is configured to run with the GENERATE request type. Obtain this URL from your ClearTax account or implementation guide. |
| Upload API Url | The full endpoint URL for the ClearTax Upload API. Used when the Process Staging scheduler is configured to run with the UPLOAD request type, and by the manual Upload e-Invoice action. Obtain this URL from your ClearTax account or implementation guide. |
Default Values
Use this FastTab to set fallback values that are applied when a transaction line does not carry its own classification, state, or unit of measure code. See E-Invoice Catalogs for details on catalog data types.
| Field | Description |
|---|---|
| Currency Code | The default document currency used when a transaction does not specify a currency. Select from the standard Business Central Currencies list. Typically set to MYR. |
| State Code | The default Malaysian state code applied when one cannot be derived from the transaction. Sourced from the State Code data type in the Data Catalog. |
| Item Classification | The default item classification code used when an item does not have a classification code set on its card. Sourced from the Classification data type in the Data Catalog. |
| Unit Code | The default unit of measure code used when a transaction line's unit of measure does not have an International Standard Code set. Sourced from the Unit Code data type in the Data Catalog. |
Invoice Type
Use this FastTab to map LS Central transaction types to the IRBM e-Invoice type codes. Values are sourced from the E-Invoice Type data type in the Data Catalog.
| Field | Description |
|---|---|
| Sales | The e-Invoice type code used for standard sales transactions (for example, 01 for Invoice). Sourced from the E-Invoice Type catalog. |
| Return Sales | The e-Invoice type code used for return or refund transactions (for example, 04 for Credit Note). Sourced from the E-Invoice Type catalog. |
See also