In this article
This article looks at the definitions of the settings that are available for Safe Management, where to find them, and what they are commonly used for.
The settings described here are on the Tender Type card and the Store card.
The Tender Type Card
- Click the
 icon, enter Store List, and select the relevant link.
 - Double-click a store in the list, and on the Store Card click the Cash Management action, then Tender Types. This gives you access to control the settings in Safe Management.
- On the Tender Type List, select a tender type, and click Manage - View on the action menu.
- The Declaration FastTab on the Tender Type Card has the options listed in the table below.
The left-hand column has general settings and settings for tender types taken to the bank. The column to the right has settings for tender types taken to the safe and Fixed Float settings.
The available settings for each tender type:
| Setting | Description |
|---|---|
| Counting Required | Decides in which cases counting is required. |
| Float Allowed | Decides whether or not a float is allowed. |
| Taken to Bank | Decides if this particular tender type is taken to the bank. |
| To Bank by Denom. | This setting decides whether the tender type is sorted by denomination or as one, total amount when taken to the bank. |
| Exclude Coins to Bank | This is used, for instance, if you do not want to take coins to the bank, since some banks charge extra for accepting coins that might as well be used at the store for change. |
| Use Bags for Banks | This setting decides whether the money is stored in bags before taken to the bank. |
| Bank Bags No. Type | The options are:
|
| Bank Bags Nos. | The options are selected from the No. Series that appear when opening the lookup. |
| Taken to Safe | Decides if this particular tender type should be taken to the safe. |
| To Safe by Denom. | This setting decides whether the tender type is sorted by denomination when taken to the safe. |
| Use Bags for Safe | This setting decides whether the tender type is stored in bags before being taken to the safe. |
| Safe Bags No. Type | The options are:
|
| Safe Bags Nos. | The options are selected from the No. Series that appear when you click the arrow. |
| Fixed Float | Decides whether Fixed Float is used. |
| Fixed Float by Denom. | Decides whether fixed float is to be sorted by denomination. |
Note: It is possible to have more than one safe in each store, for example an upstairs safe and a downstairs safe. In such cases you must define to which safe each POS belongs.
The Store Card
Your selections on this card determine the headers in the line section.
- Click the icon, enter Store List, and select the relevant link.
- Double-click to select a store, and go to the Statement/Closing FastTab. There are three options available in the drop-down list in the Statement Method field:
- Staff- means that the statement is by Staff.
- POS Terminal - means that the statement is by POS.
- Total- means that the statement is by Store.
The POS Terminal option is the most common selection. The settings that are specified on the Store card for each terminal or staff member depend on the value you selected in the Statement Method field.
You must set up a Fixed Float bag for each person or POS.
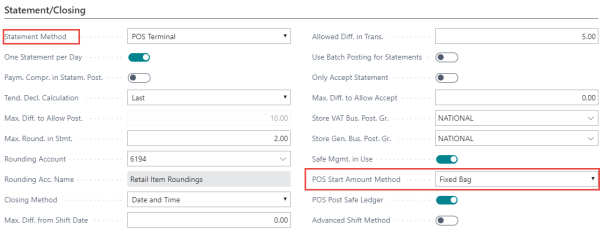
Safe Mgmt in Use: This check box decides whether Safe Management is in use or not.
POS Post Safe Ledger: If this check box is selected, the POS registers Safe transaction to the Safe Ledger entry. Otherwise, this is done at the BackOffice.
Note: You must select the POS Post Safe Ledger check box for online activities, but clear this box for offline activities.
Important: If one POS in a setup is offline, the POS Post Safe Ledger check box must be cleared.
To select a fixed float
- Click the icon, enter Store List, and select the relevant link.
- Double-click to select a store, click the Navigate action, then click Store - Cash & Safe Management - Cash Declaration Setup.
- The Cash Declaration Setup card is displayed and this is where you set the tender types:
- Next, you set the Fixed Start Amount:
- On the Store Card, select a store, click the Navigate action menu, then click Store - Cash & Safe Management - Fixed Start Amounts.
- The POS Fixed Start Amounts card opens. Here you define the Fixed Start Amount by filling out the ID, Tender Type, Currency Code (if needed), and Amount fields.
- Click the Denominations action to open the POS Fixed Start Denom. card where you fill out the combination of coins and notes.