In this article
Self-Checkout (SCO) supports different POS device types out of the box.In addition, partners can create their own custom implementations using the provided SDK and NuGet package.
How many SCO Device Types you need to configure depends on your deployment model:
- 1:1 (SCO Connector installed on the POS device) In this case, you only need to create one Device Type. The SCO Connector communicates directly with the POS it is installed on.
- 1:N (SCO Connector running centrally for multiple POS devices)
In this case, you must create one SCO Device Type per POS.
This is because the IP addresses and connection details (for example,
MainHostName,CancelHostName, and other parameters in Diebold setups) are defined in the SCO Device Type configuration. Each POS therefore requires its own Device Type entry.
Supported Device Types
SCO currently supports the following POS systems:
- Diebold Nixdorf
- NCR
Custom Implementations
SCO can also be extended to support custom POS systems implemented by partners. For this purpose, the following is provided:
- An SDK available on the public GitHub server. Partners must request access via a Support ticket.
-
A NuGet package
LS.SelfCheckout.Connector.Plugin, which provides a complete set of default service interfaces and implementations that can be used directly in custom integrations.
The SDK repository also contains full documentation on how to develop and integrate custom POS connectors.
Diebold Nixdorf
Diebold Nixdorf POS integration in SCO is based on the IfcIScanConnectorNoOut class provided by Diebold Nixdorf.
This connector manages socket-based communication between SCO and the Diebold TPiSCAN
self-checkout application.
- Create or assign the Diebold Nixdorf device type to an existing POS terminal.
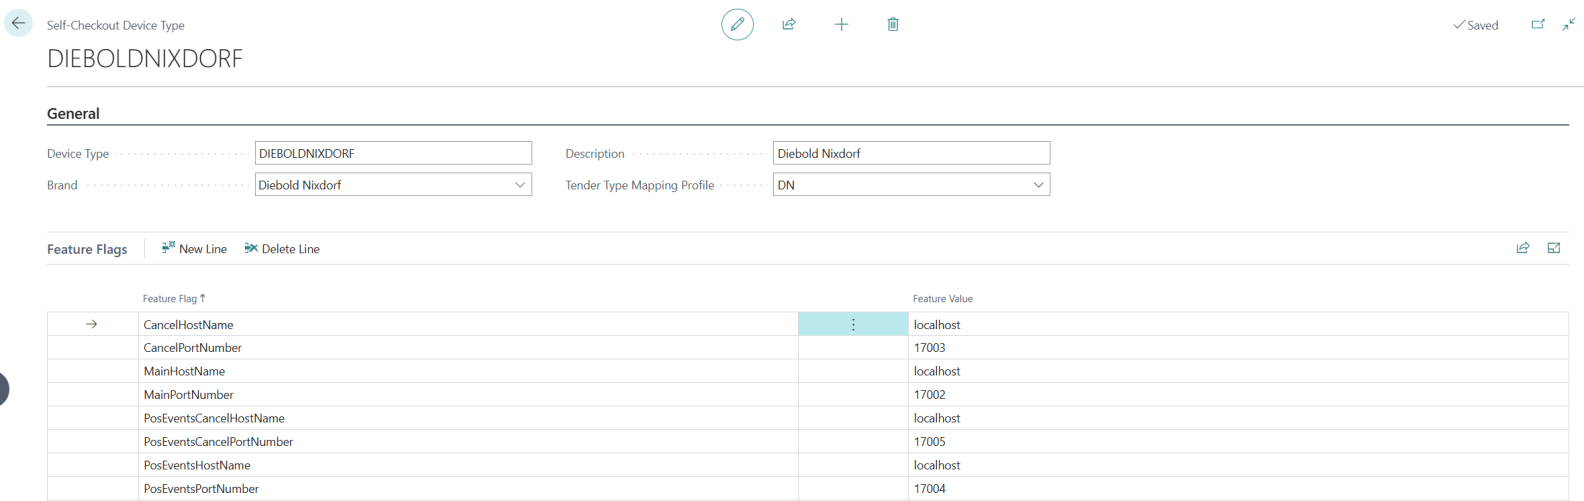
- In the Self-Checkout Device Type page in Business Central, configure all required Feature Flags that SCO uses to connect to Diebold POS.
- Restart SCO (if configuration was made after installation). SCO should automatically connect to the Diebold POS once the flags are set.
Required Feature Flags
Each feature flag corresponds to a hostname and port number used by SCO to establish a connection with a specific Diebold method group. These must be configured in the Self-Checkout Device Type page in Business Central.
| Feature Flag | Description | Corresponds to |
|---|---|---|
| MainHostName | Hostname/IP for the main method group. | hostNameMain
|
| MainPortNumber | Port number for the main method group. | portNrMain
|
| CancelHostName | Hostname/IP for handling cancel requests. | hostNameCancel
|
| CancelPortNumber | Port number for handling cancel requests. | portNrCancel
|
| PosEventsHostName | Hostname/IP for receiving POS events from Diebold. | hostNamePosEvents
|
| PosEventsPortNumber | Port number for receiving POS events. | portNrPosEvents
|
| PosEventsCancelHostName | Hostname/IP for receiving cancel-related event notifications. | hostNameCancelPosEvents
|
| PosEventsCancelPortNumber | Port number for cancel-related event notifications. | portNrCancelPosEvents
|
How It Works
- SCO reads the feature flags configured for the Diebold device type.
- SCO uses these hostnames and ports to initialize channel receivers and senders via the
IfcIScanConnectorNoOutclass. - Separate threads are started for each inbound method group (Main, Cancel, Authentication).
- Event streams (PosEvents, CancelPosEvents) are handled by dedicated channel senders.
- Once all sockets are initialized, SCO and Diebold POS exchange commands and events in real time.
After filling these feature flags and restarting SCO, the system should automatically establish a connection with the Diebold POS.
NCR
NCR POS systems integrate with SCO through an intermediate application called NCR Connector. This connector communicates with the NCR PipeServer on one side, and with SCO on the other, exchanging XML messages in real time.
How It Works
- The NCR POS client sends events (for example, item scanned) as XML messages to PipeServer.
- PipeServer forwards the XML to NCR Connector.
- NCR Connector transmits the message to SCO.
- SCO processes the request, performs the required logic (such as retrieving item details),
and returns XML responses (for example,
ItemSoldandTotals). - The responses flow back through NCR Connector → PipeServer → NCR POS, updating the user interface.
Example: Item Scan
Request from NCR POS (via PipeServer):
			<message msgid="b1" name="Item">
			<fields>
			<field name="UPC" ftype="string">50000</field>
			<field name="Scanned" ftype="int">0</field>
			<field name="LabelData" ftype="string">50000</field>
			<field name="PicklistEntry" ftype="int">0</field>
			</fields>
			</message>
Response from SCO:
			<message name="ItemSold" msgid="b2">
			<fields>
			<field name="Description" ftype="string">Briefcase, leather</field>
			<field name="ItemNumber" ftype="int">10000</field>
			<field name="IsZeroWeight" ftype="int">0</field>
			<field name="RequiresSecurityBagging" ftype="int">4</field>
			<field name="UPC" ftype="string">50000</field>
			<field name="Price" ftype="int">10000</field>
			<field name="Age" ftype="int">-1</field>
			<field name="Quantity" ftype="int">1</field>
			</fields>
			</message>

			<message name="Totals" msgid="b2">
			<fields>
			<field name="TotalAmount" ftype="int">10000</field>
			<field name="TaxAmountA" ftype="int">0</field>
			<field name="BalanceDue" ftype="int">8000</field>
			<field name="ItemCount" ftype="int">1</field>
			<field name="DiscountAmount" ftype="int">0</field>
			</fields>
			</message>
Installing NCR Connector
The SCO installer includes two components:
- Self-Checkout Connector (main SCO program).
- NCR Connector (facilitates communication between NCR POS and SCO).
Note: Both can be installed from the same installer. - SCO Connector can run on a server. - NCR Connector must be installed on the NCR POS machine.
NCR Connector Settings
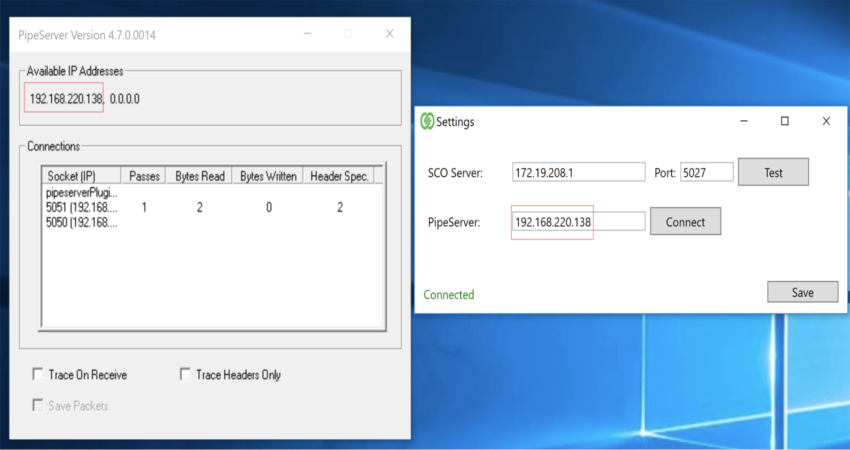
NCR Connector runs as a system tray application with two menus: Settings and Test.
- Settings menu:
- Configure SCO Server IP/Port.
- Configure PipeServer IP.
- Test button → Sends a ping to SCO to verify address.
- Connect button → Connects to PipeServer. If successful, a green Connected status appears in the lower-left corner.
- Save button → Saves all configurations.
- Test menu:
- Provides a text area where XML messages can be pasted and sent either to SCO or to NCR POS for troubleshooting.
Logs and Configuration Files
NCR Connector logs and settings are stored in:
C:\ProgramData\LSRetail\LS Self-Checkout Connector\NCR Connector
Inside this folder:
- ncr → Logs sent by NCR POS.
- sco → Logs sent by SCO.
- general → Combined logs.
- appsettings.json → Current NCR Connector configuration.
Final Steps
- Save the correct settings in NCR Connector.
- Open NCR POS.
- Restart SCO.
- SCO and NCR POS should now exchange XML messages through PipeServer and NCR Connector.