In this article
Web replication is a method to replicate data between databases or companies without the Data Director. Replicating data with the web replication method is an internal Business Central process.
The process is divided into two separate steps:
- The first step is like the typical scheduling of jobs (replication jobs), but instead of sending the requests to the Data Director, the request is sent to a new internal web replication module.
- The second step is the web replication itself, that is the internal process of replicating the actual database as specified in the job request.
Replication jobs
To activate web replication:
- In LS Central, click the
 icon, enter Scheduler Job Card, and select the relevant link.
 - Open the Object Setup FastTab, and in the Object No. field, enter codeunit 99008923, which is the codeunit used for Data Director replication.
- Select the Use Web Replication check box.
With this method the job sends its replication request to the web replication module instead of the Data Director.
Job limitations using this method:
-
From Location Code can only be the current location. The user must define the Use Current Location. This means that the source location and process location must be the same, or in other words, only data push is valid.
-
This process only supports replication between identical tables, that is from a table to the same table.
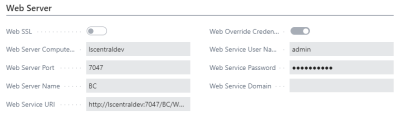
All destination locations must have a valid Web Server connection, see the Distribution Location Card, Web Server FastTab:
Web replication module
You find all UI related to the web replication module in the Scheduler Setup page.
Web replication
The web replication module that processes the replication requests is run by a Scheduler job.
-
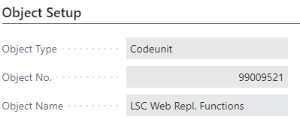
To run the web replication, create a Scheduler job and connect it with codeunit 99009521 (the Object Setup FastTab in the Scheduler Job page):
Web replication requests
The web replication process can be divided into four steps:
- The functionality that receives and validates the requests from a scheduled job.
- Create a data packet from the request to be distributed.
- Create distribution request for each distribution location involved.
- Replicate the data to each destination location.
Create Request Queue
When a web replication scheduled job is run, the request is passed to the web replication module that validates that the request can be processed, see web replication limitations above.
If the request is in order, a queue entry is created. At the same time, provided that the Client Log On check box in the Logs FastTab in the Web Service Setup page has been selected, a log file containing the request is written at the same path.
This file is in json format and could have a name like ADMIN_SendJobRequest_D20210115T144450333Z.json.
To see requests in the queue, go to the Scheduler Setup page, and click the Related action, then select Web Replication - Request Queue.
The outcome is a list of all waiting requests:

(Click image to enlarge)
Web replication
Steps 2, 3, and 4 are all run by the web replication Scheduler job in that sequence. Each step could fail individually, but should resume correctly with next retry by the Scheduler.
If everything is in order, the request is moved to the Web Replication Request Log and all extra data is deleted. This way, the log only holds limited information on process requests.
See Scheduler Setup page, click the Related action, then select Web Replication - Request Log.

(Click image to enlarge)
The request is not removed from the queue until it has been fully processed. If some steps of the process fail, additional information becomes available.
If Step 2, Create a data packet, is successful, a flag, Data Packet Created, is set and information regarding the data packet becomes available in the Request Queue list by clicking the Related action and selecting Packet Data.
If Step 3, Create distribution, is successful, the distribution information becomes available in the Request Queue list by clicking the Related action and selecting Distribution Queue.
Step 4 is the step that has the highest potential of failing because of its dependency on web connections and so on. This step will try to process for each distribution location the oldest request waiting for that location. If a request is successfully delivered, it is then removed from the distribution queue, leaving only those with problems.
Note: If the oldest request is not processed for a given location, no other requests are processed for that location. This can result in a situation where all requests have been processed for all distribution locations except one which has perhaps a list of request waiting.
You can see status for individual locations in the Request Queue list by clicking the Related action and selecting Distribution Queue.
You can cancel a request any time, by clicking Actions - Cancel Selected Requests. When this is done, the request is moved to the Request Log and all procession data are removed. The Request Log now indicates that the request was canceled.
When a request is canceled, an additional Distribution Canceled Log is created for the remaining locations still waiting, therefore listing locations that will never get this data. Given this side effect canceling is only recommended as last resort when this data (request) can never be delivered to the remaining locations.
Note: A request is not closed (that is moved to the Request Log), until it has been delivered to all locations or canceled.
For Step 4 to work, a web service to process the incoming request is needed at each destination location. Here a new type of web requests is used that utilizes OData V4 Inbound Action. The only thing needed is to publish a codeunit 99009520 with the service name WebReplicationODataMgt.

(Click image to enlarge)