In this article
Parallel calculation using background sessions
Parallel calculation using Job Queues with listener
Parallel calculation using Job Queues with Web Service
To track parallel calculation progress
The Parallel Replenishment Journal Calculation is an alternative calculation approach that reduces the overall Replenishment Journals calculation time. It is beneficial if you have a large inventory to process, and the journal calculation requires a long time to complete.
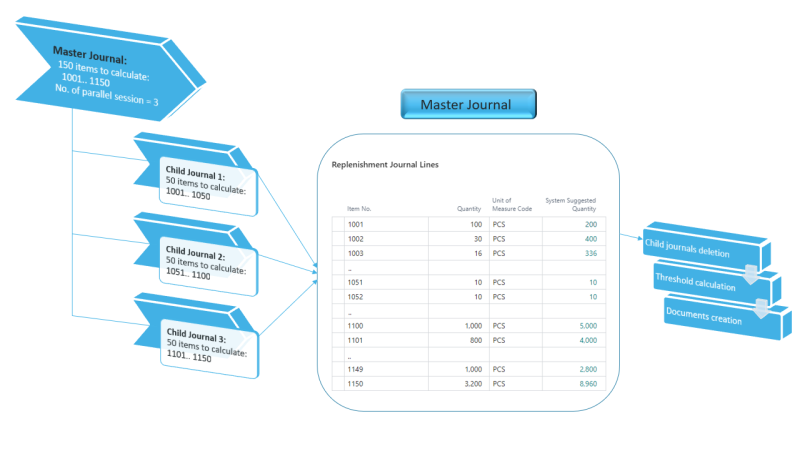
The Parallel Replenishment Journal Calculation concept is to run the calculation of a Purchase or Transfer Replenishment Journal in parallel, where the items in a Replenishment Journal are split evenly and shared across multiple sessions so that they are calculated in parallel to speed up the calculation of that journal. When the Replenishment Journal is run with the Scheduler job and there are multiple journals that need to be calculated, the journals are picked up sequentially by the job.
When the parallel calculation is enabled, a journal to be calculated is treated as the Master journal. It creates Child journals based on the number of parallel sessions and splits the item range evenly among the Child journals.
The Child journals calculate and create the lines in the journal according to their respective item range. The Master journal monitors the progress of the Child journals, and once the calculations are finished for all Child journals, the Master journal proceeds to delete the Child journals. The Master journal continues with the threshold calculation and order document creation, if necessary.
There are two approaches to set up the parallel Replenishment Journal calculation, either using background sessions or Job Queues. For the Job Queue approach, you can either start up the Job Queue entries via listener or Web Service.
Parallel calculation using background sessions
The parallel calculation with background sessions can be activated for the Replenishment Journal in the Replen. Setup page.
- Click the
 icon, enter Replen. Setup, and select the relevant link.
 - Go to the Replen. Journals FastTab, and select the Enable Parallel Calculation check box to activate the parallel calculation for the Purchase and Transfer Replenishment Journal, this is applicable for the Scheduler-based calculation.
- Select the Enable Parallel Calculation (Manual) check box to activate the parallel calculation for the Purchase and Transfer Replenishment Journal when run manually, if necessary.
- Next, fill in the No. of Parallel Sessions field to specify the number of parallel sessions that will be used to calculate the Purchase or Transfer Replenishment Journal. The value of No. of Parallel Sessions must be at least 2.
Note: There is an operational limit set by Microsoft for Business Central SaaS, where there is only a maximum number of 10 background sessions per environment that can be processed at the same time in a server instance. Background sessions that come in when this limit is exceeded wait in a queue until a time slot becomes available. For more information, see Operational limits for Business Central online.
Parallel calculation using Job Queues with listener
The parallel calculation with Job Queues can be activated for the Replenishment Journal in the Replen. Setup page.
- Click the icon, enter Replen. Setup, and select the relevant link.
- Go to the Replen. Journals FastTab, and select the Enable Parallel Calculation check box to activate the parallel calculation for the Purchase and Transfer Replenishment Journal, this is applicable for the scheduler-based calculation.
- Select the Enable Parallel Calculation (Manual) check box to activate the parallel calculation for the Purchase and Transfer Replenishment Journal when run manually, if necessary.
- Next, fill in the No. of Parallel Sessions field to specify the number of parallel sessions that will be used to calculate the Purchase or Transfer Replenishment Journal. The value of No. of Parallel Sessions must be at least 2.
- Select the Parallel Journal Calc. with Job Queue check box to activate the parallel calculation with Job Queues.
There are a few additional steps that you need to perform before you can run the Replenishment Journal calculation in parallel using Job Queues with listener. This includes setting up the users that will start up and run the parallel Job Queue entries, linking the user with the parallel threads, and setting up the Job Queue listener.
To set up Replen. Job Queue Users
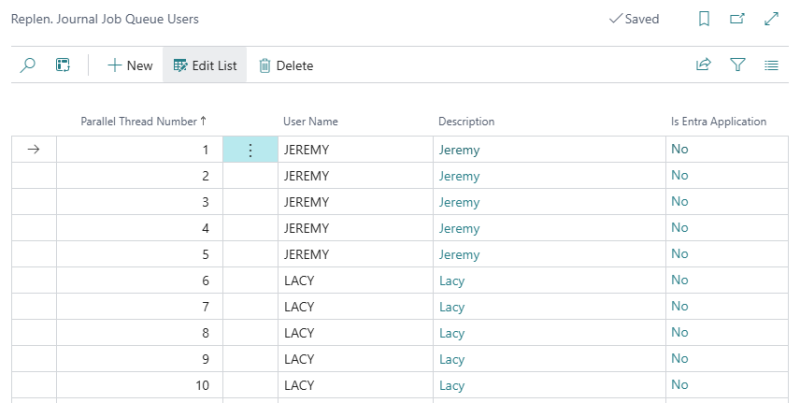
You need to set up Replen. Job Queue Users to start and run the parallel Job Queue entries. Note that one user can only run a maximum of five Job Queue entries simultaneously. Therefore, you need to set up more users in your environment if you want to run more than five parallel sessions. For example, if you want to run 10 parallel sessions, you must set up a minimum of two users where each user picks up five parallel jobs.
- Click the icon, enter Replen. Job Queue Users, and select the relevant link.
- Create a new Replen. Job Queue User by clicking the New action.
- Enter a User Name, which corresponds to the user that will log in to the system.
- Enter a Description.
To link Replen. Job Queue Users with parallel threads
Next, you need to link the Replen. Job Queue Users with the parallel threads. For each parallel thread that is set up, a Job Queue entry will be created, assigned with the linked user.
- Click the icon, enter Replen. Setup, and select the relevant link.
- In the Replen. Journals FastTab, drill down to the Parallel Journal Calc. Job Queue Users field to open the Replen. Journal Job Queue Users page.
- Link the Replen. Job Queue User with the parallel thread by filling in the Parallel Thread Number and User Name fields. Note that the Parallel Thread Number must start with 1 and be set up in sequence without gaps, up to the specified No. of Parallel Sessions.
Note: Due to Microsoft's operational limit, you should only link a user with a maximum of five parallel threads to achieve maximum parallelism.
- Back in the Replen. Setup page, fill in the Maximum No. of Attempts to Run field, which specifies how many times a Job Queue of the parallel thread should be rerun after the Job Queue fails to run.
To set up Job Queue listener
You must set up a Job Queue entry for each Replen. Job Queue User, which will act as a listener to start and run their respective parallel Job Queue entries assigned with the same user.
- Click the icon, enter Job Queue Entries, and select the relevant link.
- Create a new Job Queue Entry by clicking the New action.
- In the General FastTab, select Codeunit in the Object Type to Run field, and assign the Object ID to Run with 10012228 (LSC Start JQ with Listener).
- Fill in the fields in the Recurrence FastTab as needed, which define the recurring and frequency settings of the Job Queue listener.
- Click the Set Status to Ready action to activate the Job Queue listener.
Note: Each user must log in to the system to set their respective Job Queue listener to Ready.
Parallel calculation using Job Queues with Web Service
The parallel calculation with Job Queues can be activated for the Replenishment Journal in the Replen. Setup page.
- Click the icon, enter Replen. Setup, and select the relevant link.
- Go to the Replen. Journals FastTab, and select the Enable Parallel Calculation check box to activate the parallel calculation for the Purchase and Transfer Replenishment Journal, this is applicable for the scheduler-based calculation.
- Select the Enable Parallel Calculation (Manual) check box to activate the parallel calculation for the Purchase and Transfer Replenishment Journal when run manually, if necessary.
- Next, fill in the No. of Parallel Sessions field to specify the number of parallel sessions that will be used to calculate the Purchase or Transfer Replenishment Journal. The value of No. of Parallel Sessions must be at least 2.
- Select the Parallel Journal Calc. with Job Queue and Parallel Jrnl. Calc. Run Job Queue with WS check boxes to activate the parallel calculation using Job Queues with Web Service.
There are a few additional steps that you need to perform before you can run the Replenishment Journal calculation in parallel using Job Queues with Web Service. This includes setting up the Entra ID App, setting up the Entra Application Users that will start up and run the parallel Job Queue entries, linking the user with the parallel threads, and publishing the relevant Web Service.
To set up an Entra ID App
Microsoft Entra ID is a cloud-based identity and access management solution. See How to: Set Up an Entra ID App for more information about how to register an Entra ID App in the Microsoft Azure portal.
To set up Entra Application Users
You need to create Entra Application Users that will be used to start and run the parallel Job Queue entries. See How to: Create the External Application Account in LS Central for more information about how you can create Entra Application Users in LS Central.
To set up Replen. Job Queue Users
You need to set up Replen. Job Queue Users to start and run the parallel Job Queue entries. Note that one user can only run a maximum of five Job Queue entries simultaneously. Therefore, you must set up more users in your environment if you want to run more than five parallel sessions. For example, if you want to run 10 parallel sessions, you must set up a minimum of two users where each user will pick up five parallel jobs.
- Click the icon, enter Replen. Job Queue Users, and select the relevant link.
- Create a new Replen. Job Queue User by clicking the New action.
- Enter a User Name, which corresponds to the Entra Application User's user name.
- Enter a Description.
- Enable the Is Entra Application setting and select the relevant Entra App Client ID.
- Fill in the Entra App Secret field with the client secret value that you copied during the Entra ID App registration in the Microsoft Azure portal.
You can test the web service connection of the Entra Application Users based on their Entra App Client ID and Entra App Secret configuration, by using the Test Connection (Current User) and Test Connection (All Entra Users) actions.
To link Replen. Job Queue Users with parallel threads
Next, you need to link the Replen. Job Queue Users with the parallel threads. For each parallel thread that is set up, a Job Queue entry is created during the calculation, assigned with the linked user.
- Click the icon, enter Replen. Setup, and select the relevant link.
- In the Replen. Journals FastTab, drill down to the Parallel Journal Calc. Job Queue Users field to open the Replen. Journal Job Queue Users page.
- Link the Replen. Job Queue User with the parallel thread by filling in the Parallel Thread Number and User Name fields. Note that the Parallel Thread Number must start with 1 and be set up in sequence without gaps, up to the specified No. of Parallel Sessions.
Note: Due to Microsoft's operational limit, you should only link a user with a maximum of five parallel threads to achieve maximum parallelism.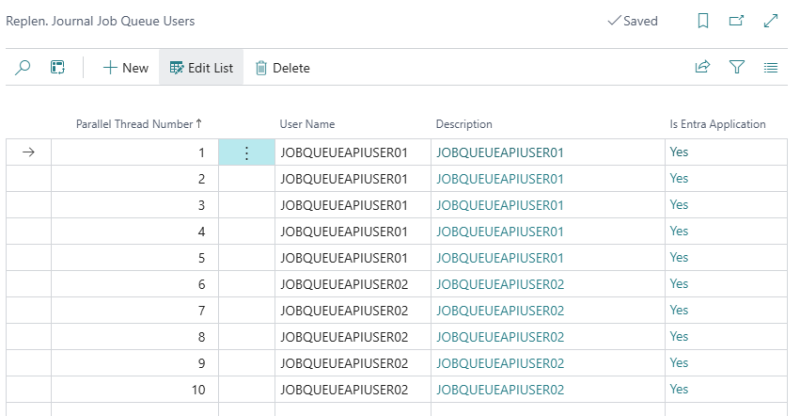
- Back in the Replen. Setup page, fill in the Maximum No. of Attempts to Run field, which specifies how many times a Job Queue of the parallel thread should be rerun after the Job Queue fails to run.
To publish the Web Service that starts the Job Queues
You need to set up and publish the Web Service that will be used by the Entra Application Users to start and run the parallel Job Queue entries.
- Click the icon, enter Web Services, and select the relevant link.
- Create a new Web Service by clicking the New action.
- Select Codeunit in the Object Type field, and assign the Object ID with 10012222 (LSCStartJobQueueAPI).
- Fill in the Service Name field with LSCStartJobQueueAPI, and select the Published check box.
To track parallel calculation progress
During the Replenishment Journal calculation, you can monitor how many Replen. Item Quantity (RIQ) records have been processed by each Child journal.
To enable this feature:
- Click the icon, enter Replen. Setup, and select the relevant link.
- In the Replen. Journals FastTab, enable the Track Progress in Journal Batch setting.
- Fill in the Track Progress Frequency field, which specifies how frequently the RIQ counter is updated.
During the calculation, to monitor the progress:
- Click the icon, enter Replen. Template List, and select the relevant link.
- Click Related - Template - Replenishment Batches to open the Replen. Worksheet Batches page.
- Filter the page to view the Child journal batches. You can identify the Child journals with their Replenishment Template Code, which always start with ##CHILDTEMPLATE.
- The progress of how many RIQ records have been processed so far is shown in the Calculation Counter field of the respective Child journal batches.
See also
Parallel Replenishment Calculation