This article explains how to use periodic discount to offer a lower price on an item that is close to its Expiration/Best before date.
When you set up a discount in this way, Expiration dates and Best Before dates are handled the same, and will be referred to as the expiration date in this article.
-
Click the
 icon, enter Open the Discount Offers page.
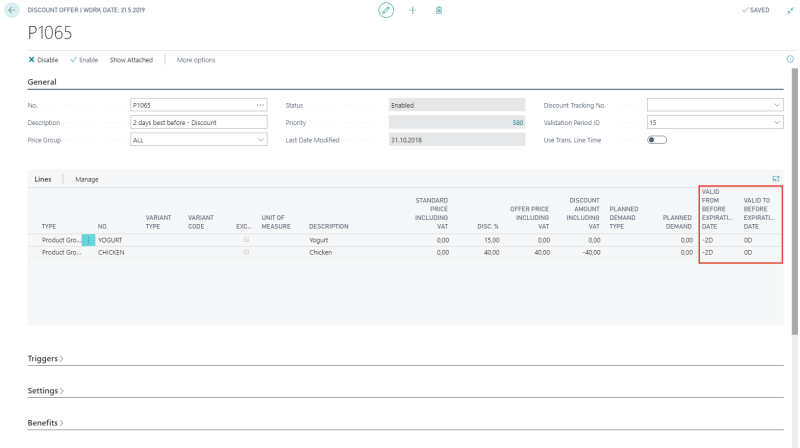
In this example, all items in the Retail Product Group YOGURT get an 15% discount when sold within two days from their Expiration date. The fields Valid From Before Expiration Date and Valid To Before Expiration Date are set to -2D and 0D respectively, meaning that the discount is active two days before the expiration date and is valid until and on the date it expires.
A common way of selling an item with an expiration date is to include the expiration date in the barcode. This example is using the Business Central supported GS1 Barcode.
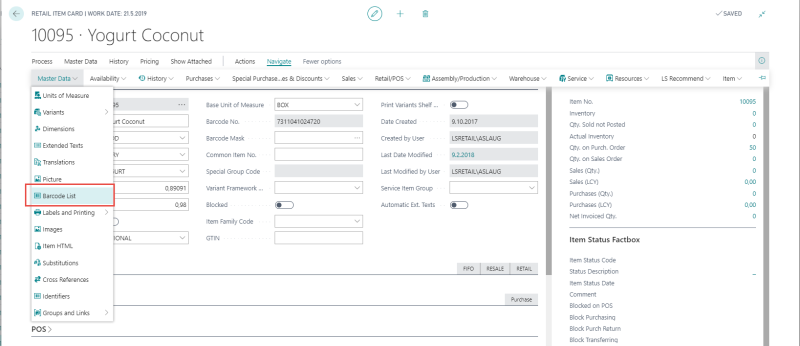
- Open the item's Retail Item card, in this example 10095 - Yogurt Coconut.
-
Click the Related action, then Master Data - Barcode List to open the Item Barcodes page:

- Click the Report action, then Print GS1 Barcode , and select one of the options for printing the barcode.
- Enter a value for the No. of Barcodes to Print, in this example 1 is sufficient.
- Select the Add Best Before Date check box, and select the date when the product expires. In the example, this Coconut Yogurt is set to expire the 31st of October 2017.
Note: Expiration Date is the same as Best Before Date. The only difference is the identifier in the barcode and the terminology in some stores. A barcode should never have an Expiration Date and a Best Before Date.
-
Click Print to print the barcode.

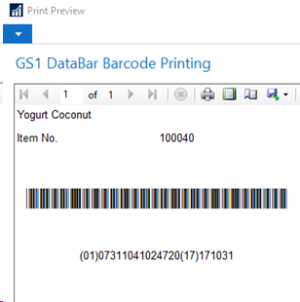
The image below shows a preview of the barcode.
Note: In the image, the parentheses () are there to show the different identifiers from the GS1 Barcodes, and are not part of the actual barcode. Scanning this barcode will result in: 010731104102472017171031.
Note: To be able to print the barcode, a barcode font must be installed, for example the Free 3 of 9 Extended font. If a barcode font is not installed, the output is simply a string of numbers.

Now the Discount is ready for use.
- Open the POS, and scan the barcode (you can also enter the barcode manually).
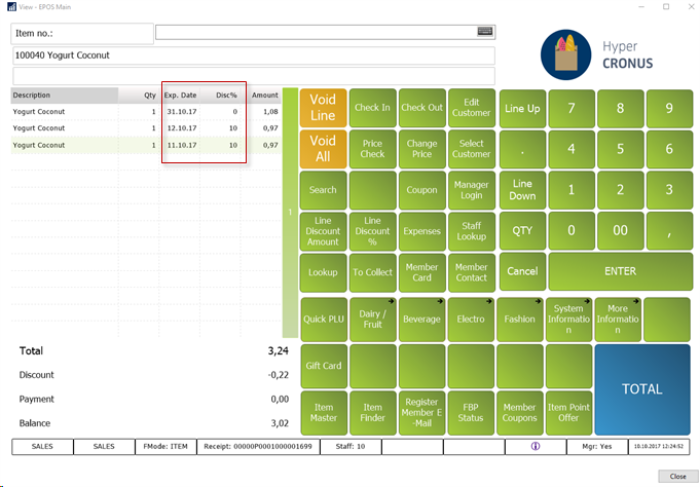
In this example the barcode is entered manually three times to show what happens with three different expiration dates. The last six digits of the barcode represent the date in YYMMDD format.
The date in the example is the 10th of October 2017.
Scanned expiration dates (in order):
- 31st October 2017 (21 days until the product expires)
- 12th October 2017 (2 days until the product expires)
- 11th October 2017 (1 day until the product expires)

Note: You can see that the discount is applied for the two Yogurt Coconut items that have an expiration date close to the current date as set up in the discount.
Note: If an expired item is scanned, the POS displays a message and does not allow the item to be sold.