In this article
Searching with the POS Input Control
To run the Search Dialog from a Menu Button, you set the SEARCH POS command on the button. Optionally, you can specify a POS Search Setup ID in the Parameter field. If the Parameter field is blank, the system will use the #DEFAULT POS Search Setup.

The image shows the Search Dialog running the #DEFAULT Search Setup. Typing "home" in the input control shows results from 3 indexed tables, ITEM, CUSTOMER, and MEMBER. Now you can select any one of the results and the active POS Transaction will be updated, depending on the type of record you chose. Double-clicking a record inserts the record without closing the Search Dialog.
Because the #DEFAULT POS Search Setup does not have a special Search Index Setup, you get results from many tables. If, however, you pass a parameter with the SEARCH Pos command, for example #CUSTOMER, you get different results because the #CUSTOMER POS Search Setup uses the CUSTOMER Search Index Setup which only searches the customer table.
Advanced search filtering is done by pressing the Input Control Caption (or assist icon, the keyboard sign).

Searching with the POS Input Control
The #CURRINPUT input control on the POS can be configured to use a search as you type into it.
- To do this, edit the POS input control you are using and in the field Input Change Search ID enter an asterix (*).
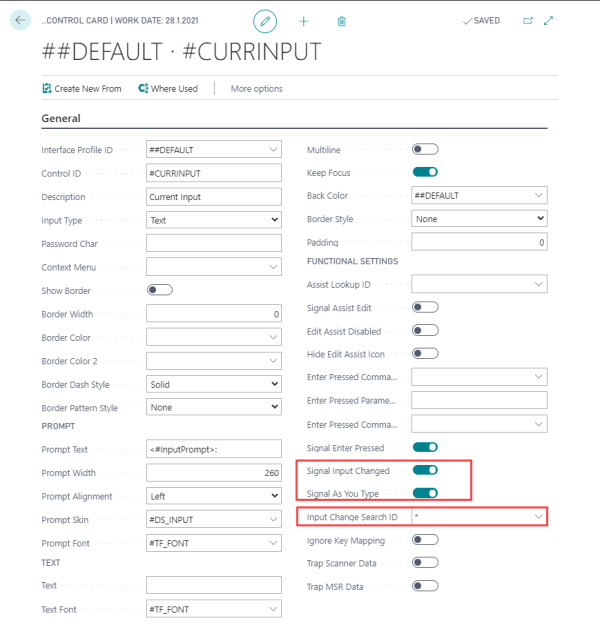
- Also, select the Signal Input Changed and Signal as You Type check boxes for the search to work.
When you type in the #CURRINPUT Input Control, the system checks if there is a setup for the current Function Mode and if so, shows a drop-down grid with the search results.
To select an item from the search result grid, the user will need to use the keyboard arrow keys to navigate to a record and press Enter, or simply click an item in the drop-down grid.