On POS Profiles
In this article
POS profiles and their connections
Profile settings for the Store Card
Profile settings for the Terminal Card
Profile settings for the Staff Card
Example: Two hardware profiles
Example: Sharing a menu for the stores
When the POS Client is started there is always one of each type of the Profiles active for the client. How the system sets up and knows which profile is active depends on rules in the system. This article explains how the system decides which profile is active and also explains the ##Default profile concept.
POS profiles and their connections
The system has five types of profiles:
- Interface Profile: With this profile all the different interface controls for the POS are defined. The controls are, for example, the input field, data grid including the POS journal, and areas for the menus, button controls. Some of the Interface profile’s controls become active when different commands are used. Each POS look consists of a panel with controls, it is customizable how much space within the panel is covered by each control.
- Menu Profile: Includes a lot of Menus where each menu contains one or many menu lines. Each menu line is then set up with its own setup, a POS Command. Each menu or menu line can be set up with different values for its look, these values are then defined in the Style Profile.
- Functionality Profile: The Functionality Profile includes different POS functionality that decides the POS behavior. The profile includes many different settings for different features.
- Style Profile: The Style Profile defines the look of the POS that is the colors and fonts for all areas, for example the style and color of a button, the font on the button, and the background color .
- Hardware Profile: In the Hardware Profile the setup for the POS hardware is set up. This includes settings for which hardware is in use and how it is set up.
Within each company of LS Central it can be normal to have more than one setup for each POS profile, the number of profiles depends on the variety of POS setups in use. It is always possible to edit or add more POS profiles later to re-define the look and behavior of the POS.
Note: LS Central Demo Data company has several profiles of each type to give examples of different types of stores and layouts. Some of the profiles in Demo Data are set up and used for Hospitality.
All five profiles can be connected to Stores and Terminals. Three of the profiles, the Interface, Menu, and Style Profiles, can be connected to Staff Cards and to the Store Link Lines in the Staff Card, too.
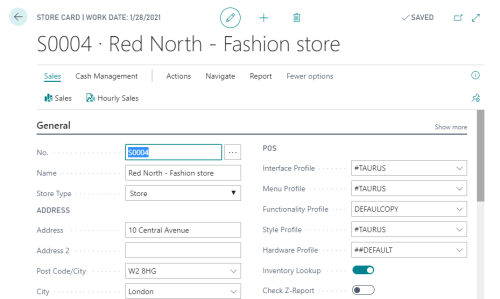
Profile settings for the Store Card
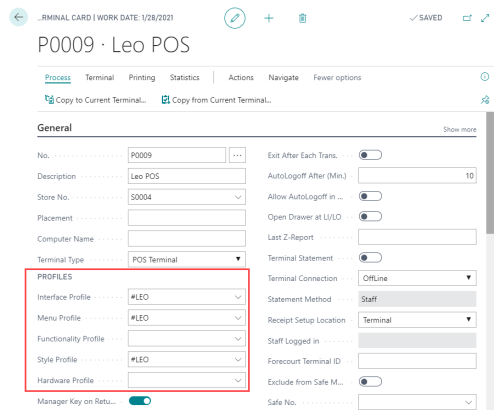
Profile settings for the Terminal Card
Profile settings for the Staff Card
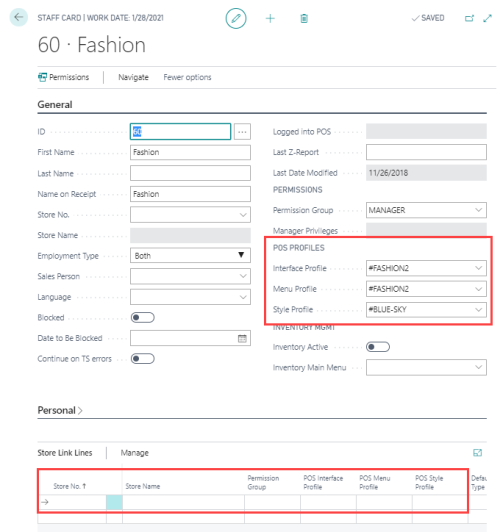
Note: Connecting profiles in the Store Link Lines makes it possible for a Staff ID to log on the POS with different profiles per store.
Which profile is active?
How does the system know which profile is active?
The rule is the same for all profiles:
- When the POS is loaded it looks for which profile should be the Active Profile for the session.
- First, the system looks for the profile value in Store Links on the Staff card.
- Secondly, the system looks for the profile value on the Staff card.
- Thirdly, on the Terminal card.
- And finally on the Store card.
- When no profile value is found, the system uses the ##DEFAULT profile value as the active value.

Note: Whenever the POS finds a value, the value becomes the active value and the search for the active profile’s value stops.
The ##DEFAULT profile concept
Each profile type in the demo data includes a profile with ID ##DEFAULT. It is highly recommended to have a ##DEFAULT Profile in all company setups.
The purpose of the ##DEFAULT profile is:
- If no active profile is found, the ##DEFAULT profile automatically becomes the active profile.
- Reusing the Data; the POS can use data which belongs to other profiles according to the Search Profile Rule.
A menu which is identical for more than one menu profile should be located in the ##DEFAULT Profile and only there. The Menu Profile only needs to have the menus which are unique to it for a setup, other menus are located in the ##DEFAULT Menu Profile. Having only one copy of most menus saves a lot of time in creating menus and maintaining them.
Note: The Interface, Menu, and Style profiles have a lot of data assigned to the them. If the active profile does not include the data that the POS is asking for, the system looks for it in another profile according to the Search Profile Rule.
It is recommended that each profile type should have a ##DEFAULT Profile.
Example: Two hardware profiles
Let’s assume that in our company we have only two types of printers; they need separate setups and therefore we need two Hardware Profiles. Our company has five stores and each store has 10 terminals. Nine out of ten terminals have Printer A and the rest have Printer B.
For this we define two Hardware profiles: Profile ##DEFAULT for Printer A and Profile SKY for Printer B.
The Hardware Profile connections:
- For all the stores we have an empty Hardware Profile field.
- For all the terminals with Printer A we have an empty Hardware Profile field.
- For all the terminals with Printer B we enter the value SKY in the Hardware Profile field.
In this setup we only need to fill out the value for the Hardware Profile field for five terminals. Other setups have this field empty. An empty value in the Hardware Profile field for both the Store and Terminal automatically makes the ##DEFAULT profile the active profile.
Sometime later, one of the stores, S0004, replaces all its printers with a new type. For this we need to create a new Hardware Profile XYZ. On the S0004 store card we enter the value XYZ into the Hardware Profile field, and clear the Hardware Profile value for the terminal. Nothing more needs to be done. The profile value set for the Store will automatically be active for the terminals since their Hardware profile value is empty.
Example: Sharing a menu for the stores
When the POS calls for the menu Payment:
- It starts to look for the menu in the active Menu Profile.
- If the menu is not found there, the systems looks for the menu in the ##DEFAULT Menu Profile.
By having the payment menu only in Menu Profile ##DEFAULT we save work by only creating one menu instead of ten.
Sometime later, the company decides to add a payment method, foreign currency, for all stores except two, which share the menu profile called Furniture.
What we need to do is:
- Copy the payment menu from Menu Profile ##DEFAULT to Furniture.
- Edit the payment menu in Menu Profile ##DEFAULT.
- Add one menu line and set it up for Foreign Currency payment.
- Create a new menu, Foreign Currency, in Menu Profile ##DEFAULT.
- Add in the menu lines for the different currency.
Terminals in the store with the active menu profile Furniture will now use the payment method included in the Menu Profile Furniture. All other terminals use the payment menu from Menu Profile ##DEFAULT.
Note: The payment menu has the same menu ID in profile ##DEFAULT and Furniture even though it has different menu lines.