In this article
To open the Import Export Worksheet tool
Update Table List for the Import Export Worksheet
It is possible to export selected data from a company and then import it into another company in the same database or another database.
The tool to do this is the Import Export Worksheet, also called LS Import Export WS.
This tool exports the selected data into an XML file and imports the data from the XML file. The user has to make sure to be active in the company the data is being exported from and imported to.
The POS setup data for retail recommended to be imported from the Demo Data is:
- Interface Profile ##DEFAULT
- Menu Profile ##DEFAULT
- Functionality Profile ##DEFAULT
- Hardware Profile ##DEFAULT
- Style Profile ##DEFAULT
- POS Commands
- POS Tag, all tags
- POS Data Table, all tables
- Scheduler Job Header, all jobs
- WS Request, all data
- POS Context Menu, all data
Optional import data:
- Other profiles which exist in the Demo Data Company
- POS Search IndexTable
- Hospitality and KDS data, if needed.
All this data can then be adjusted to fit the customer’s requirements.
Tip: When setting up a new company in LS Central, import the relevant POS profiles from the demo data company as you like. It might be easier to build the new POS from some of the existing profiles.
To open the Import Export Worksheet tool
- Click the
 icon, enter LS Import Export WS, and select the relevant link.
With this tool it is possible to export and import different POS Setup Data.
To export data
- Be active in the company the data is being exported from.
- Open the LS Import Export WS page.
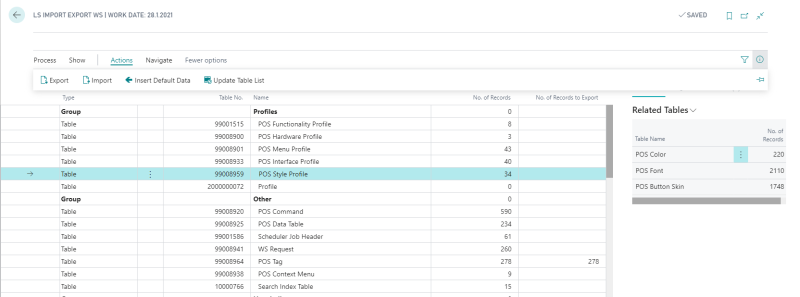
- Select the group line which is going to be exported.
- Most of the records to be exported need to be selected before they can be exported. To do so, go to the No. of Records to Export field, open the drop down list, select the Export check box for one or more profile for each profile to export.
Note: Click the Select All action to select all records. - On the LS Import Export WS page, click Actions - Export.
- An XML file is created in your Downloads Windows folder.
Tip: For most of the options, the user selects check boxes for the individual records to export. The No. Of Records to Export field displays the number of selected profiles. You can either select individual records for exporting or use the Select All action for all data.
Note: The export tool exports the selected data table and all of its related tables as is displayed in the Related Tables window.
Tip: It is possible to export and import group of options, for example if you want to export all the profiles select the profiles to export, be active in the Profiles line and finish by selecting action Export. Similarly it is possible to import the different groups of data.
To import data
- Be active in the company the data is to be imported to.
- Open the LS Import Export WS page.
- Be active in the group line data to receive the imported data.
- Click Actions - Import.
- Click the Choose button to open a Windows Explorer window where you can select the folder containing the import file.
- Select the folder where the XML file is located.
- Select your file, and click the Open button.
- The system asks if you want to overwrite existing records. Click Yes or No, depending on your wishes.
- The imported XML file is read into its data tables.
Tip: If you reply with a No, you can import new data only .
Update Table List for the Import Export Worksheet
When the program is updated, you may need to update the table list for the Import Export Worksheet:
- Click Actions - Update Table List in case more Groups options have been imported for the worksheet.