In this article
Changing the Journal Data Table on the Dual Display
The LS Central Dual Display is a customer-facing display that can show information on, for example, what is being sold in a transaction or some selected offers in the store.
The Dual Display is configured in the LS Central BackOffice and must be enabled in the POS Terminal Card to run. The Dual Display starts by default on a secondary screen when the POS is run.
If the POS is run from within the LS Central app (in Windows AppShell), the Dual Display starts in full-screen mode.
The Dual Display has its own panels and uses controls and menus from the POS Profiles.
Setup
The POS Terminal using the Dual Display needs some configuration. This is done in the Dual Display FastTab in the POS Terminal Card:

Dual Display fields
| Fields | Description |
|---|---|
| Dual Disp. Enabled | Select this field for terminals that have Dual Display. |
| Dual Disp. Interface Profile | Primary Interface Profile for the Dual Display program. |
| Dual Disp. Menu Profile | Primary Menu Profile for the Dual Display program. |
| Dual Disp. Style Profile | Primary Style Profile for the Dual Display program. |
| Dual Disp. Slideshow | This field is for the Media Playlist Number. The Media Playlist entered here is what the Dual Display will run after it gets a connection with the POS client and nobody is logged into the POS |
| Dual Disp. Screen | This field is set to 0 by default and does not need to be changed, unless you have more than two screens in your setup and want to run the Dual Display on other than the secondary screen. For example, if you want to set the Dual Display to your third screen, enter 3 in this field. The Dual Display cannot be run alongside the POS on screen one. |
Dual Display panels
The Dual Display program has three states where each state has its own panel.
Panels are part of the Interface Profile, and are explained in the Interface section.
Dual Display states:
- Offline: When no employee is logged into the POS.
- Sales: When the POS is in Sales Mode.
- Payment: When the POS is in Payment Mode, after Total has been pressed.
Each state has its own panel with these panel IDs:
- #DD-OFFLINE
- #DD-SALES
- #DD-PAYMENT
The Dual Display is only to display information so the Dual Display panels can only have controls of these types:
- Data Grid
- Button Pad
- Media
- Browser
Example of the ##DD-OFFLINE panel:

Example of the #DD-SALES Panel:

The #DD-PAYMENT panel appears on the Dual Display when the POS goes into Payment mode. It is possible to have it different from the #DD-SALES panel, but it can be the same and in that case it is easy to copy the #DD-SALES panel to #DD-PAYMENT.
Changing the Journal Data Table on the Dual Display
To update the Dual Display sales lines separately from the POS Terminal sales lines, a specific Interface Profile needs to be assigned to the Dual Display as well as a separate Journal Data Table.
To use a different data table for the Dual Display you need to do the following:
-
Open the POS Interface Profile List, and create a new Interface Profile for the Dual Display (for example #HYPER_DD):
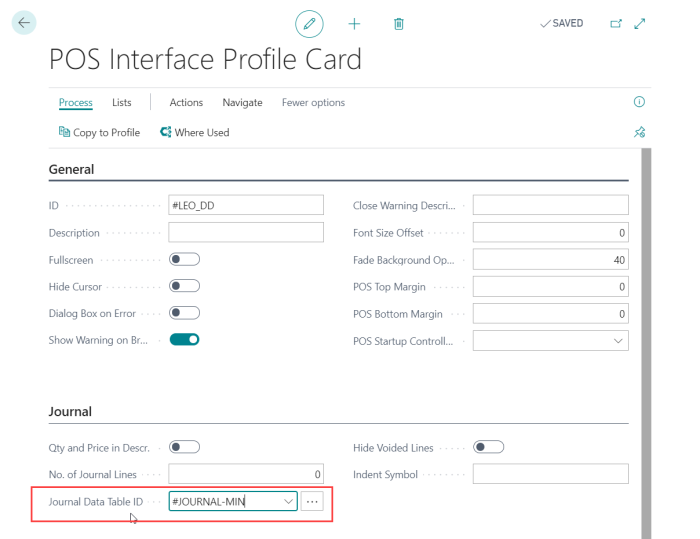
- On the Interface Profile Card created for the Dual Display, assign a new data table in the Journal Data Table IDfield (for example #JOURNAL-MIN).
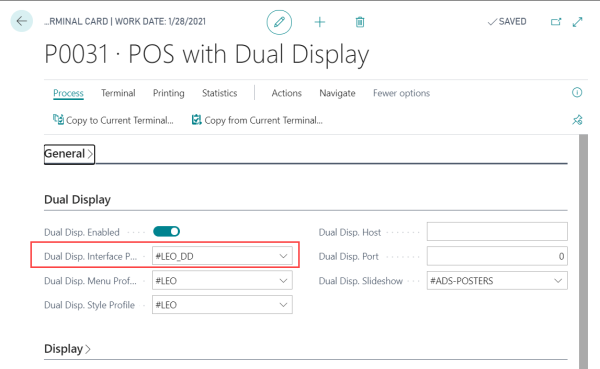
- Open the POS Terminal Card in use, and assign the new Interface Profile in the Dual Disp. Interface Profile field.
Now the sales lines on the POS and the Dual Display will update separately and show specified data for each journal as set up in the Data Tables assigned.
Sales Lines on the POS:
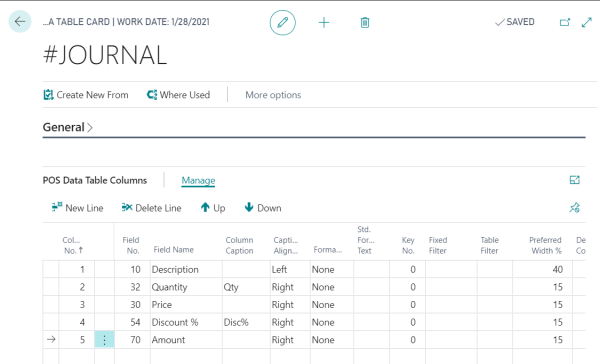
The POS Data Table Card for #JOURNAL:
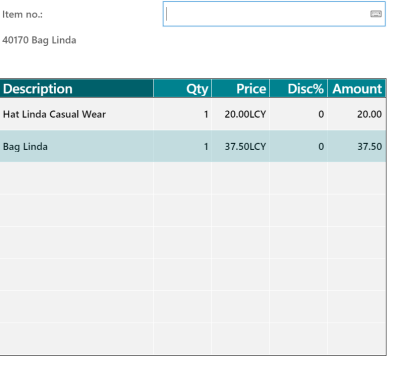
Sales Lines on the Dual Display:
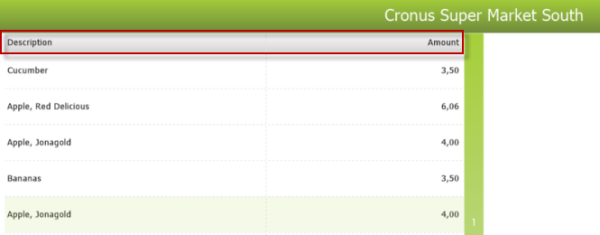
The POS Data Table Card for #JOURNAL-MIN:

See also