In this article
In the POS it is possible to edit the buttons and the grids.
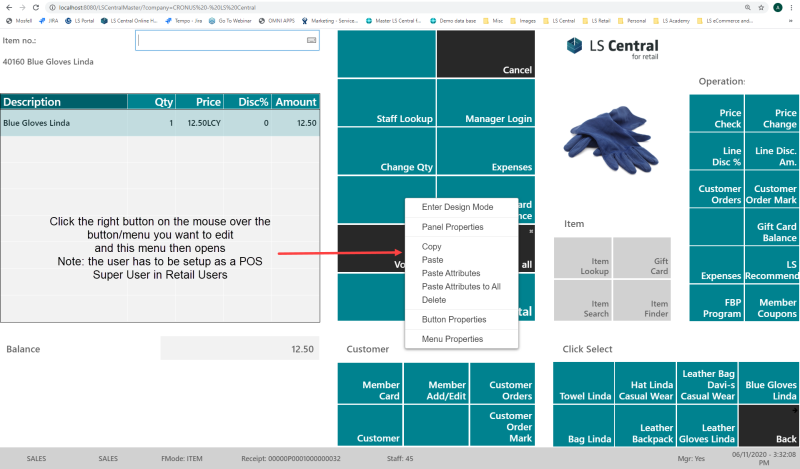
To edit a button/grid
- Place the cursor over the button/grid you wish to edit.
- Right-click the button.
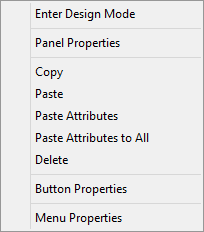
The possibilities, when the active part is a menu/button, are shown in the below image. Note: Other areas display a limited version of this menu:
It is possible to edit the data with these actions; the POS will update its look accordingly.
Tip: There is no Undo action available for the Design mode, so take care to save a copy of the different profiles before you start working. It is so easy to change and edit the POS setup in the Design mode.
| Function | Description |
|---|---|
| Enter Design Mode | Enters the design mode, gives controls for the setup data. |
| Panel Properties | Opens the POS Panel Card for the active panel. |
| Copy | Valid for the selected button. |
| Paste | Pastes the button that was copied with the Copy function for the selected button. |
| Paste attributes | Pastes the attributes for the button that was copied with the Copy function for the selected button. |
| Paste Attributes to All | Pastes the attributes for all the buttons in the menu which the selected button belongs to and which was copied with the Copy function for the selected button. |
| Delete | Delete the setup for the button. |
| Button Properties | Opens the POS Button Properties Card for the selected button. |
| Menu Properties | Opens the POS Menu Card for the active menu. |
To switch on the Design mode
- Select the option Enter Design Mode.
To exit Design mode
- Select the option Exit Design Mode.
The DESIGNMODE command is an On/Off command; the same command is used to start and exit the design mode.
- While in Design Mode, the POS indicates this with a watermark text.
- The different columns and rows are marked with red dotted lines.
