In this article
To open a Menu List for a profile
Copy and paste glyphs for POS menu lines
To open a Menu List for a profile
- Click the
 icon, enter POS Menu Profiles, and click Related - Profile - Menu List on the action menu.
Or
- Open the POS Menu Profiles list, double-click a profile, and click Lists - Menu List.
Or
- Click the icon, enter POS Menu List, and select the relevant link.
Note: The third and last option displays a list of all menus for all profiles, while the other options list up all menus for the selected profile.
Actions for a Menu Item
-
The Create New From action copies a menu to another menu, either to the same Menu Profile or another Menu Profile within the company.
- The Where Used action displays all the actions the selected menu is used in. There can be six different setups. The systems automatically activates the action depending on the type of the selected line.
Note: It is possible to edit the data that Where Used lists up by selecting the line and using the active action item for this line type.
Warning: It is not possible to rename a Menu item. This is due to technical reasons: a menu item with the same name can exists in many Menu Profiles.
Tip: To change the Menu ID for a menu, you must copy the menu to the new Menu ID and then delete the original Menu ID.
Tip: You can also use web templates for your item and deal POS menus.
A few points about menus
- Each Menu Profile has its Menu list; that is, different menus exist in different Menu Profiles.
- When one Menu ID exists in Menu Profiles, it does not mean that it is the same menu, the menu lines and settings can be different between Menu IDs.
- Menus, which are identical for all profiles, should be in Menu Profile ##DEFAULT and only exists in Menu Profile ##DEFAULT.
- Menu Profile ##DEFAULT should include all menus that are a base for the company, that is the menus that are identical to all Menu Profiles.
- When a menu has some specialty for a setup, it should be copied in a Menu Profile and changed there.
FastTabs
Each menu has many setups: fields and menu lines located in a these FastTabs:
| FastTab | Description |
|---|---|
| General | Setup options for the menu. |
| Menu Attributes | Fields for the menu’s attributes. |
| Sliding and Scrolling | Sliding and scrolling setup options. |
| Lines | The menu lines, the max number of them depends on what is set up in Menu Attributes. |
Tip: It is easy to move lines up and down with the Up and Down tools. Note: This tool keeps the order of the Key No.
Note: It is possible change the settings any time, next time the POS is loaded it will display the menu according to the settings.
General FastTab
| Field | Description |
|---|---|
| Pre-Execute Total | Needs to be true for payment menus which do not require the Total mode to be active. |
| Codeunit | If a codeunit is specified for a Panel, that codeunit’s RUN Trigger will be called when events are received from the POS Control. These events include Button Press events, Row Selection event, and Input events from devices like MSR, scanner, and so on. The specified codeunit will get a chance to process the event and stop it (mark as processed) before the system will process it. |
Menu attributes
Some of the fields on the FastTab:
| Field | Description |
|---|---|
| Min. Columns | Number of column for the menu. |
| Min. Rows | Number of rows for the menu. By entering number of columns and rows the user is in fact deciding the number of buttons for the menu |
| Button Spacing | Defines the space in pixels between the buttons. If the value is 0, the buttons are close to each other. |
| Popup Width | Defines the window width for the menu when it is used with the POS Command POPUP. The value is in pixels. Value 0 uses the default size of 400 pixels. |
| Popup Height | Defines the window height for the menu when it is used with POS Command POPUP. Value is in pixels. Value 0 uses the default size, 400 pixels |
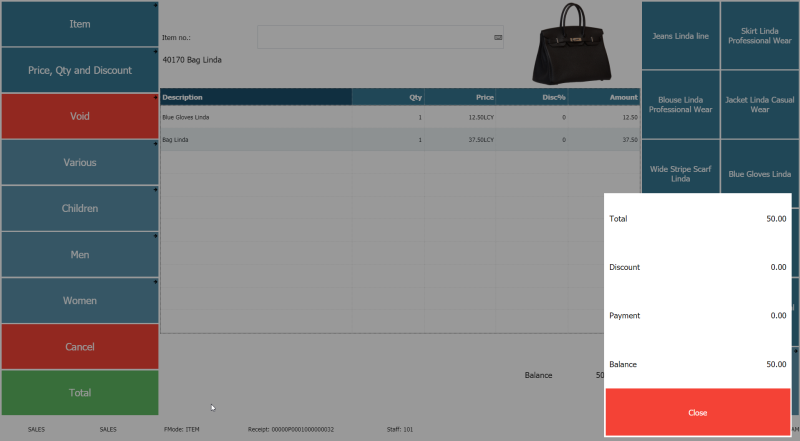
Example of a POPUP menu:
POS Command POPUP opens a menu that is set with the command in the field parameter.
Example of the POS command POPUP:
- This POS has only one Balance value. The Balance is set up as a button that is setup as a POPUP command with the menu METRO-ALL-POSTOTALS

To activate the pop-up menus, touch or click the Balance field.
Sliding and Scrolling

Lines
The Lines FastTab displays all lines within the menu. One menu line normally represents one menu button.
It is possible to define the menu lines so that some buttons can cover more than one menu line.
The columns in the Lines FastTab display only few of the settings for each menu button.

- Click the Assist button
 in each menu line to open the POS Button Properties card for the selected menu line.
The POS Button Properties card provides many possibilities for the Menu button.
- Command - the system has over 400 available POS commands to select from.
- Parameter - use the valid parameters for the POS Commands; it differs between POS Commands whether they have parameter options and which values they use.
- Set Skin and Font for the button.
- ColumnSpan and RowSpan - with these options it is possible to “enlarge” the button.
- With the Glyphs FastTab it is possible to display more information for the button.
- With the Picture FastTab it is possible to place a picture on the button.
- And many more options ...
Copy and paste glyphs for POS menu lines
It is possible to copy the glyphs from one menu line to another line that has been added to the POS Menu Lines.
To use this option, click the Manage action on the Lines FastTab, and select the relevant glyph action.
To copy glyphs from one menu line to another
- Select the menu line to copy glyphs from.
- Click the Copy Glyphs action.
- Select the glyph you wish to copy by selecting the relevant check box on the POS Button Glyphs page.
- Select the menu line where you wish to paste the glyphs.
- Click the Manage action, then click Paste Glyphs.
- Click Yes to confirm the paste action.
Menu Assignment
Menus can be assigned by different actions in the system:
- Menus are assigned in a POS menu.
- The Menu Lines can have commands to call a menu: POS Menu Profile
- Menus can be set up on the Menu Profile card; these menus are the menus for the #MAIN Button Pad Control.
- POS Permission Group Menu in the Menu Profile
Assignment for Permission Group Menus in the Menu Profile Card.
- POS Panel
Menus can be assigned into panel lines for dynamic control lines. Panels are part of the Interface Profile.
- POS Button Pad Control
A Menu is assigned to POS Button Pad Control. The Button Pad Control comes with the Interface Profile.
- POS Lookup
Menus are assigned for Lookup. Lookups are part of the Interface Profile.