In Magento, you can apply configurations specific to different scopes. Make sure you are in the required scope (default, website, or store view) to view and update the configurations that are only meant for that specific scope.
Click here for more information about Magento scopes and how to switch scopes.
This article describes configuration and setup fields in the following screens:
- Industry
- Configuration
- Replication
- Item Availability
- Customer Dashboard and Loyalty Elements
- Loyalty Points
- Coupons
- Gift Card
- Discount and Coupon Management
- Stores Listing
- Basket Calculation
- Magento Order Number Prefix
- Order Management
- Delivery and Pickup Date Management
- Return Policy
- Webhooks Configuration
- Restore
Industry

The table below lists the fields in the Industry screen:
| Field | Description |
|---|---|
| Choose Industry: | Option to show and update the relevant industry and all its dependent configurations to the current scope. The default value is Retail. |
Configuration
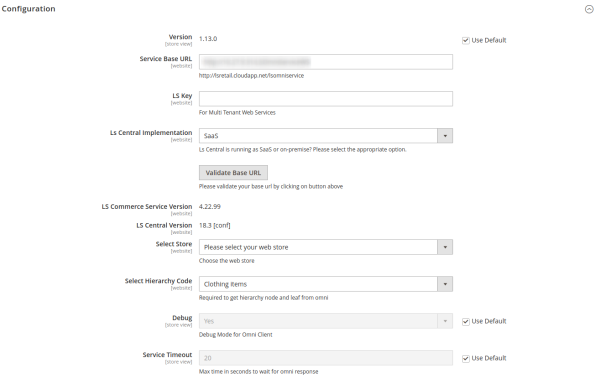
The table below lists the fields in the Configuration screen:
| Field | Description |
|---|---|
| Version: | Shows the version of eCommerce – Magento. |
| Service Base URL*: | This field specifies which Commerce or LS Central URL you want to connect with Magento. |
| LS Key: | This is a multi-tenant key that is used to secure the communication with Commerce in the cloud. You must create the LS Key on the Commerce end, and enter it here in order to authenticate all the communication from Magento to Commerce. If you do not want to use the key, just leave this field empty. |
| LS Central Implementation: | This drop-down menu lets merchants select the appropriate implementation of LS Central. The menu has two options, SaaS and On-premises. This configuration determines, if you need to pass a valid GUID for replication requests to properly support SaaS. |
| Omni Service Version: | Shows the version of Commerce being used for the integration. |
| LS Central Version: | Shows the version of LS Central being used for the integration. |
| Select Store*: | The store from LS Central that you want to use for eCommerce. |
| Select Hierarchy Code*: | The Hierarchy code you want to use for eCommerce. This is being used on the Magento to build the main navigation on the front end and the assignment of products in the categories and the relationship between the category trees. |
| Debug: | To log all the requests and responses sent and received from Commerce in the omniclient.log file located under var/log/omniclient.log file. Note: Default option is set to false. |
| Service Timeout: | This configuration lets you configure the maximum time to wait for the service to respond. Default value is 20 seconds. |
* Mandatory fields
Replication
This section provides various configurable options for the replication that you can use to control the speed of data.
All values need to be selected based on how fast or slow the Server can process the data in a single call.
The table below lists the fields in the Replication screen:
| Field | Description |
|---|---|
| Replicate All Stores Items: | Here you specify if you want to replicate all the items in LS Central or only those that are assigned to the selected store. The default value is No. |
| Manual Cron Grid Default Store: | Here you select which store you want to set as Default store in the listing of replication grids found in LS Retail - Replication Status in the left navigation menu. The default value is set to Default Store View in Magento. |
| Create attribute sets on the basis of: | Option to select the desired attribute set creation mechanism. The default value is Item Category Code. |
| Web Service List: | Option to add comma separated service names where you have identical tables and want to use the same db table but different cron job. |
| Default Batch Size: | Batch size for receiving the data from Commerce for all the replication calls. The default value is 2000. |
| Product Batch Size: | Batch size for processing of products from Flat to Magento tables. The default value is 30. |
| Product Attribute Batch Size: | Batch size for attributes creation in Magento. The default value is 1000. |
| Product Discount Batch Size: | Batch size for discounts processing from Flat to Magento. The default value is -1. |
| Product Inventory Batch Size: | Batch size for processing of product inventory from flat to Magento. The default value is 1000. |
| Product Prices Batch Size: | Batch size for processing of product prices from Flat to Magento. The default value is 1000. |
| Product Images Batch Size: | Batch size for processing of product images. The default value is 50. |
| Product Barcode Batch Size: | Batch size for the processing of product barcodes. The default value is 1000. |
| Variant Batch Size: | Batch size for the processing of product variants. The default value is 2000. |
| Product Assignment to Category Batch Size: | Batch size for the assignment of products into categories. The default value is 100. |
| Item Modifier Batch Size: | Batch size for processing modifier products from Flat to Magento tables. The default value is 200. |
| Item Recipe Batch Size: | Batch size for processing recipe products from Flat to Magento tables. The default value is 200. |
| Convert Attributes To Visual Swatch: | If enabled, attributes configured under Variant Attributes that Convert to Visual Swatch Type will be converted to Visual Swatch. |
| Variant Attributes that Convert to Visual Swatch Type: | List of attributes (in comma-separated format) to convert to Visual Swatch. |
| Data Translation Language Code: | Language code to be set in store view for data translation replication. |
Item Availability

The table below lists the fields in the Item Availability screen:
| Field | Description |
|---|---|
| Availability Check: | Live call to LS Central for Item Availability before adding an item to the cart. The default value is No. |
| Product Availability in Stores: | Option to show a link in the Product Detail page to see the availability of items in other physical stores with locations. The default value is Yes. |
| Display Stores: | Option to specify which types of stores need to be displayed on the item availability call on the Product Detail page. Available values are:
The default value is Show the Click and Collect stores only. |
Customer Dashboard and Loyalty Elements
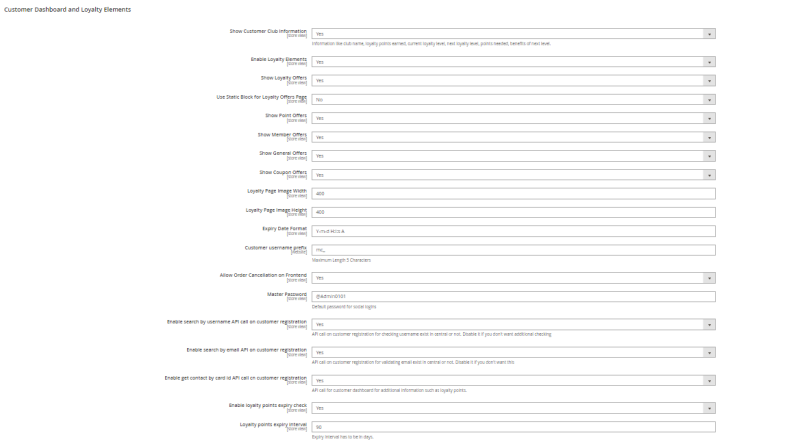
The table below lists the fields in the Customer Dashboard and Loyalty Elements screen:
| Field | Description |
|---|---|
| Show Customer Club Information: | Option to display customer club information on the My Account dashboard. |
| Enable Loyalty Elements: | Option to enable loyalty point details on customer account. |
| Show Loyalty Offers: | Option to enable a loyalty page link on the main menu on the front end for logged-in customers to view the offers. The default value is No. |
| Use Static Block for Loyalty Offers Page: | Indicates static block display is enabled (true) or disabled (false) for GraphQl. |
| Show Point Offers: | Option to show point offers. The default value is Yes. |
| Show Member Offers: | Option to show member specific offers. The default value is Yes. |
| Show General Offers: | Option to show general offers. The default value is Yes. |
| Show Coupon Offers: | Option to show coupon offers. The default value is Yes. |
| Loyalty Page Image Width: | Option to dynamically control the width of images on the loyalty page. The default value is 400. |
| Loyalty Page Image Height: | Option to dynamically control the height of images on the loyalty page. The default value is 400. |
| Expiry Date Format: | Option to dynamically control the date format in the offers. The default value is Y-m-d H:i:s A. For more information click here. |
| Customer username prefix: | Username prefix to be added during customer creation in LS Central. |
| Allow Order Cancellation on Frontend: | Option to enable or disable order cancellation from frontend. |
| Master Password: | Default password for social logins. |
| Enable search by username API call on customer registration: | Option to enable or disable an API call on customer registration for checking if a username exists in LS Central or not. Disable this option, if you do not want additional checking. |
| Enable search by email API on customer registration: | Option to enable or disable an API call on customer registration for validating if an email exists in LS Central or not. Disable this option, if you do not want this. |
| Enable get contact by card ID API call can customer registration: | Option to enable or disable an API call for a customer dashboard for additional information, such as loyalty points. |
| Enable loyalty points expiry check: | Option to enable or disable loyalty points expiry check. |
| Loyalty points expiry interval: | Interval value (in days) at which Loyalty points expire. |
Loyalty Points

The table below lists the fields in the Loyalty Points screen:
| Field | Description |
|---|---|
| Enable: | Option to enable or disable Loyalty Point elements in GraphQL. |
| Show on Cart Page: | Option to enable or disable Loyalty Point elements in the Cart page. |
| Show on Checkout Page: | Option to show Loyalty Point elements in the Checkout page. |
Coupons
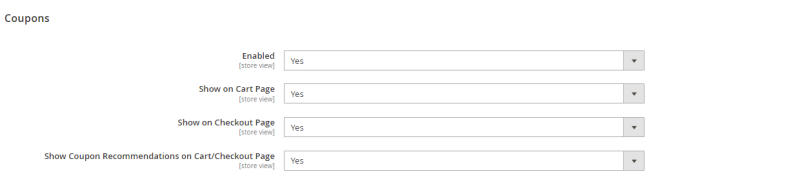
The table below lists the fields in the Coupons screen:
| Field | Description |
|---|---|
| Enable: | Option to enable or disable coupon elements in GraphQL or frontend. |
| Show on Cart Page: | Option to enable or disable coupons in the Cart page. |
| Show on Checkout Page: | Option to enable or disable coupons in the Checkout page. |
| Show Coupon Recommendations on Cart/Checkout Page: | Option to enable or disable Coupon Recommendations in the Cart and Checkout pages. |
| Enable loyalty points expiry check | Option to enable loyalty points expiry to be shown on customer dashboard. |
| Loyalty points expiry interval | Option to set how many points will be expire in near future. |
Gift Card

The table below lists the fields in the Gift Card screen:
| Field | Description |
|---|---|
| Enable: | Option to enable or disable gift card elements in GraphQL or frontend. |
| Show on Cart Page: | Option to show the Gift Card Redeem option on the Shopping Cart page. The default value is Yes. |
| Show on Checkout Page: | Option to show the Gift Card Redeem option on the Checkout page. The default value is Yes. |
| Show Pin Code Field | Option to show pin code field when applying gift card. |
Discount and Coupon Management
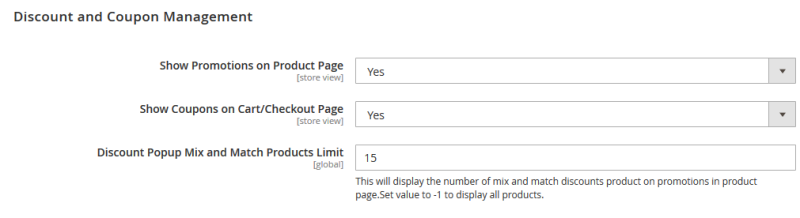
The table below lists the fields in the Discount and Coupon Management screen:
| Field | Description |
|---|---|
| Show Promotions on Product Page: | Option to show offers/coupons related to a specific product on the Product Detail page. The default value is Yes. |
| Show Coupons on Cart/Checkout Page: | Option to show the Gift card redeem option on the Shopping Cart page. The default value is Yes. |
| Discount Popup Mix and Match Products Limit: | Option to control the size of products displayed in Mix and Match promotion on the Product Detail page. The default value is 15. |
Stores Listing

The table below lists the fields in the Stores Listing screen:
| Field | Description |
|---|---|
| Opening Hours’ Time Format: | Controls the format of operating hours that are displayed in the Stores Listing page. The default value is 12 Hours. |
Basket Calculation

The table below lists the fields in the Basket Calculation screen:
| Field | Description |
|---|---|
| Calculate basket at: | Option to choose (between every cart update, once on checkout, or both) on which location Basket Calculation has to be triggered. |
Magento Order Number Prefix

The table below lists the fields in the Magento Order Number Prefix screen:
| Field | Description |
|---|---|
| Magento Order Number Prefix: | Configurable option in Admin to set the prefix of the Magento Order ID that is sent to LS Central in order to avoid sending duplicate IDs. This is useful when two or more Magento environments (staging/production) are connected to the same LS Central system. Default value is empty. |
Order Management
Since each mode of payment has a specific tender type assigned to it, it is very important to send a correct tender type ID for each payment line while making a request to create an order. Since you can enable a variety of payment methods in Magento, mapping is required between these payment methods and LS Central tender types. To serve this purpose, a configuration is available in Order Management:
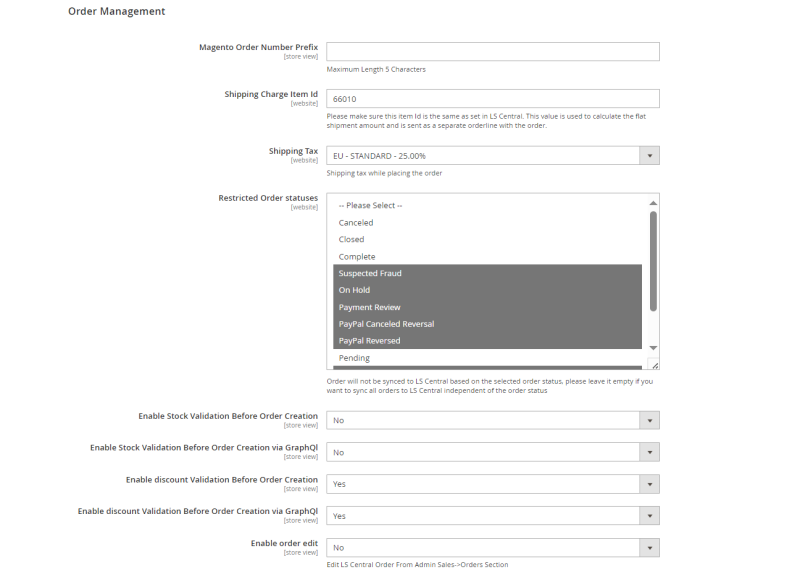
The table below lists the fields in the Order Management screen:
| Field | Description |
|---|---|
| Magento Order Number Prefix: | Option to set a prefix for orders placed from Magento stores. Each store can have different prefix. |
| Shipping Charge Item Id: | Item ID must be same as set in LS Central. This value is used to calculate the flat shipment amount and is sent as a separate orderline with the order. |
| Shipping Tax: | Shipping tax to be calculated while placing the order from Magento. The tax setup in LS Central is standard Microsoft Business Central configuration(for more details see here). Click here to see region specific tax setup in LS Central. |
| Payment methods: | These drop-down menus show all enabled payment methods plus gift cards and loyalty points. |
| Tender Types: | These drop-down menus show all replicated tender types coming from LS Central . |
| Restricted Order statuses: | Orders with selected order statuses will not be synced to LS Central. |
| Enable Stock Validation Before Order Creation: | Option to enable or disable stock validation before order creation from store front. |
| Enable Stock Validation Before Order Creation via GraphQl: | Option to enable or disable stock validation before order creation via GraphQL. |
| Enable Discount Validation Before Order Creation: | Option to enable or disable discount validation before order creation from store front. |
| Enable Discount Validation Before Order Creation via GraphQl: | Option to enable or disable discount validation before order creation via GraphQL. |
| Enable Order Edit: | Option to enable order edit in the Magento Admin order view page. Click Order Edit for more details. |
Delivery and Pickup Date Management
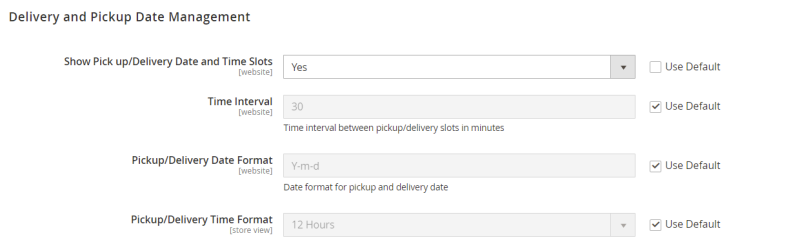
The table below lists the fields in the Delivery and Pickup Date Management screen:
| Field | Description |
|---|---|
| Show Pick up/Delivery Date and Time Slots: | Option to show or hide the Pickup/Delivery Date and Time Slots. |
| Time Interval: | Time interval between Pickup/Delivery slots in minutes. |
| Pickup/Delivery Date Format: | Date format for pickup and delivery date. |
| Pickup/Delivery Time Format: | 12/24 hour time format for pickup and delivery time. |
Return Policy

The table below lists the fields in the Return Policy screen:
| Field | Description |
|---|---|
| Return Policy: | Option to show or hide a link in product detail page for return policy. |
Webhooks Configuration
The table below lists the fields in the Webhooks Configuration screen:
| Field | Description |
|---|---|
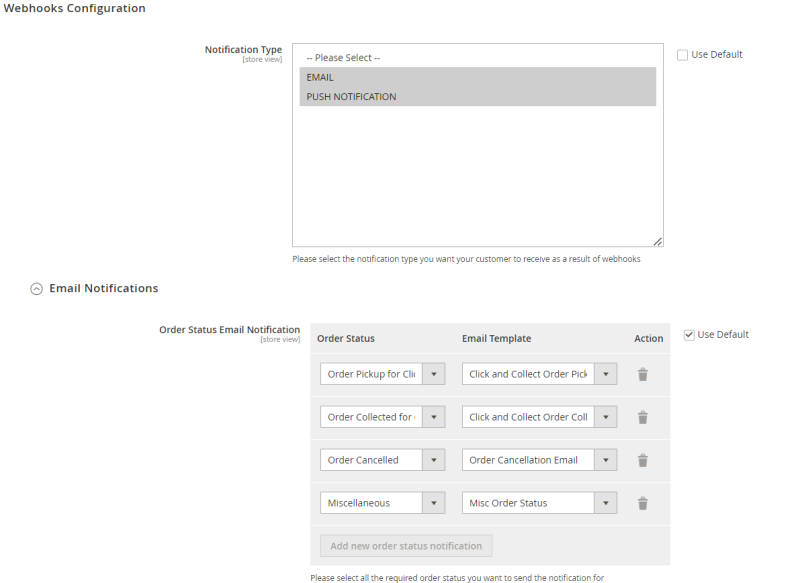
| Notification Type: | Option to select the notification type when an Order status is updated. There are two options, email notification or push notification. |
| Order Status Email Notification: | Option to select Order status and a corresponding email template to be used for the notification. |
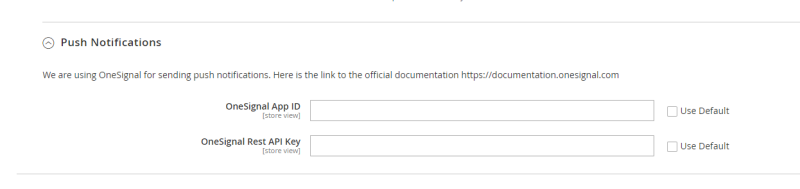
| Push Notifications: | Currently, OneSignal is used for push notification services. In order to use OneSignal you must create an account and set up the app. Then add the relevant App ID and Rest API Key. |
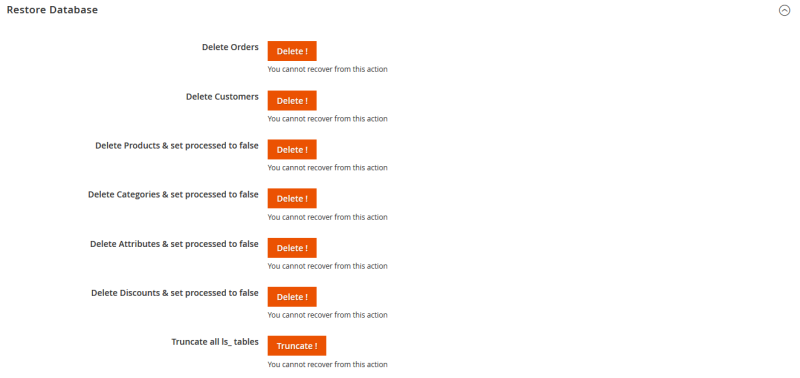
Restore Database
This screen has various replication options to reset the database for various areas.
Note: Use this screen for development purposes only.