In this article
This is the ScanPayGo app's main screen (see more details below):
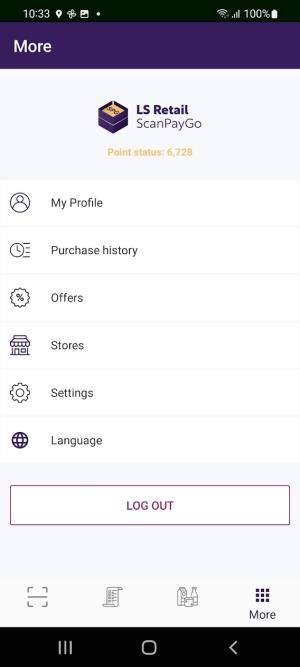
Header – the store
The demo version comes with the logo Nutrice. When retailers implement the ScanPayGo app, their partner changes the following for them:
- The logo
- Two main colors in the app.
User information
This part of the screen displays information about the app's users:
- The area shows if a member or loyalty user is not logged in.
- When members or loyalty users are logged in, their name and the status of the user's loyalty points are displayed here.
General operations
To use the options in this section of the main screen, tap the arrow to the right of each option.
Purchase History
Use this option to view your previous purchases, POS purchases, and ScanPayGo purchases.
Tap a purchase to see detailed information about the items that belong to the purchase.
You can also use the Move to Shopping List action in this screen to move selected item(s) to a shopping list.
Offers
This screen displays valid offers.
The General offers group displays the offers that are valid for all shoppers in the store.
The Personal offers group only displays offers that are valid for the currently active member or loyalty customer.
Stores
Use this option to see all stores in the company that are valid for the ScanPayGo app. This is set up in LS Central in the Store card.
Tap the Find Store option, and then tap a store to see more information.
The stores are listed in a sequence where the store next to the user’s location is at the top of the list. The app can display a map with this store’s location.
If you tap the store on the map, ScanPayGo displays the store’s opening hours with the option to display driving instructions as well.
Settings
The demo version of the ScanPayGo app is by default connected with the LS Retail demo setup for the LS Retail apps.
Server URL
Use this option to change the connection string and connect with another setup, for example a local setup you may want to connect with. You only need to replace the text mobiledemo.lsretail.com with your service name or IP address.
Note: When the app is being adjusted for individual retailers, make sure that this string is updated at the same time to connect with the setup for that retailer.
Ping
You can use the Ping option to check, if the app is connected with the setup that is specified in the Server URL field. The feedback PONG OK tells that the connection is good.
Selected Store
Here you can select the store where the shopper is shopping and put in the default store. The list of stores is arranged with the physically closest store at the top of the list and so on.
Login option
- Select the Login option to log into the app. The Login screen opens.
Here members or loyalty customers can log in by entering their login name and password.
Create Account
With this option you can create a new account, that is create new members or loyalty customers.
Note: The LS Central demo data company has a member club named Cronus-SPG. The club has a few members and loyalty customers that are ideal to use when connecting to the demo setup for ScanPayGo (see table below).
| Member Contact | Member Login | Password |
|---|---|---|
| Gregory Brown | gregory | gregory.1 |
| Gabrielle Houston | gabrielle | gabrielle.1 |
| Gitte Tomsen | gitte | gitte.1 |
| Grant Carson | grant | grant.1 |
Actions
The app has these actions:
 .
.
Shop
This action lets users start shopping, that is to scan items into their basket.
Here the Scan straight to the basket field, a toggle field in the right corner of the screen, offers two options:
- Field is disabled: scan, and the system displays the item with an expanded description, the html text. Shoppers can now decide, if they want to add the item to their basket or shopping list.
- The field is enabled: scan an item, and the item is put straight into the basket.
Shopping lists
This option lets you make your own shopping lists, as many as you like. There is also an option here to share individual shopping lists with others.
It is easy to add items to a shopping list. This can be done in
- Previous purchases
- From the item list
- By scanning an item directly into one of the lists.
Item hierarchy view
The Item view option makes it easy to browse the store’s items as they are grouped in a hierarchy the way the store wants to display them.
-
Tap an item to see expanded information about the item.
Tip: You can add an item to a shopping list from the Item view.
More screen
This option opens the first screen in the app where all options in ScanPayGo are displayed in a single screen.