The Mobile POS is set up in LS Central just like any other POS terminal. Certain specific setup, however, is required for using the Mobile POS. Most important are:
POS terminal
Each and every Mobile POS needs to be set up as POS Terminal in LS Central.
- In LS Central, go to the POS Terminal List and select an existing terminal, or click the New action to create a new one.
- In the Terminal Type field, select the Mobile POS option.
Note: If you are using the Member Management functionality, you must define a Functional profile for the Mobile POS.
Note: Setting up printing headers and footers on receipts is identical to other POSs.
In the Omni FastTab, go to Mobile License Registration where you can register the Mobile POS with the Device License Key you received from LS Retail.
Functional profile
Best practice is to set up and use a specific functional profile for the Mobile POS. When you are using the Mobile POS together with LS Retail's Member Management functionality, the Web Servers definition should have Local Request selected.
- Open POS Functionality Profile for the profile that POS is using.
- Select Related and Web Servers to activate the Local Request.
Note:This depends on each user’s setup. It is possible to export the #MOBILE functionality profile from the Demo Data and import it into your company.
Store Card
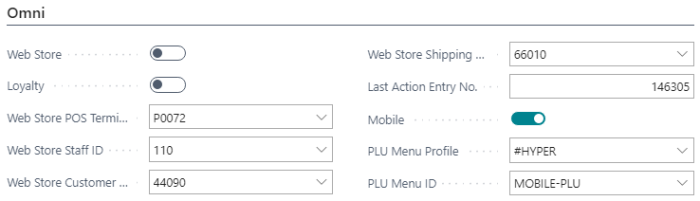
On the Store Card, the Omni FastTab holds the specific settings for the Mobile POS.
-
Select the Mobile check box.
The PLU menu is used to display frequently sold items. A Mobile POS-specific PLU menu is defined and the same PLU menu can then be used for all stores, or you can have one menu for each store to be used with the Mobile POS.
-
Select a PLU-menu for the Mobile POS in the PLU Menu Profile and PLU Menu ID fields.
The Last Action Entry No. field contains a replication counter that shows the last action in preparing data for the Mobile POS.
To display currency on the Mobile POS
The Mobile POS needs the default currency of the Company that is registered in the LCY Code field in the General Ledger Setup page.
-
Make sure to have local currency available under Retail Currencies with exchange rate 1.0 for all rate options.
The currency that is used to display prices on the Mobile POS is set according to the Currency Code selected in the Store Card's General FastTab.
If a currency code is not selected on the Store Card, the LCY Code from the General Ledger Setup is used.
You can specify the placement of the POS currency symbol for price amounts that are displayed in the Mobile POS:
- Go to the Retail Currency Card.
- In the POS Terminal FastTab, the Placement of Currency field, select either After the Amount or Before the Amount.
For example, if the price is 100 EUR and the value in the Placement Of Currency Symbol field is After the Amount, the Mobile POS displays 100 €. If, on the other hand, the value is Before the Amount, the amount is displayed as € 100.
The Rounding is decided on the Rounding tab of the same card. The rounding in sales lines is controlled by the field Amount Rounding Precision. On the traditional POS, the user has full control via Functionality Profile but for the Mobile POS this approach is considered the best solution. However, this can be implemented differently but if the user wants to do so it requires a change in the code.
Store Tender Type
The tender type that the mobile POS is going to use for payment needs to be
- Made valid for Mobile POS.
- This is configured within the tender type for the store the mobile POS is connecting with.
- Open the Tender Type card and select theValid on Mobile POS check box.
Note: The Mobile POS app has a limited number of tender types. Check if your tender type needs to be customized for the app.
Quick menu in Mobile POS
It is possible to have a quick menu in the Mobile POS.
This menu is set up as any other PLU menu and then it has to be linked on the Store Card in the Omni FastTab.