In this article
To set up Distribution Location
To set up for DD Push on the POS Functionality Profile
The purpose of DD Push is to push transactions done on the store POS to the Head Office.
The process is described below.
To set up Distribution Location
Depending on the setup, DD may be running on the POS itself or the Store Server, or only at the Head Office. When the POS pushes the transaction, it will send the transaction to the Sender Location which then forwards the job to the Receiver location that will process the data. Sender and Receiver can be the same if only DD is running at the Head Office.
You must set up the distribution location for both Head Office and an optional Store or POS (if any):
- Open the Distribution Location List, and set up a Head Office and Store.
- On the Distribution Location Card, fill in the fields for each one on these FastTabs:
Data Director FastTab
- Data Director Mode: TCP
- Distribution Server: DD Host name
- Server Port: if not using the default port (default is16860)
WS Distribution Server FastTab
- Distribution Server URL: http://localhost/DDWebService/
Replication FastTab
- Company Name: Central Company name
- User ID / Password: Log in for Central Database
- Db Server Name: SQL Server instance
- Db Path & Name: Database name
- Version: Type and version of database.
Web Server FastTab
- Web Server Computer Name: the name of localhost
- Web Server Port: for example 9047
- Web Server Name: the name of the server
- Web Service URI: automatically filled in from the above fields.
To set up for DD Push on the POS Functionality Profile
- Open the Store List, and locate your store.
- Locate the Functionality Profile in the Store General Information box, and click to select.
- Edit or create a new POS Functionality Profile.
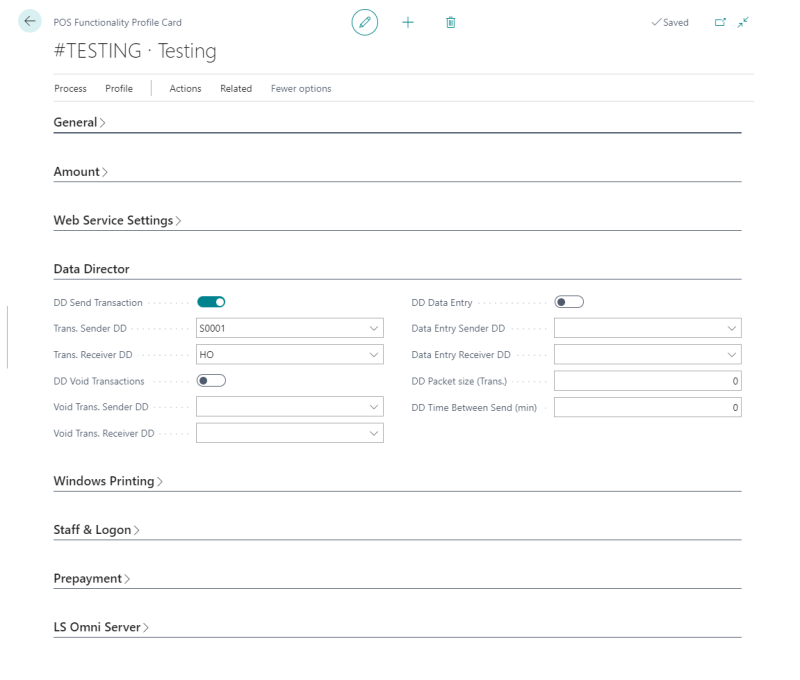
- In the Data Director FastTab, select the DD Send Transaction check box.
- In the Trans. Sender DD field, select Store/POS location, if any, or HO from the lookup list.
- In the Trans. Receiver DD field, select HO from the lookup list.
When you have completed the above steps, set up a Retail user and Run POS on the Store database to check that everything is working correctly.
- Open the Transaction Register on the HO database.
- Open the DD Job Monitor to see the transactions go through the DD.