Links can be added to nodes in a hierarchy. In LS Central there are two types of hierarchies:
- Item/Deal: For a hierarchy of this type you can add Item and Deal links.
- Store/Warehouse Loc./Customer: For a ierarchy of this type you can add Store, Store Group, Warehouse Location, Customer, and Customer Group Links.
Links can be added directly to nodes on the Hierarchy Node page:
- Click the
 icon, enter Hierarchy, and select the relevant link.
 - Select the hierarchy you want to work with, and click the Edit Hierarchy action.
- Select the node you want to work with, and then in the lower part of the page add the links for the node.
The following link types can also be added to Hierarchy Nodes directly from their respective list or card pages in BackOffice:
| To | Action |
|---|---|
| Add an Item to Hierarchy Nodes |
|
| Add a Deal to Hierarchy Nodes |
|
| Add a Store to Hierarchy Nodes |
|
| Add a Vendor to Hierarchy Nodes |
|
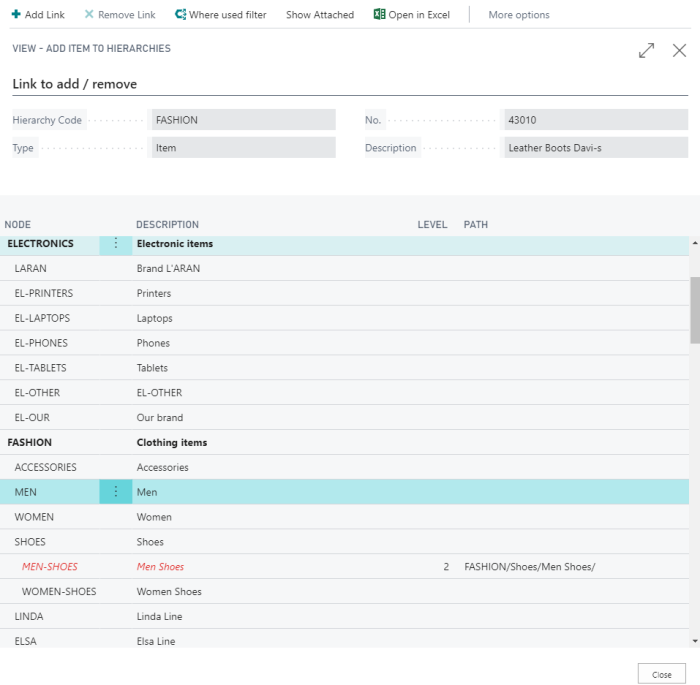
On the above mentioned cards (Retail Items, Deals, Stores, or Retail Vendor), click Actions - Hierarchies and then the relevant Hierarchies action (Item, Deal, Store, or Vendor to Hierarchies) to display the Hierarchies and Nodes page:

In this example there are two Hierarchies, ELECTRONICS and FASHION (bold lines). The red line means that there is already a link to the Shoes / Men-Shoes node in the FASHION Hierarchy.
The Link to add / remove FastTab contains details about the link that is being managed in this example. Some of the details are promoted as in this case a node was selected in the FASHION Hierarchy, and links are being processed for Item number 43010.
Nodes can be selected from all Hierarchies. Red lines represent nodes that are already linked. If you select a red line, the Remove Link action is enabled and the Add Link action is disabled.
To locate existing links to nodes, click the Where used filter action. The node names are then displayed, and when a node is selected the Hierarchy Code is updated in the Link to add / remove FastTab. Then, if you click Where used filter again, the Hierarchy is expanded.
Note: Only Hierarchies of the Store type are displayed when you are managing Store Links, and similarly, only Hierarchies of the Item/Deal type are displayed when managing Item and Deal links.
See also
How to: Bulk Insert Items and Deals to Hierarchy Nodes
How to: Bulk Insert Stores, Warehouses, and Customers to a Hierarchy Node