In this step you set up the Scheduler server. This needs to be either a physical computer or a VM (virtual machine) that is hosted either on-premises or in Azure.
This is the server that you use to run the scheduled replication from LS Central in-cloud (SaaS) to Analytics pre-staging tables.
For this you use LS Central on-premises and Data Director. LS Central keeps the schedule and the replication jobs and Data Director runs the job to move the data between the two databases.
Note: It is very important that this server is always running. If the server is not running when a job is scheduled to run, the job will not run and the data will not be replicated.
Hardware and software requirements
Minimum hardware requirements
The only hardware requirements for this server follow the requirements for the SQL server and the Business Central setup and Data Director setup.
The server must have:
- At least a four-core processor
- 16 GB RAM
- 50 GB hard drive or SSD
Minimum software requirements
Operating system:
- Windows 10 Pro, Enterprise, or Education (64-bit edition)
- Windows Server 2019 Standard, Essentials, or Datacenter
- Windows Server 2016 Standard, Essentials, or Datacenter
SQL server:
-
Microsoft SQL Server 2019 Express, Standard, or Enterprise. SQL server Express is sufficient here since this machine is not used to store any data (10 GB database limit).
If you already have a machine that you are using for other things and it is always on, you can use that machine as the scheduler service.
Note: The computer used for testing is a virtual machine on LS Retail company domain with these specs:
Hardware
- Intel® Xeon® Gold 6142 Processor 2.60 GHz
- 16 GB RAM
- 100 GB hard drive
Software
- Windows Server 2019 Standard
- Internet Information Services 10 (setup by Data Director setup)
- Data Director 3.2.102.7564
- SQL Server 2019 Express
- SQL Server Management Studio v18.5 (not essential but good for accessing Analytics Azure database, if needed)
Licensing
The customer will need an extra LS Central license for the Scheduler server. LS Retail Licensing has been selling license like this for the hybrid cloud server, but if you are not running hybrid cloud setup and want to set up Analytics, you can ask to buy an offline store license to supplement your SaaS license.
LS Central setup
The best way to set up LS Central on-premises that is quick to set up and easy to update is to get the Go Current (Update Service) installer from the LS Retail Portal (login required).
- Download the latest version of LS Central. This link will download the LS Central - Latest.exe file.
- Run the .exe file.
- Go Current will display the installation options.
- Select the top option to install LS Central with Demo Data or the next option to install LS Central for hotels with Demo Data if you are running LS Central for hotels in LS Central SaaS.
The only setup parameters you might need to change are the:
- SQL server, if the instance is a named instance. For example, if the server is SQL Express.
- License file.
- Start the installation. The installation will take between 1 or 2 hours.
- When the installation is completed, you can find the LS Central web client in your Windows Start menu and open LS Central from there.
NAS configuration
Set up Service Tier Administration
To check if you have Service Tier Administrator set up on the machine, type 'Service tier' in the Windows search field and it should pop up.
If it does not, you need to download it here. When you have gone through the setup and started the client, you should see a line for the Microsoft Dynamics 365 Business Central Server you have just installed. It should be called LS Central.
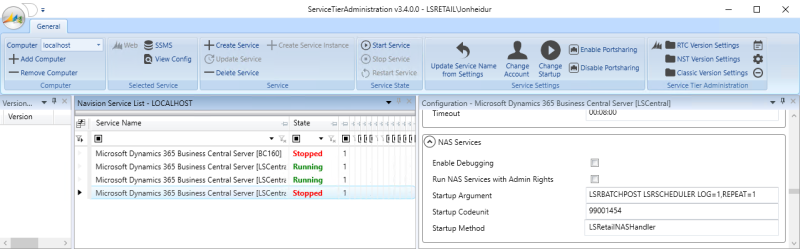
Configure NAS service
- Select that line (see above) and click Stop Service in the top ribbon.
- Once you have stopped the service, you need to locate the NAS Services configuration section on the right.
- If the parameters are empty and have not been set, enter the following information:
- Startup Argument: LSRBATCHPOST LSRSCHEDULER LOG=1,REPEAT=1
- Startup Codeunit: 99001454
- Startup Method: LSRetailNASHandler
If the NAS is in use, for example if you are using Hybrid cloud server, you need to be careful not to overwrite any existing settings.
If the TYPEFILTER parameter is set, for example like this: TYPEFILTER=MISC|DD, you need to add the LSINSIGHT typefilter to the setting like this:
- TYPEFILTER=MISC|DD|LSINSIGHT
Now you have the NAS Service settings in place, but you have yet to enable them in LS Central. This will be done later in the process.
Data Director setup
You can download the Data Director (DD) from the LS Retail Portal (login required). For replication to and from the cloud you need to use the new version of DD 3.2.102 or later. It is best to always use the latest version of the DD.
Find the Latest version folder and download the LS.DataDirector.3.02.XXX.Setup.exe. Once you have set up the DD, you will be able to access the documentation files from this folder: C:\Program Files (x86)\LS Retail\Data Director 3\docs, so you do not need to download them at this point, but it is always a good idea to familiarize yourself with software you have not used before by reading the documentation.
To set up the Data Director
- Run the LS.DataDirector.3.02.XXX.Setup.exe. On the first page, select a setup folder for the Data Director. We recommend keeping the default folder, if possible.
- Click Next to continue.
- In the task selection window, make sure that the top two check boxes and the bottom check box for Web service setup are selected.
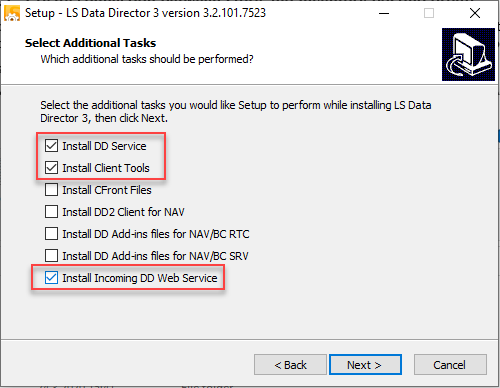
You do not need to install the other remaining tasks.
- Click Next to continue.
- Here you should keep the proposed Web site name and Web service name:
- Web Site name: Default Web Site
- Web Service name: DDWebService
The Web service name is used later in the LS Central web service setup.
- Click Finish when the installation is done.
- Click Install to start installation.
- Click Next to continue
- When the installation is complete, you need to open the DD Configuration tool as administrator:
- Select the App Config tab, and select the Use WS check box.
- Click the Save Config button.
- Click the Stop DD button.
- Click the Start DD button to restart the Data Director.
The Data Director setup is now ready for replication.