In this article
To set up menu types in the restaurant
Assigning a default menu type to an item
Assigning a default menu type to a deal
Assigning a default menu type to an item, product group, item category, or deal in one page
Assigning a default menu type to an item, product group, item category, or deal in one page
Using default menu types within a Hospitality type
Setting up menu type related commands in the Sales POS
Restaurant menu types in the Journal
Restaurant menu types indicate for example whether ordered items should be considered a starter, main course, or dessert. They are important to control which items are sent together to the kitchen for preparation in order for the items to be ready at the same time.
If menu types are used for taking orders, the item transaction line is marked with the item's (or deal's) default menu type (if any) on entry.
In the Sales POS you press a button to set an active menu type. All the items and/or deals selected will have this active menu type until you change the active menu type. This overrides any default menu types set.
You can mark lines and set or change the menu type for all of them.
You can also select a single line and set or change the menu type for it (no marking necessary).
You can let items that belong to the same menu type belong to their own KOT. The Menu Type Usage field controls this.
To set up menu types in the restaurant
- Open the Restaurants page and double-click the desired restaurant.
- Click the Hospitality action, then click Menu Types.
- Insert a new line for each menu type you want to create.
- Fill in the lines according to these instructions:
Field Description Order The order of the menu type. Decides in which order the menu types appear in pop-up windows. Description Description of the menu type. Code on POS A single letter denoting the menu type in the journal and on POS transaction lines. Clear Menu Type Indicates whether this menu type is used to clear the menu type on a line. The line will then have a blank menu type. Compress Menu Type If this field is selected and Compress when scanned is enabled in the active functionality profile, identical items with this default menu type are compressed when entered. Otherwise, the items are not compressed even if they have the same default menu type. This makes it possible to change the menu type later on.
Assigning a default menu type to an item
Note: If you have set an active menu type (the POPUPMENUTYPE command), this menu type is assigned to the order line, not the default menu type of the item or deal.
- Click the
 icon, enter Hospitality Item List, and select the relevant link.
 - Select the hospitality item you want to set a default menu type for.
- On the Hospitality Item Card, click the Master Data action, then click Default Menu Type.
- Click New to insert a new line.
- In the Restaurant No. field select the desired restaurant.
- In the Menu Type Order field, select the menu type that is default for this item.
- Repeat for each restaurant in question.
Assigning a default menu type to a deal
Deals can have default menu types as Items. When the deal is selected in the Sales POS and the active hospitality type is using default menu types for deals, the system automatically assigns the default menu type to the order line if there is no active menu type selected.
- Click the icon, enter Deal List, and select the relevant link.
- Select the deal you want to set a default menu type for.
- Click the Deal action, then click Default Menu Types.
- Click New to insert a new line.
- In the Restaurant No. field, select the desired restaurant.
- In the Menu Type Order field, select the menu type that is default for this item.
- Repeat for each restaurant in question.
Assigning a default menu type to an item, product group, item category, or deal in one page
Instead of assigning a default menu type to every single item, it is also possible to assign a default menu type to a product group or item category in one page for the selected restaurant. When an item is selected in the Sales POS and the item does not have a default menu type for itself, but the product group of the item has a default menu type, the system automatically assigns the default menu type to the order line if there is no active menu type selected. If the product group does not have a default menu type, the system checks for a default menu type assigned to the item category.
- Click the icon, enter Restaurant List, and select the relevant link.
- Select the restaurant you want to set default menu types for.
- Click the Hospitality action, then click Default Menu Type Assignment.
- Click New to insert a new line.
- In the Type field, select the desired type, Item, Product Group, Item Category, or Deal.
- In the No. field, select the desired item, product group, item category, or deal number.
- In the Menu Type Order field, select the menu type that is the default menu type.
- Repeat for each assignment in question.
Using default menu types within a Hospitality type
If you have assigned default menu types to your items and/or deals, you need to configure those hospitality types that use default menu types and how they are used in relation to kitchen printing/display.
- Go to the Hospitality Types list, and double-click the hospitality type you want to work with.
- In the Hospitality Type Card, the KDS FastTab, select the appropriate option in the Menu Type Usage field and the Menu Type Deal Usage field.
Setting up menu type related commands in the Sales POS
System preconditions:
- You have registered the Hospitality Module (see Basic Setup).
Commands used on menu buttons in the Sales POS regarding menu types:
| POPUPMENUTYPE (Menu Type) | Sets the active menu type for the following item or deal selections. It overrides the default menu type set for the item or deal. Can have Menu Type as parameter and the parameter constant CLEAR. |
| BOMMENTYPE (To Kitchen) | Sends the selected menu type(s) to the kitchen. Enables multi-selection of menu types with parameter MULTSEL. If you select more than one menu type, one KOT is created per menu type, if possible. Parameter ALL sends all lines regardless of menu types. The lines end up in one KOT, if possible. If printed, they are organized by menu type. Can have Menu Type as Parameter. |
| MTYPE_CHG (Change Menu Type) | Changes the menu types for the marked lines or the single line selected. Can have Menu Type as Parameter. |
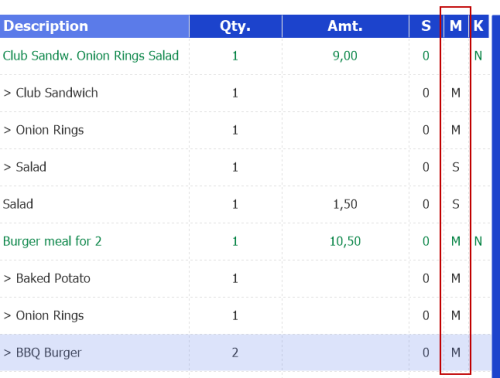
Restaurant menu types in the Journal
The M field in the journal data table is the Restaurant Menu Type Code in the POS Trans. Line table. The Club Sandwich deal does not have a default menu type, the deal lines have the same default menu type as a normal item. The Burger meal for 2 has M (Main course) as a deal default menu type. You can change the menu type for a specific deal line by selecting the line and pressing Change Menu Type.