In this article
To seat guests directly at a dining table (Timeline view)
To seat guests directly at a dining table (Graphical view)
To seat guests directly at a dining table (List view)
To seat guests from a reservation, waiting list, or walk-in entry with table or tables allocated
To seat guests from a reserved interval button (Timeline View)
To seat guests on multiple dining tables
You can seat guests in the Dining Allocation Panel in three ways:
- Directly at a free dining table (time range is the current time).
- From a selected reservation, waiting list, or walk-in entry (no table allocated, prompted to select a table).
- From a selected reservation, waiting list, or walk-in entry allocated to specific table(s).
Note: When you seat guests at a dining table, the system checks for upcoming reservations for the table. If there are any, the system's response is decided by how overlapping on allocation is set up in the Dining Area.
To seat guests directly at a dining table (Timeline view)
- With the Dining Allocation panel showing the current time (press TODAY if it doesn't), select the dining table button or the first or second interval button in the desired dining table's row (the dining table must be free).
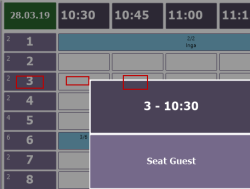
- Select Seat Guests from the drop-down list (if the number of guests is preset, select the number of guests you want to seat).
- Enter the number of guests in the numerical input panel (unless you already selected the preset number).
- Enter the guest name or ID (this may be optional). The table is now occupied. The program has created a walk-in reservation entry for the dining table.
To seat guests directly at a dining table (Graphical view)
- Select the desired dining table (the dining table must be free).
- Select Seat Guests from the drop-down list (if the number of guests is preset, select the number of guests you want to seat).
- Enter the number of guests in the numerical input panel (unless you already selected the preset number).
- Enter the guest name or ID (this may be optional). The table is now occupied. The program has created a walk-in reservation entry for the dining table.
To seat guests directly at a dining table (List view)
- Select the desired dining table's row and the Allocation Status column (the dining table must be free).
- Select Seat Guests from the drop-down list (if the number of guests is preset, select the number of guests you want to seat).
- Enter the number of guests in the numerical input panel (unless you already selected the preset number).
- Enter the guest name or ID (this may be optional). The table is now occupied. The program has created a walk-in reservation entry for the dining table.
To seat guests from a reservation, waiting list, or walk-in entry (no table allocated) (Timeline View)
- Select the desired reservation, waiting list, or walk-in entry row and the Table column.
- Select Seat Guests from the drop-down list. You are now in Seating mode.
The program changes the time range of the panel, if necessary, so that it starts from the present time. It shows only those dining tables and combined dining tables that have the minimum and maximum capacity suitable for the requested number of guests (the text Showing tables for x guests appears on a button).
- You can press Toggle View to see where the dining tables are situated graphically.
- You can set a Section filter to see only the tables in a specific section.
- You can press the Showing table for x guests button to remove the filtering and see all tables. You can press the same button again to filter on capacity again.
- To allocate the desired free dining table, you can either
- Select the table by pressing the Table button in the first column:

- Select an interval button in the dining table row as long as it is free. If the interval is not the first interval, the program will change the reservation time to the time of the first interval time.
- Select the table by pressing the Table button in the first column:
The dining table is now occupied and the reservation, waiting list, or walk-in entry has disappeared.
To seat guests from a reservation, waiting list, or walk-in entry with table or tables allocated
- Select the desired reservation, waiting list, or walk-in entry row and the Table column.
- Select Seat Guests from the drop-down list. This is only possible if the dining table(s) are free. If you are seating at more than one table, the system offers to join those tables together. The dining table(s) are now occupied and the entry has disappeared.
To seat guests from a reserved interval button (Timeline View)
- Select the desired reservation, waiting list, or walk-in entry row and the Table column.

- If the start of the reservation is within 30 minutes of the present time, you get to select Seat Guests from the drop-down list. This is only possible if the dining table(s) are free. If you are seating at more than one table, the system offers to join those tables together. The dining table(s) are now occupied and the entry has disappeared.
To seat guests on multiple dining tables
You can only seat guests at more than one table in the Allocation panel by allocating more than one table:
- Create a walk-in entry in the Allocation panel, allocate the necessary tables, and then seat the guests.
The program can join the tables together, if you like, otherwise the guests are split up between the tables. You can select how the system handles the joining by selecting the desired option in the Seating Multiple Table Allocations field in the dining area. If the seat capacity of the table(s) is less than the number of guests in the entry, the program's response is decided by the Cover Exceeds Capacity field in the Dining Area.
Note: You can also use the normal graphical table view to join the tables together and seat the guests at the main table.
See also
How to: Set Up the Seating Process