In this article
Understanding the differences
It is important to be aware of differences between the Update Service bundles and differences in the setup.
Differences in the Update Service bundles
In the older Hybrid Server model there were two different bundles to be created and imported in the Update Service Server:
- POS Master bundle
- POS bundle
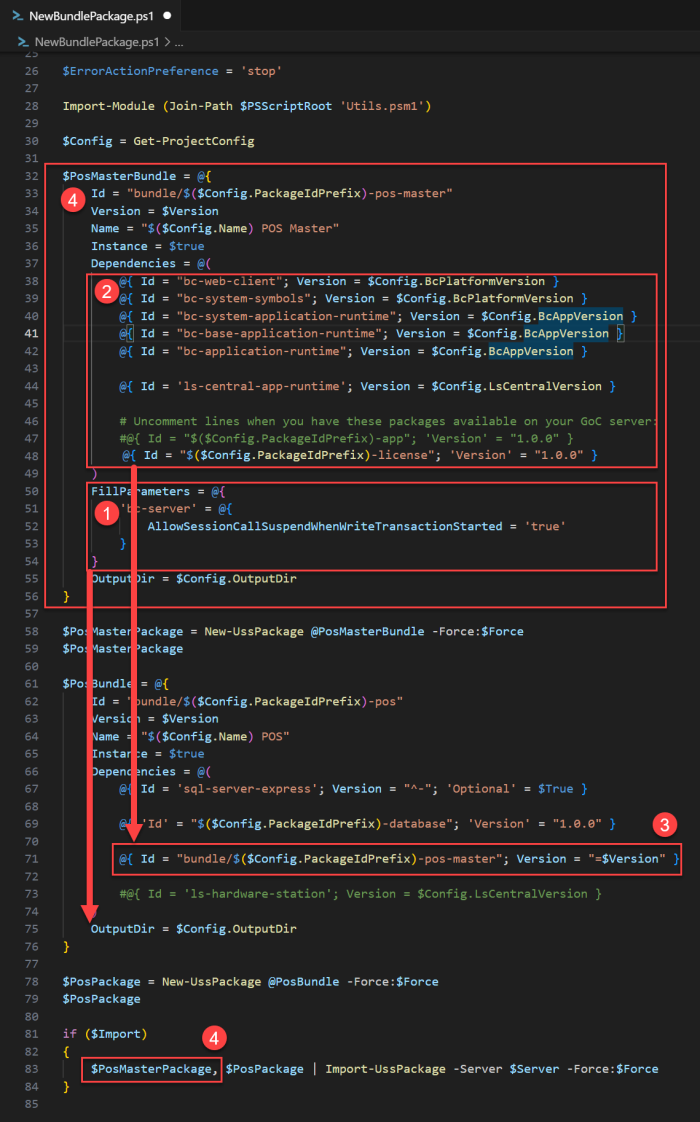
Looking at the NewBundlePackage.ps1 script you see that the POS bundle has a dependency on the POS Master bundle.
| POS Master bundle | POS bundle |
|---|---|
| @{ Id = 'sql-server-express'; Version = "^-"; 'Optional' = $True } | |
| @{ 'Id' = "$($Config.PackageIdPrefix)-database"; 'Version' = "1.0.0" } | |
| @{ Id = 'ls-hardware-station'; Version = $Config.LsCentralVersion } | |
| @{ Id = 'ls-central-appshell'; Version = '' } | |
| @{ Id = "bundle/$($Config.PackageIdPrefix)-pos-master"; Version = "=$Version" } | |
| @{ Id = "bc-web-client"; Version = $Config.BcPlatformVersion } | |
| @{ Id = "bc-application"; Version = $Config.BcAppVersion } | |
| @{ Id = 'ls-central-app-runtime'; Version = $Config.LsCentralVersion } | |
| @{ Id = "$($Config.PackageIdPrefix)-license"; 'Version' = "1.0.0" } |
For the Offline POS architecture, using Web Replication with Azure Storage, the POS Master bundle is no longer required.
This means that to handle the migration from Hybrid Server to the new Offline POS architecture, you should create a new version of the POS bundle and:
- remove the POS Master bundle dependency.
- include all the dependencies that were inherited from the POS Master bundle.
The new POS bundle version should look like this:
| POS bundle |
|---|
| @{ Id = 'sql-server-express'; Version = "^-"; 'Optional' = $True } |
| @{ 'Id' = "$($Config.PackageIdPrefix)-database"; 'Version' = "1.0.0" } |
| @{ Id = 'ls-hardware-station'; Version = $Config.LsCentralVersion } |
| @{ Id = 'ls-central-appshell'; Version = '' } |
| @{ Id = "bc-web-client"; Version = $Config.BcPlatformVersion } |
| @{ Id = "bc-application"; Version = $Config.BcAppVersion } |
| @{ Id = 'ls-central-app-runtime'; Version = $Config.LsCentralVersion } |
| @{ Id = "$($Config.PackageIdPrefix)-license"; 'Version' = "1.0.0" } |
The FillParameters part should also be copied from the POS Master bundle to the POS bundle.
Note: If your POS Master or POS bundle included other packages, you should include them in the new POS bundle version.
Differences in the setup (Hybrid Server vs Web Replication using Azure Storage)
On the POS
Note: The differences in the below instructions were identified in one particular environment. Based on your customer’s requirements and current setup, there may be other differences in your setup which you must adjust accordingly. For full details on the setup see Setup on the Offline POS .
-
Set the distribution location and store number to the current location.
- In the Retail Setup card, the General FastTab, specify:
- The current store in the Local Store No. field - although it is not needed for the replication, it is needed to run the POS terminal later.
- The current location in the Local Distribution Location field, for example DEVICE001.
- In the distribution location (the Local Distribution Location in the Retail Setup card), activate the Azure Storage Active field in the Distribution Location Card:

- In the Retail Setup card, the General FastTab, specify:
-
Set the distribution location to the Azure Storage Control Location (HO), to where the requests for new packages will be sent:
-
In the Scheduler Setup card, in the General FastTab, specify the control location in the Azure Storage Control Location field.
Note: In the distribution location for the Azure Storage Control Location (HO distribution location), you need to have the Web Server FastTab properly filled out for the POS to be able to connect to Head Office in SaaS.
-
-
Create the scheduler job to run the replication (AZSREPLUPDATE).
Migration steps
Step 1 - Create a new version for the POS bundle (and remove the POS Master bundle dependency)
Update the NewBundlePackage.ps1 script in the folder where you have the Hybrid Cloud Component project.
- Copy the FillParameters part to the POS bundle.
- Copy the dependencies from the POS Master bundle to the POS bundle.
- Delete the dependency to the POS Master bundle from the POS bundle.
- Delete the POS Master bundle related part from the script.
The final NewBundlePackage.ps1 script would look like this:
Note: Before running the script to generate the new version for POS bundle and to import it into Update Service Server, do not forget to increment the POS bundle version (in line 24).
When the changes have been made, create the new version for the bundle and import it into Update Service Server by running:
.\NewBundlePackage.ps1 -ImportAfter running the script, you can view the new version for the bundle on Update Service server, under Packages.
Step 2 - Update the POS to the new bundle version
Note: This should not change anything in the POS installation. It will only affect the meta data related to the instance, in the Update Service Client, removing the dependency to the POS Master bundle.
Follow the default procedure to update the POS to the new version of the bundle.
Step 3 - Review the setup on each POS
See Setup on the Offline POS .