In this article
Hybrid Cloud Components Project
Note: The IIS on the machine where the POSMaster is installed must be configured for the DD Webservice to install correctly. For more information, see Install and Configure IIS.
The next step is to install the needed components in the Hybrid Component Server (HCS), and we will be using Update Services for that.
If you have not download the Hybrid Component Server installer in Step 1, now is a good time to do that.
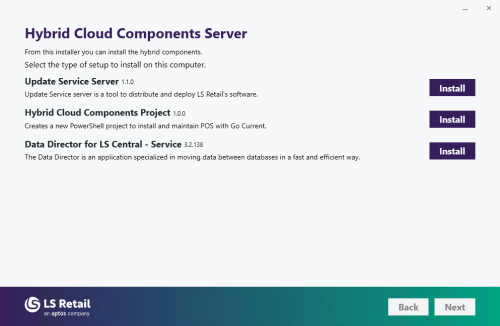
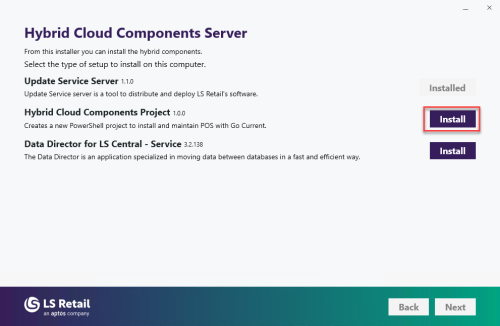
The Hybrid Component Server (HCS) installer was created using the LS Retail Update Service and contains the packages listed below:
- Update Service Server, which is the tool used to create the installer. It is a tool used to distribute and deploy LS Retail's software as well as your own software, Business Central extensions, licenses, and to manage environment updates.
- Hybrid Cloud Components Project, which includes a PowerShell project to install and maintain the Hybrid Server components as well as the POSs, using LS Retail Update Service.
- This includes the POS Master, that is the database that will be used to store all the master data needed to run the POS, that is going to be replicated from the Head Office (Cloud Master). This database can also be used when setting up a new POS installation. Specifically, this includes a Business Central Service Tier/Web Client and the POS Master database.
- LS Data Director Service, which handles the replication of master data from the Head Office (Cloud Master).
Run the Hybrid Component Server installer as Administrator and install the following components. Each part is installed separately:
Update Service Server
Select Optional Components
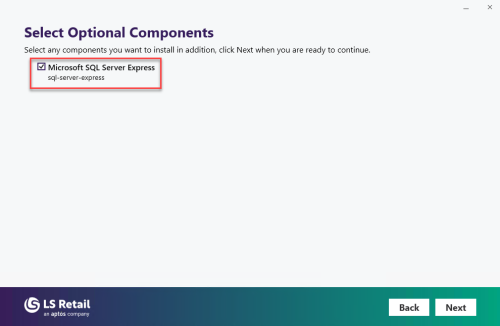
SQL Server Express is an optional component.
If the server does not have any SQL Server instance installed, or you are not going to use an SQL Server instance installed on a different server, you can choose to install a SQL Server Express instance.
Arguments
Microsoft SQL Server Express (only visible if installing SQL Server Express)
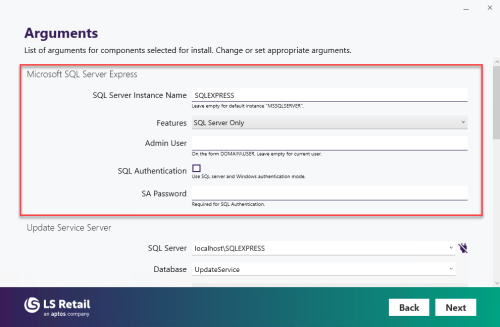
You will be presented with a set of fields to fill out:
- SQL Server Instance Name: Enter the SQL Server Instance Name. Should be filled in by default.
- Admin User: By default, leave this field empty and the current domain user will be set as the SQL Server administrator. Enter a different domain user, if needed.
- SQL Authentication: Enable this field to enable SQL Server Mixed Authentication mode.
- SA Password: Enter the password for the SA user. Required if the SQL Authentication (SQL Server Mixed Authentication mode) is enabled.
Update Service Server
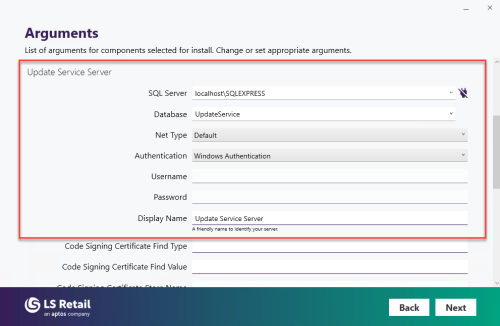
You will be presented with a set of fields to fill out. These fields will be used to connect the Update Service website in IIS to the Update Service database in the SQL Server.
- SQL Server: Enter the SQL Server name (and include the instance name, if it exists). Should be filled in by default.
- Database: Enter the name for the Update Service database. By default it is filled with UpdateService.
- Authentication: Select the authentication to be used to connect to the SQL Server:
- Windows Authentication - Windows Authentication mode will be used to connect to the SQL Server and to the Update Service database.
- Database Server Authentication - SQL Authentication mode will be used, so you need to fill the Username and Password fields.
- Username: Only applicable to Database Server Authentication.
- Password: Only applicable to Database Server Authentication.
- Display Name: Enter the name for the Update Service website created in IIS. By default , it is filled with Update Service Server.
Note: A connection string is created based on these fields, to allow the Update Service website to connect to the SQL Server. This information is saved in the appsettings.json file, in IIS (example: C:\inetpub\wwwroot\Update Service Server\appsettings.json)
Install completed
After the installation is successfully completed, run the Hybrid Component Server (HCS) installer again and proceed to the next package: Hybrid Cloud Components Project.
Hybrid Cloud Components Project
Select Optional Components

Click Next as the Update Service Server (former Go Current Server) has been installed previously.
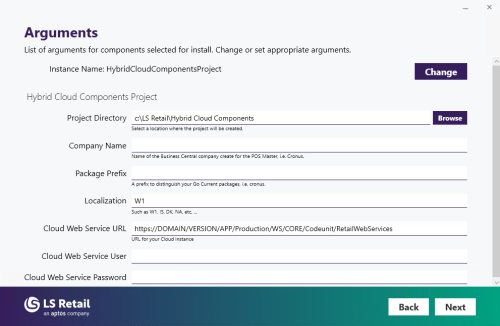
You are presented with a set of fields that you must fill out:
- Project Directory: Select a location where the project should be created. By default it is filled with C:\LS Retail\Hybrid Cloud Components.
- Company Name: Name of the company to be created in the POS Master database.
- This company will automatically created by the installer.
- The data will be replicated from the Head Office to this company in the POS Master database.
- Package Prefix: Any Update Service packages you create for this project will get this prefix.
- Using the customer or partner initials should work fine (example: lsr for LS Retail) or just use something like custom).
- Localization: Enter the localization code matching the Head Office instance in the cloud, such as W1, IS, DK, or NA, and so on.
- This is going to be used when setting up the database for the POS Master, on the Hybrid Components Server, to that the platform and application matches the same localization as on the Head Office.
- Cloud Web Service URL: The URL to the RetailWebServices web service endpoint, in your cloud instance.
- On Business Central Online, the expected format is: https://api.businesscentral.dynamics.com/<version>/<tenant id>/<environment name>/WS/<company name>/Codeunit/RetailWebServices
- Example: https://api.businesscentral.dynamics.com/v2.0/1c7cbf82-aa4a-49a5-97cf-4004dc33116f/Production/WS/Master%20Company/Codeunit/RetailWebServices
- If the environment is in the LS Retail ISV cluster, and the Application Family is still LS Central, then use https://lscentral.api.bc.dynamics.com/ as the base url instead.
- Cloud Web Service User: Enter the Application (Client) ID for the App created on the Azure Portal.
- Note: Microsoft deprecated the Web Service Access Key so you must enter the Application (Client) Id here, for the App Registration created in the AAD.
- See How to: Set Up an Azure Active Directory App.
- Cloud Web Service Password: Enter the Client Secret created for the App created on the Azure Portal.
Example:
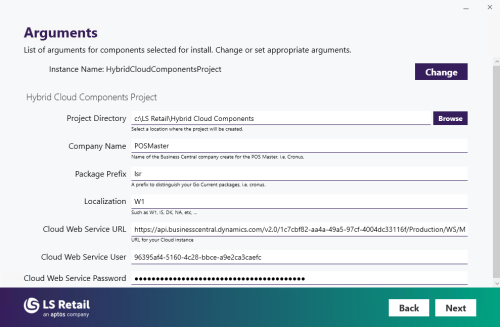
Note: You find the Cloud Web Service URL on the Web Services page in the Cloud Master database:

Install completed
After the installation is successfully completed, run the Hybrid Component Server (HCS) installer, and proceed to the next package: Data Director Service.
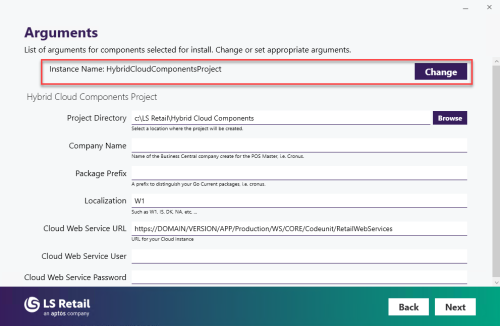
Note: When you run the Hybrid Component Server (HCS) installer again, notice that the Hybrid Cloud Components Project package is marked as Installed:
This is because the Hybrid Cloud Components Project is an instance based package, meaning that you can have multiple instances for the same package. Below, you see where you can change the Instance Name, if needed.
Data Director Service
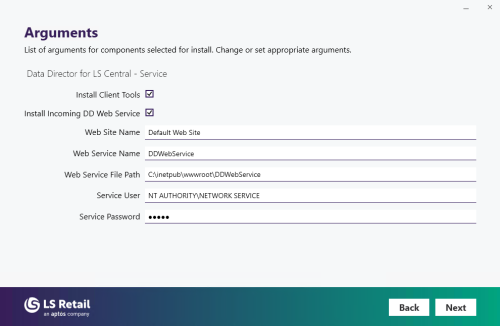
You are presented with a set of fields to fill out. Note: All the fields should be filled by default, and in a default installation there is no need to change them.
- Install Client Tools
- Install Incoming DD Web Service
- Web Site Name
- Web Service Name
- Web Service File Path
- Service User
- Service Password