For the Analytics data warehouse to be updated with fresh data from LS Central every day we need to schedule both the export and data factory pipeline run.
Schedule data Export
Lets start with the export. In LS Central Saas make sure you are located in the company you want to export from every day. If added more than one company to Analytics you need to repeat the steps below for all companies before continuing.
- Navigate to the Export to Azure Data Lake Storage page
- Click the Schedule Export action from the top menu.
- In the Schedule export panel
- Enter schedule description for example Daily export for Analytics
- Enter the start date / time (today at 11 pm for example - this should run after stores are closed and all posting is done)
- Set number of minutes between runs to 1440 (24 hours)
- Set recurrence to every day you want to export (you should export every day that stores are open)
- You do not have to set ExportCategory.
- Click OK and the panel closes and Scheduled run job queue entry has been created.
- You can open the job queue entry list to view the entry and from there you can also monitor whether the export is running every day.
Activate the Scheduled Run pipeline trigger
Now that the initial load of data from LS Central to Analytics is complete and you have set the export trigger, you can activate the scheduled trigger for the Scheduled run - BC2ADLS staging pipeline that moves data from the storage account to the Azure data warehouse:
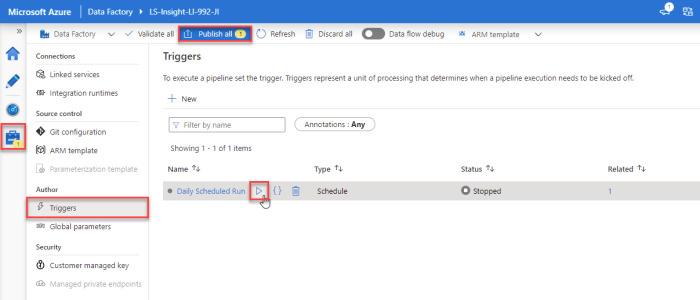
- In the Azure Data Factory (ADF), the Manage section, open Triggers from the left menu Author section.
- When the ADF was created, the Daily Scheduled Run trigger was added and set to start tomorrow at 1 AM (two hours after export schedule). To edit the trigger just open it by pressing the Daily Scheduled Run link and changing the start date and time and the timezone, if needed. You can also change the recurrence interval, but be aware that this will affect the cost of the service, shorter interval will increase the cost since more actions are run by the ADF. This is explained in more detail in the cost calculations.
- When you have set the schedule start date and time, you can either activate it by selecting Activated - Yes and then pressing OK, or by just pressing OK to close the Edit trigger window, hover over the Daily Scheduled Run trigger in the list and clicking the Play icon.
- Then select Publish all from the top menu, and Publish in the panel that opens, to commit the changes to the server.
Now the setup for Analytics Azure Data Factory and Data Warehouse is done and will run as the trigger schedule settings specify.
In the future, if you do not want to wait for the scheduled run, you can manually run the pipeline trigger, and edit the trigger schedule, if needed.
Tip: If you have data issues when you have connected the Power BI reports to Analytics, it is always a good idea to monitor how the pipeline run went.
As mentioned before, you need to keep the schedules in sync without the runs overlapping so it is good to have a couple of hours between the runs in the beginning but once you have feeling about how long each step takes you can optimize the time between the export, pipeline and report refresh schedules.
And how the only thing that is left is to connect the Power BI report templates to the data warehouse database and setup a refresh schedule which we will show in the next step.