In this article
Set up and configure Analytics
LS Retail ehf. has been testing a third-party solution as an alternative to setting up replication with Data Director for Analytics implementations with LS Central SaaS. The solution is a Business Central app called Ecodel Exclusive - Data Warehouse Connector and is available from AppSource. You can find more details and price information on the product website.
As this is a third-party solution, LS Retail does not take any responsibility for the quality of the data the Ecodel data warehouse connector app exports, but all our testing so far has been positive. If you have any questions or issues with the export you should direct those to Ecodel support.
To ease the export setup,a setting has been added to the Ecodel data warehouse app. With a button selection you can automatically load all tables and fields that are needed for Analytics to the export list.
This article also explains what needs to be done during and after the Analytics setup, for the Ecodel data warehouse to function as a source for Analytics.
Note: You can not switch the source of an existing Analytics data warehouse from LS Central to Ecodel data warehouse. You should always create a new Analytics environment.
Ecodel app and data warehouse
- Set up the Ecodel Exclusive - Data Warehouse Connector app in your LS Central SaaS environment (if you want to test it in a Sandbox first, you should of course do that), and create the database and storage account resources in Azure according to their setup instructions. A video is available from the AppSource page.
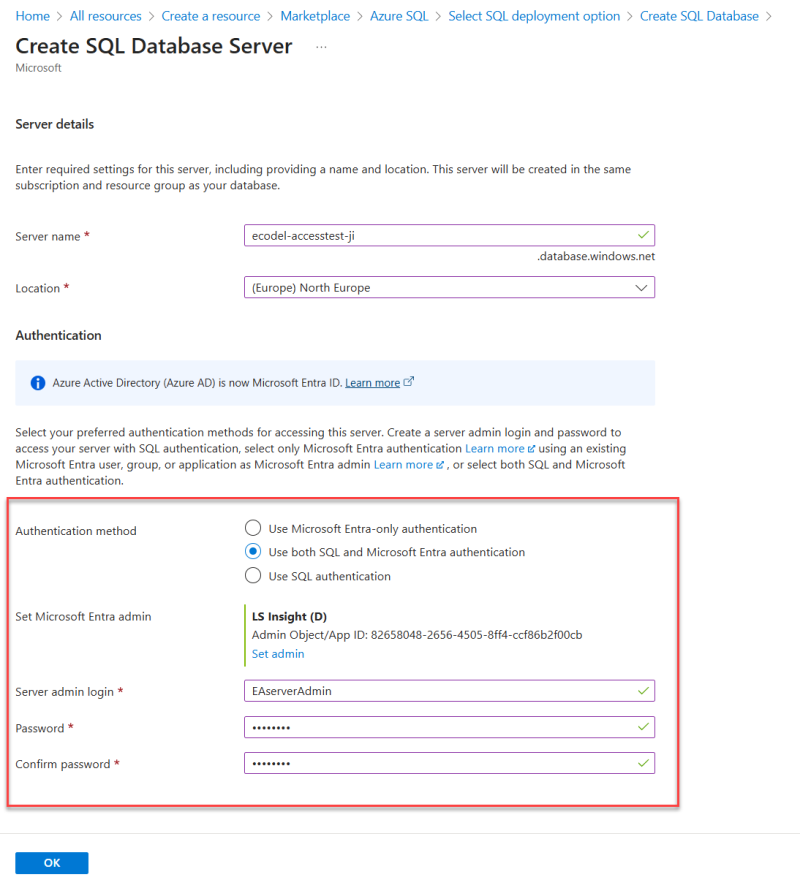
- If you want to setup a new SQL server in Azure and you want to use that server for both Ecodel data warehouse and the Analytics database you must select Authentication method - Use both SQL and Microsoft Entra authentication and then you must set a Microsoft Entra admin on the server (single user or group) and you also need to create a Server admin login and password. You need to do this because Ecodel database uses SQL login but Analytics uses managed identity and therefor you need Microsoft Entra authentication as well.

- If you only want to use the new server for Ecodel data warehouse then you should select SQL authentication like is stated it the setup video.
- If you want to setup a new SQL server in Azure and you want to use that server for both Ecodel data warehouse and the Analytics database you must select Authentication method - Use both SQL and Microsoft Entra authentication and then you must set a Microsoft Entra admin on the server (single user or group) and you also need to create a Server admin login and password. You need to do this because Ecodel database uses SQL login but Analytics uses managed identity and therefor you need Microsoft Entra authentication as well.
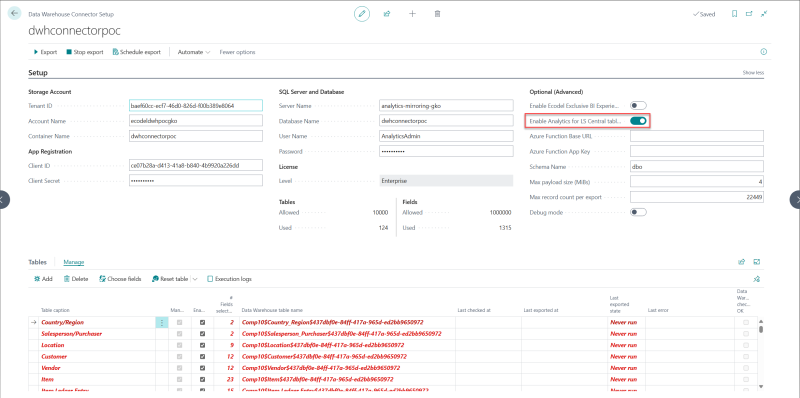
- When you have setup the app and configured the storage account, app registration and SQL server and database on the Data Warehouse Connector Setup page, as shown in the setup video, you can enable the Analytics for LS Central tables and fields by simply clicking the switch under Optional (Advanced) section in the Setup fast tab. All tables needed for standard Analytics tables will be added to the Tables list with the minimum fields selected. You can of course add more fields to the export if you want to extend Analytics, and you can also do this at a later point but then you will need to reset the table to get data for the added fields.

- Next, you need to schedule the export to run every half hour.
Note: You need to do this in every company you want to use data from in Analytics. - Now you just let the export run for one company at a time. To check if all data has been exported, you can query the [dbo].[BcDatawarehouseChecksums] table for row counts and checksums. The export exports the data 100.000 rows at a time, so it can take a while for the export to finish, if the tables are large. If there are any errors in the export, you should contact Ecodel support.
- While data is being exported, you need to run a script that adds the NAV App Installed Apps table on the Ecodel data warehouse database.
- When all data has been exported from LS Central to the Ecodel data warehouse database, you are ready to use the Ecodel data warehouse as a source for Analytics.
- Now that all tables have been fully exported from LS Central to the Ecodel data warehouse, you can set the Ecodel app to export as frequently or infrequently as you want.
We recommend exporting frequently throughout the day while transactions are being created, and then pausing after the store has closed and while the Analytics Scheduled run pipeline is running. You can also just schedule the export to run once a day if you have low transactional throughput. In that case you just have to make sure that the export has completed before the Analytics Scheduled run pipeline is run.
Set up and configure Analytics
Read through these instructions before starting the Analytics setup.
- Follow the setup instructions for Analytics with LS Central on-premises.
- Since you will be using the Ecodel Data warehouse as a source, you can skip the following steps in the setup wizard:
- Step 1 - Create SQL user in LS Central. This is not needed since you already have an admin user for the Ecodel data warehouse database that you will insert when the script prompts for credentials to LS Central.
- Step 3 - Setup gateway server. This is not needed since the Ecodel DW database is located in Azure and you will use AutoResolveIntegrationRuntime for the connection later on.
- Part of Step 6 - Setup gateway server section. This is not needed since the Ecodel DW database is located in Azure and you will use AutoResolveIntegrationRuntime for the connection later on.
- You need to have an Azure subscription and get the latest product package for Analytics. You can use the same Azure account, resource group, and server that you used when setting up the Ecodel data warehouse database.
- When the script prompts for LS Central source information, enter the information for the Ecodel data warehouse that you have created in Azure.
- Remember that when connecting to Azure SQL server you need to supply the server name with the .database.windows.net suffix.
- When the script prompts for Companies, you must enter the company name manually into the file. One company name per line, if you have more than one company you want to add. Make sure that the company name is written exactly like it is in the companies table in Business Central. Then save the file and follow the instructions in the script. The script then reads the file and asks you to confirm the company name(s).
- Do not run the initial load pipeline until you have completed the steps below.
- Since you will be using the Ecodel Data warehouse as a source, you can skip the following steps in the setup wizard:
- When the setup is complete and resources have been created in Azure, run the following scripts on the Analytics data warehouse database.
- Script to update AppAffixRegistry
- Scripts to update procedures with timestamp and duration fields, ACI Alerts and ACI Signals
- Script that updates Hospitality DetailedRevenuEntry stored procedure.
- In the Azure data factory you also need to do the following:
- Change the integration runtime used in the LSCentralSource linked service to the AutoResolveIntegrationRuntime instead of the Analytics-integrationRuntime.
- Test the connection to the Ecodel data warehouse.
- If test is successful you can continue, otherwise you need to check the parameters used in the linked service to connect to the Ecodel data warehouse.
- Test the connection to the Ecodel data warehouse.
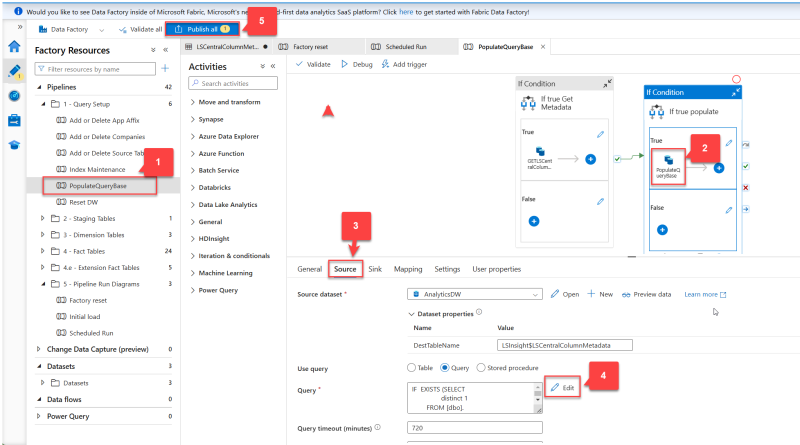
- Now follow the steps below to update the PopulateQueryBase pipeline query with the new sql query and publish the change:
- Open the PopulateQueryBasePipeline.
- Open the PopulateQueryBase copy activity by clicking it.
- Navigate to the Source tab.
- In the Source tab, click the Edit button by the query, and replace the query with the one from the document you downloaded. Click the OK button to save the changes.
- Publish the change to the data factory by selecting the Publish button in the top menu.

- Change the integration runtime used in the LSCentralSource linked service to the AutoResolveIntegrationRuntime instead of the Analytics-integrationRuntime.
-
Go back to the instructions, and find the Run the Initial load pipeline section, complete the steps, and then complete the rest of the steps in the onboarding process to set up a schedule for the Scheduled run pipeline and connect the Power BI reports.