In this article
Migration from Shopify LS Connector to Shopify BC Connector
To set up Shopify, start by going throuch the online help from Microsoft.
After completing the setup in Shopify and connecting your store to Microsoft Dynamics 365 Business Central, you can configure the integration by creating a Shop record on the Shopify Shop Card page. Each Shopify store must be added as an individual shop in Business Central, and each shop maintains its own connection details, synchronization preferences, and data‑mapping settings.
The connector supports multiple Shopify stores, allowing you to create additional shop cards as needed. Each shop can be configured independently with its own product mappings, customer handling rules, order import behavior, inventory synchronization logic, and pricing setup.
The Shopify Shop Card serves as the central configuration page, where you define how Business Central communicates with Shopify. LS Shopify Extension code has its seperate section of field that needs to be set.
The table below lists available LS fields on the page:
| LS Central Extension | |
|---|---|
| Store Code | Specifies the LS Store code, usually has same location as set for main location for Shopify web store. |
| API Url | Specifies the API Url for connecting to Shopify, same as URL above, except include version path too. Reason for have to set this again, is because the fields from Microsoft are blocked. Same goes with the Authentication process and API Key. |
| Shopify Client ID | Specifies the Shopify Client ID used for OAuth authentication to generate API Key. Temporarily used during authentication, the values will be removed after. |
| Shopify Client Secret | Specifies the Shopify Client Secret used for OAuth authentication.Temporarily used during authentication, the values will be removed after. |
| API Key | Specifies the API Key used to connect to Shopify. Key is either generated by providing Client Id/Secret and request access, or can be entered in this field. Key is stored securely but will not displayed in the API Key field after being entered. These fields are input-only fields, and the values cannot be viewed after input. |
| Line Discount Code | Specifies the line discount to use to register Shopify discounts. |
| Missing Contact Name | Specifies the default text used for missing customer first or last name. If empty, missing name will give an error. |
| Gift Card Code | Specifies the POS Data Entry to use for BC Gift Cards that will be sent to Shopify. |
| Gift Card Item No | Specifies the Gift Card Item No to be used when Gift Card is sold in Shopify order. |
| Use LS Variant Framwork | Specifies whether to use LS Variant framework to set up Variants for products, instead of using the BC variants. |
| Use MetaData Mapping | Specifies whether to enable LS MetaData mapping functionality for this Shopify Shop. |
| Include Attributes in MetaData | Specifies whether to include Product attributes as LS MetaData when synchronizing products to Shopify. |
| Order Create Member Contacts | Specifies whether to create Member contacts from new incoming orders. |
| Shopify Can Update Contacts | Specifies whether Shopify can update Member contacts when synchronizing from Shopify. |
| Use POS for Local Delivery | Specifies whether to ship orders from LS POS. |
| Ship CAC Orders | Specifies whether if always mark Click and Collect orders to be shipped, not picked up. |
| Post Sales Order | Specifies whether to post Sales order when order has been fulfilled in Shopify. |
| Post Fulfillments | Specifies whether to post fulfillments for Sales orders made from LS Customer orders. |
| Send Payment WebHook | Specifies whether to send Pre Auth payment web hook to shopify to finalize payment. |
| Full Capture Payment | Specifies whether to when Send Payment is checked, Web Hook should request full capture payment. This option depends on payment providers. |
| Send POS Returns | Specifies whether to send returns, for Shopify order, made on LS Pos and create Shopify return order. |
| Use Variant Description | Specifies whether to display the variant description instead of the variant code for Shopify options. |
LS Central Extension
Set up all necessary settings based on Microsoft BC Shopify help. Settings that affect the LS Central code are:
- Locations:This is used for Click and Collect orders to route orders to the correct Store in Business Central or to route Smart order routing orders to the correct Store.
- Shipment Method Mapping: Used to set Shipping Agent in Customer order.
Click Actions in the menu toolbar, and open the LS Central Extension menu.
Request Access
This is same as the one done in standard BC Shopify but just for LS Central code to have access to Shopify. Fill out Client Id and Secret, run Request Access, and API Key value will be generated and is stored but will not be visible in the API key field. These fields are input-only fields, and the values cannot be viewed after being entered. If the API key is known, you can just put it in the API Key field, and skip the Request Access part.
Tender Type
This is same mapping as Payment Method Mapping, but due to access restriction, this needs to be set again. Use same values in this mapping and map to correct Tender type in Business Central.
In demo mode, Gateway is BOGUS.

Meta Data
Sets up Mapping of a field in Business Central tables to Shopify Meta Data entry. Fields from Product and Customer tables can be used and all fields in related tables to those (with relationship mapping to Product or Customer). This is addition to the Meta Data mapping in BC Shopify which is not linked to Table and fields.
Attribute names can be mapped to different Meta Data entries names, if no mapping is done the default Attribute name is used. If Include Attributes in MetaData is NOT selected, only those attributes that have been mapped, with default name or renamed, are sent to Shopify as Meta Data entry. For more information, refer to Metafields.
Note: All Meta Data is created under the lsretail namespace in Shopify.
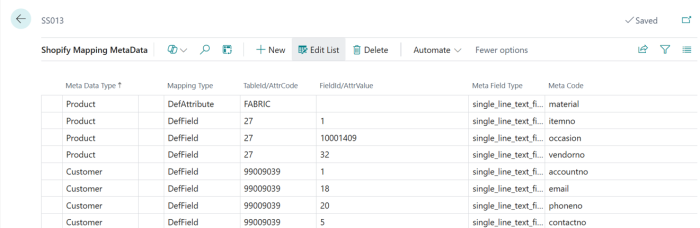
- Meta Data Type: Type of Shopify Meta Data
- Meta Field Type: Shopify Meta Type
- Mapping Type: Rename Attribute name (DefAttribute) or use data from Field in a Table (DefField)
- DefAttribute:
- Index Field: Attribute name to rename.
- Meta Code: Shopify meta data name to use for attribute.
- DefField:
- Index Field: Table ID.
- Index Value: Field ID to get data from.
- Meta Code: Shopify meta data name to use for field data.
Images
Mapping LS Retail Images to Shopify Images. Use this to send images for Item Variant Framework and other extra Item images, as Business Central Shopify does only send one image for the item to Shopify.
This view is only for maintenance purposes or to fix broken links as it gets filled out when LS Images are sent to Shopify. The whole mapping can be cleared for resetting the mapping between the two systems. Can be useful during testing or implementation.
Migration from Shopify LS Connector to Shopify BC Connector
The migration process involves using an existing LS Shopify store as the source environment, preparing a new Shopify shop in Business Central, and transferring data from the Shopify LS Connector into the Shopify Business Central Connector.
- Click Actions in the menu toolbar, and open the LS Central Extension - Migration menu.
The migration menu has these actions:
| Action | Description |
|---|---|
| Migration - Products | Migrates products from the Shopify LS Connector to Shopify Business Central Connector. |
| Migration - Images | Migrates images from the Shopify LS Connector to Shopify Business Central Connector. |
| Migration - Meta Data | Migrates meta data from the Shopify LS Connector to Shopify Business Central Connector. |
| Migration - Tender Type | Migrates tender type from the Shopify LS Connector to Shopify Business Central Connector. |
| Migration - Orders | Migrates unprocessed orders from the Shopify LS Connector to Shopify Business Central Connector, and scans all Shopify orders to update Customer and Sales Order numbers when matching records are found. |
Migration Process:
-
Prepare the Source Environment
Set up a new LS Shopify store or use an existing LS Shopify store containing the required standard data and mappings.This store serves as the source environment for the migration.
-
Create the Destination Shopify Shop
Create a new Shopify Shop in Business Central to serve as the destination for the migrated data.
-
Align Store Numbers
Assign the same Store Number used in the LS Shopify store to ensure correct alignment during the migration process. Complete the Business Central Shopify Shop without manually importing any LS data such as products, metadata, or mappings.
-
Run the Migration
From the Shopify Shop Card, initiate the migration by navigating to:
Action - LS Central Extension - Migration
Run the required migration steps individually from the Migration menu:
- Products – Migrates items and item variants mappings.
- Images – Migrates items and item variants images.
- Meta Data – Migrates metadata and attributes configuration.
- Tender Types – Migrates tender type mappings.
Each migration option executes independently and migrates its corresponding data from from LS to Business Central
Note: It is recommended to complete data migrations before proceeding with order migration.
-
Verify Migrated Data
Verify that products, images, meta data and tender type data have been successfully transferred to Business Central.
-
Retrieve Shopify Orders
To pull open or unprocessed orders from LS Shopify to Business Central, navigate to the Shopify Orders page and select Sync Orders From Shopify.
-
Migrate Orders
Run the migration for unprocessed orders by selecting Action - LS Central Extension - Migration - Orders. Verify that corresponding Customer Orders exist in LS Central.
-
Post‑Migration Testing
Perform basic testing by updating a product, creating an order, and running synchronization to confirm that the new setup; Shopify Business Central Connector is functioning correctly.