In this article
To Send Product Metafields to Shopify
To Send Customer Metafields to Shopify
To delete Metafields in Shopify
eCommerce - Shopify Business Central Connector provides a feature to sync metadata (metafields) from Business Central to Shopify for products and customers.
Metafields Usage
Metafields in Business Central allow additional product data to be passed to Shopify. To utilize this functionality, it is critical to understand the role of metadata settings and how attributes and custom fields interact with metafield configurations.
The metafield feature can be activated by enabling the Use MetaData Mapping option. If attributes need to be included automatically, the Include Attributes in MetaData option can also be enabled. However, these are distinct settings:
- Enabling Use MetaData Mapping is mandatory if any metafield functionality is required. This single option enables metadata synchronization for both products and customers.
- Enabling Include Attributes in MetaData is optional and should only be enabled if item attributes should automatically be pushed as metafields.
Additionally, there is an option to include attributes in the HTML. If desired, both the metafield and HTML inclusion settings can be enabled for full visibility on the storefront and in structured data.
Initial Configuration
To begin using metafields, the following options in Business Central must be correctly configured:
1.Product
- Enable Use MetaData Mapping — This is required to allow sending any metadata to Shopify.
- Disable Include Attributes in MetaData — Optional. If enabled, it automatically includes all item attributes as metadata.
Note: You only need to enable Include Attributes in MetaData if you want all item attributes to be sent automatically as part of the metafield. Otherwise, you can manually map and send only specific fields.
2.Customer
- The Use MetaData Mapping option enabled in the Product section above also enables metadata synchronization for customers — there is no separate customer-specific option.
-
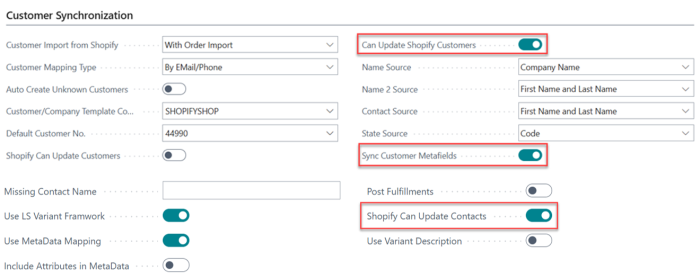
Enable Can Update Shopify Customers — Specifies whether D365BC can update customers when synchronizing to Shopify.
-
Enable Shopify Can Update Contacts — Specifies whether Shopify can update Member contacts when synchronizing from Shopify.
To Send Product Metafields to Shopify
Method 1: Configure mapping in Business Central, then send to Shopify.
- We start by opening the Shopify Shop card page. In the LS Central Extension FastTab, enable Use MetaData Mapping.
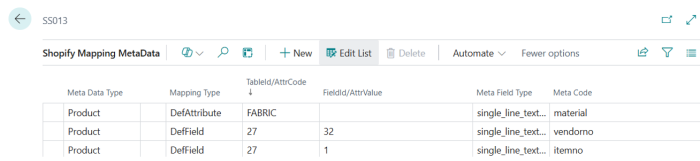
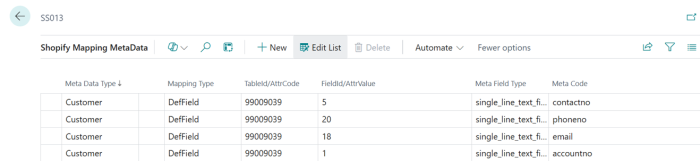
- Then, navigate to Action - LS Central Extension - Meta Data which opens the Shopify Mapping MetaData page in Business Central, where you can map data fields to Shopify metafields.
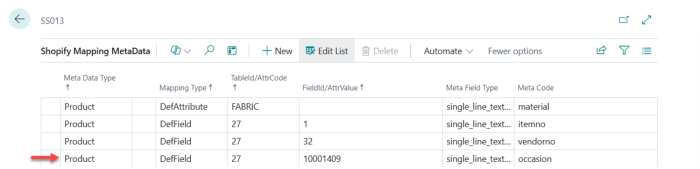
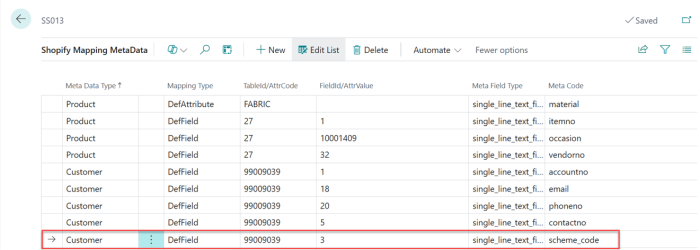
- Put BC table Id and Field Id of the value that should appear in Shopify as metafield. This defines how data from Business Central is transferred and displayed in your Shopify store. Refer the screenshot below for a sample configuration of metafield mappings in Business Central. Put as DefField, Table Id number in TableId/AttrCode and Field Id number in FieldId/AttrValue and metafield name in Meta Code. Any field from Item table (27) can be used and also any field from a table that has Item No. relation to Item table. Attributes can also be renamed instead of using the Attribute name. Put DefAttribute with Attribute name in TableId/AttrCode and the metadata name that should be used in Shopify in Meta Code.
- After completing the mapping, return to the Shopify Shop Card page. Click Related - Products - Synchronization - LS MetaData to send the mapped metafields for the specific item (e.g. 40170 – Bag Linda) to Shopify.
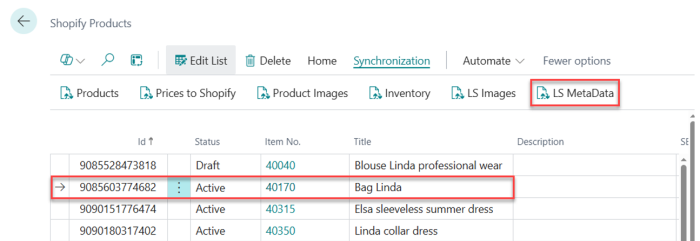
Note: Select the relevant item row first, then click LS Metadata.
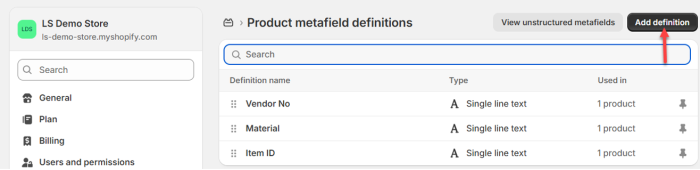
- Open the Shopify Admin, and navigate to Settings - Metafields and metaobjects - Products. Click View unstructured metafields, then add a definition for each metafield key that was successfully synced from Business Central and click Save.
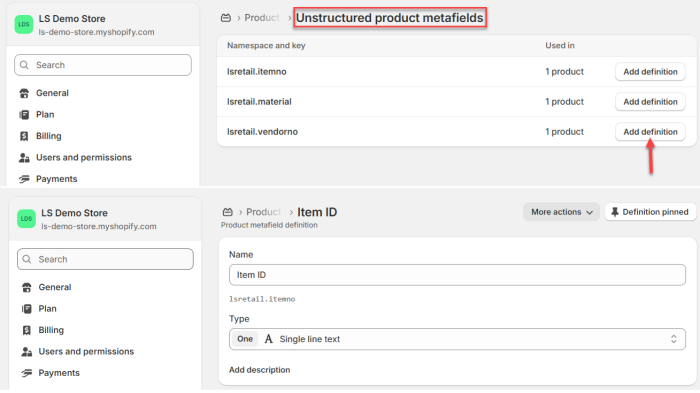
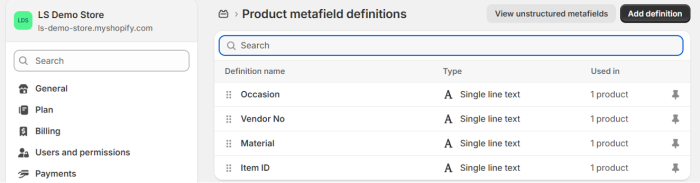
- After saving the definitions, return to the Product Metafield Definitions page, where you can see the list of list of defined metafields matching the configuration set in the mapping table in Business Central.

-
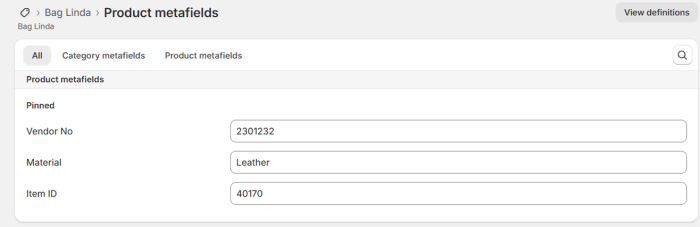
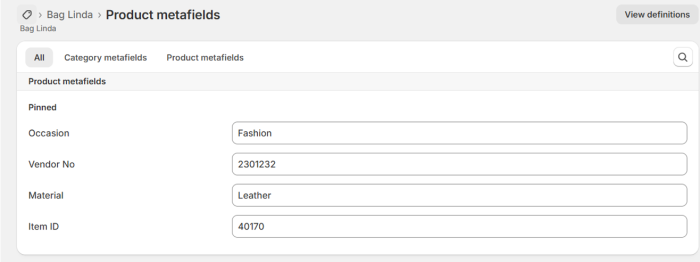
To verify the result, we go to Products in Shopify Admin. You search for Bag Linda, open the product, and scroll to the Metafields section to confirm that all synced metafield keys and values are displayed correctly.
Note: Repeat Steps 3 and 6 for each additional item that requires metafield updates.
Method 2: Create Metafield Definition in Shopify and Map in Business Central
- Open the Shopify Admin, and navigate to Settings - Metafields and metaobjects - Products. Click Add Definition.
- You are redirected to the Add Product metafield definitions page where you can enter the name, customize the namespace and key, select the type, and then click Save to create the metafield definition.

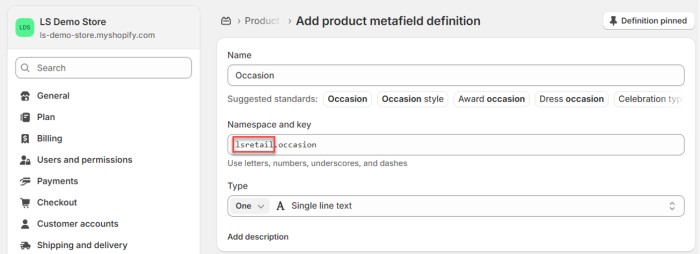
Note: Be sure to change the namespace from custom to lsretail, as this is hardcoded.
- Next, we return to the Shopify Shop Card page and navigate to Action - LS Central Extension - Meta Data, where you map the product metafields that were previously created in Shopify.
- After completing the mapping, we send the metafields to Shopify by clicking Related - Products - Synchronization - LS MetaDatafor the selected item (e.g. 40170 – Bag Linda) to Shopify.
- Back in the Shopify Admin, and navigate to Settings - Metafields and metaobjects - Products, where you can see the newly added metafield definition, including the number of products it is currently applied to.
-
Go to the Products and pick one from the list (e.g. 40170 – Bag Linda). Scroll down to the Metafields section and verify that Occasion metafield is synced and that its corresponding value is displayed correctly.
To Send Customer Metafields to Shopify
Method 1: Configure mapping in Business Central, then send to Shopify.
- Open Shopify Shop Card page, navigate to Action - LS Central Extension - Meta Data to open Shopify Mapping MetaData page in Business Central and configure the metafields mapping.
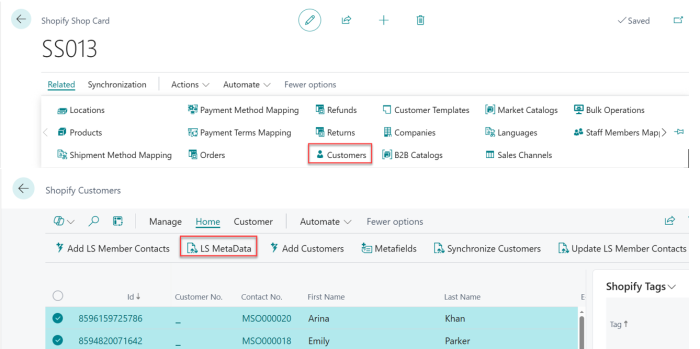
- After completing the mapping, return to the Shopify Shop Card page. Click Related - Customer. Select the customers you want to send metadata for, then click Home - LS MetaData.
Note: There is no scheduler involved. To update a customer, simply select the customer record on the page and proceed with the update action.
- Open the Shopify Admin, and navigate to Settings - Metafields and metaobjects - Customers. Click View unstructured metafields, then add a definition for each metafield key that was successfully synced from Business Central and click Save.
-
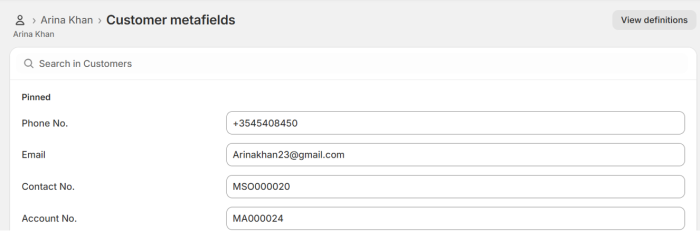
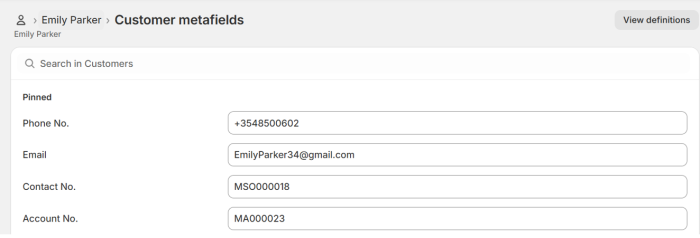
To verify the result, open Customers in Shopify Admin. Search for Arina Khan and Emily Parker, open each customer record, and scroll to the Metafields section to confirm that all synchronized metafield keys and values are displayed correctly.
Method 2: Create Metafield Definition in Shopify and Map in Business Central
- Open the Shopify Admin, and navigate to Settings - Metafields and metaobjects - Customers. Click Add Definition.
- On the Add Customer metafield definitions page where you can enter the name, customize the namespace and key, select the type, and then click Save to create the metafield definition.
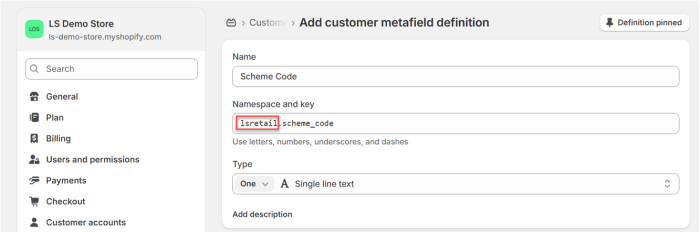
Note: Be sure to change the namespace from custom to lsretail, as this is hardcoded.
- Next, we return to the Shopify Shop Card page and navigate to Action - LS Central Extension - Meta Data, where you map the customer metafields that were previously created in Shopify.
- After completing the mapping, return to the Shopify Shop Card page. Click Related - Customers. Select the customers you want to send metadata for, then click Home - LS MetaData.
-
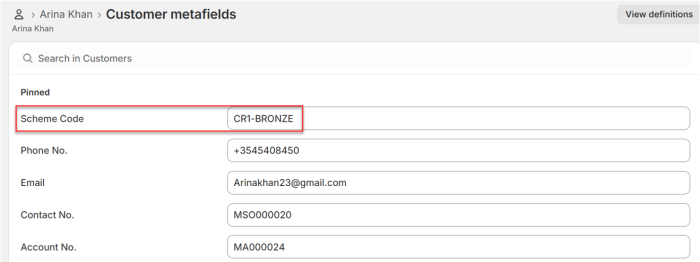
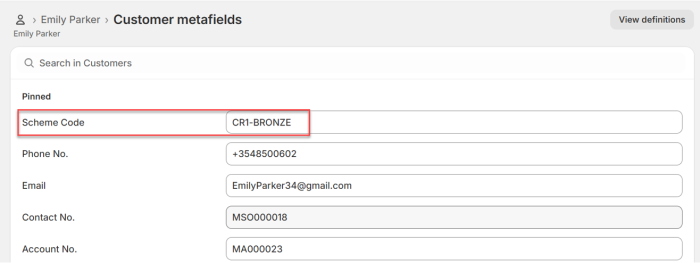
To verify the result, open Customers in Shopify Admin. Search for Arina Khan and Emily Parker, open each customer record, and scroll to the Metafields section and verify that Scheme Code metafield is synced and that its corresponding value is displayed correctly.
To delete Metafields in Shopify
Metafields cannot be deleted from Business Central. To delete a Metafield, open Shopify Admin page.
- Go to Settings - Metafields and metaobjects - Products, then click on the definition you want to delete (for example, Vendor No).
- In the definition details page, click More actions - Delete definition, then choose whether to delete the field only or delete the field and its saved values, and click Delete to confirm.
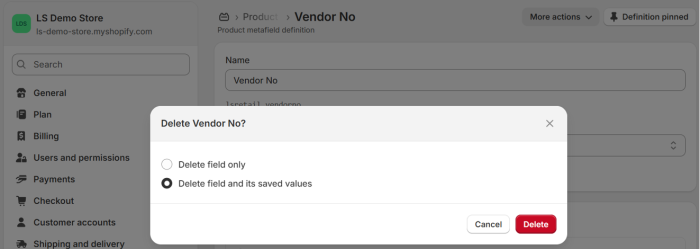
Note: Selecting delete the field and its saved values permanently removes the metafield and all associated data from your products in Shopify. This action cannot be undone.