In this article
To set up the Release Calendar Links
To create Vendor Location Release Calendar combinations and Release Actions
To disable the automatic release functionality for a vendor/location
Before a Release Calendar can be used, it must be linked to vendors and locations.
To set up the Release Calendar Links
To perform the calendar linking:
- Click the
 icon, enter Release Calendar Links, and select the relevant link.
The Release Calendar Links page is a matrix where the combinations between vendors and locations are set. For each of these combinations a calendar is being assigned.
The linking can be done at three different levels: all vendors and locations, groups of vendors and locations, directly at the vendor and location level, or any combination of these.
Fields in the Release Calendar Links page:
| Field | Description |
|---|---|
| Vendor Group Type |
The available options are:
|
| Vendor Group Code | This field is used to select a vendor group or a vendor, depending on the value in the Vendor Group Type field. This field is not used if the Vendor Group Type is set to All. |
| Location Group Type |
The available options are:
|
| Location Group Code | This field is used to select a location group or a location, depending on the value of the Location Group Type field. This field is not used if the Location Group Type is set to All. |
| Calendar No. | This field is used to select the calendar that will be used for the specified vendor(s) and location(s) combination. |
| Status | Shows if the Vendor Location Release Calendar combinations and the Release Actions have been create or /updated for the current line. |
To create Vendor Location Release Calendar combinations and Release Actions
Once the Release Calendar Links have been defined, the detailed vendor/location/calendar combination entries should be created, taking into consideration all the lines from Release Calendar Links and applying priorities. The vendor always has a higher priority than the location.
The priorities applied are as follow, a higher number indicates a higher priority:
| Vendor Added From | Store Added From | Priority |
|---|---|---|
| All | All | 1 |
| All | Location Calendar Group | 2 |
| Vendor Calendar Group | All | 3 |
| Vendor Calendar Group | Location Calendar Group | 4 |
| All | Location | 5 |
| Vendor Calendar Group | Location | 6 |
| Vendor | All | 7 |
| Vendor | Location Calendar Group | 8 |
| Vendor | Location | 9 |
You can view the detailed vendor/location/calendar combination entries in the Vendor Location Release Calendars page:

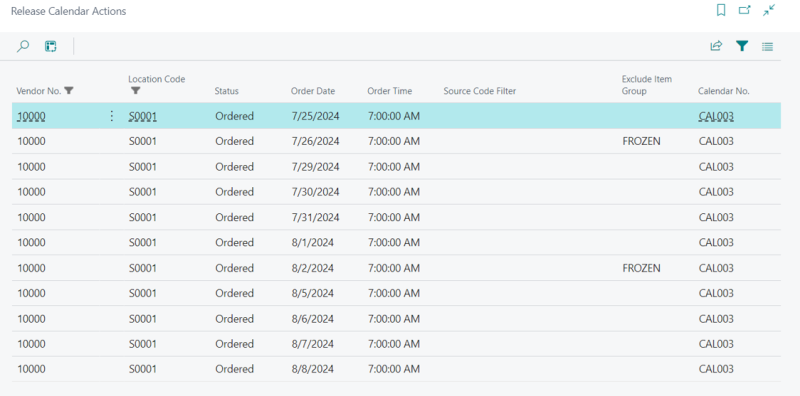
For each vendor/location/calendar combination that was created from the Release Calendar Links based on the above described priorities, and depending on the release calendar lines, the system creates Release Calendar Actions. These are entries at the vendor/location/date and time level and the system processes these actions with a Scheduler job. By processing these actions, the purchase orders are released.

The vendor/location/calendar combination entries and the release actions are created by using the Create/Update Actions action in the Release Calendar Links page.
In case the Release Calendar has been updated, or if a line has been added or updated in the Release Calendar Links, that line is marked in red color. This indicates that the vendor location release calendars and the release actions are not up-to-date and you need to use the Create/Update Actions action to update the entries.
The number of release actions that are created depends on the Release Details Period setting in the Replen. Setup. Once created, these actions are automatically maintained by the system (once an action is processed from the top of the list, a new one is generated at the bottom of the list), as long as no changes occur on the calendars, links, and the vendors or locations.
There are three ways to access the release actions:
- Click the
 icon, enter Release Calendar Actions, and select the relevant link.
 - By drilling down the No. of Release Calendar Actions field in the Release Calendar page.
- By using the Release Calendar Actions button in the Vendor Location Release Calendars page.
Note: In a scenario where:
- A vendor was enabled/disabled from using the Release Calendars,
- A vendor was added/removed from a Vendor Calendar Group,
- A location was enabled/disabled from using the Release Calendars,
- A location was added/removed from a Location Calendar Group,
- A Release Calendar was updated,
- A new Release Calendar Link was created, or an existing one was updated,
you must use the Create/Update Actions function to recreate all the Vendor Location Release Calendar entries and Release Calendar Actions.
To disable the automatic release functionality for a vendor/location
By default, all the Vendor Location Release Calendar combinations are created with status Active. This means that Release Actions will be created from them, and the corresponding purchase orders will be released when these actions are processed.
If you want to suspend the automatic release functionality for a vendor/location, this can be done from the Vendor Location Release Calendars page, by selecting the relevant entry and pressing the Deactivate action. The Status of the entry changes to Inactive, and all its Release Actions are deleted.
If, at a later stage, you want to reactivate the automatic release functionality for the vendor/location, you can be do that by using the Activate action. The status of the entry changes to Active and all its Release Actions are generated.
See also