In this article
To copy skin, font, and color lines
To delete skin, font, and color lines
The ##DEFAULT skin, font, and color setup line
Example: Style Leo in the Demo Data
Viewing skin, font, and color setup lines
Rules for POS skin, font, and color to be used in the POS
With the POS Style Profile the look of all buttons and fields for the POS are defined. This includes the buttons' look, the font and the color used for all the different controls, and the space between buttons. The Style Profile's main purpose is to make the setup easier and quicker; that is, the buttons’ look is defined with the Style profile and not individually for each menu line.
The Style profile has three parts:
- Skin Lines which define the color, shape, curvature, gradient mode, and transparency of the POS buttons and other areas.
- Font Lines which define the font name, size, and attributes for POS buttons and other areas.
- Color Lines of different parts of the POS. This can, for example, be the background color for different parts, color area between buttons and the grid line color.
Note: The POS buttons’ color is defined in the Skin, not in the color setup. Color Setup is for other parts of the POS, used in the Controls and for the color between buttons in menus.
The Button look is used here in a broad definition; it has to do with input fields and other fields in the POS as well as the buttons.
By having many skin, font, and color lines in one Style profile, it is possible to display the POS buttons with a different look. When you wish to change a look, you only have to change the base definition, all parts which use the definition will change accordingly.
Active POS Profile, style profiles can be assigned to staff/terminal/store, just like other profiles. The settings in the assigned style profile overwrite the ##DEFAULT settings (explained later) if they exist, otherwise the ##DEFAULT settings are used.
This article explains how the Style Profile functions.
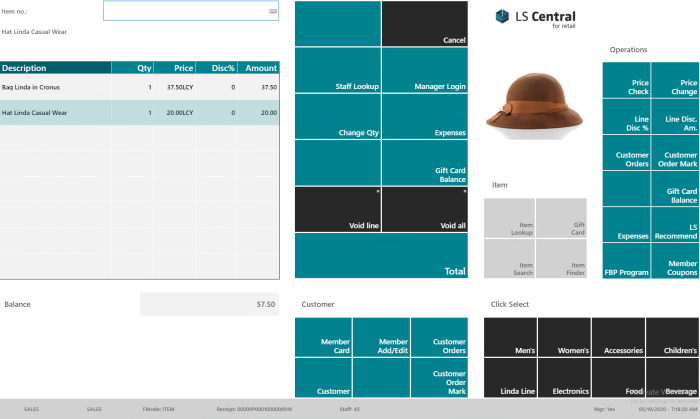
In the above main POS screen, the buttons and other fields have a different look:
- The buttons have different colors, some are black, blue-green, gray, or even white.
- The Journal header is blue-green with white text.
- The Journal lines are gray and the journal text is dark-gray. Note: Active Journal lines have a different color though, a light version of blue-green.
- The information lines are white with dark-gray text.
- The Status bar has gray skin with black text; the font size is smaller than the information text.
- The space between the information boxes and the space between all the sales buttons is white; this is defined with the background color.
For this setup, that is to have different colors and text, you set up a Style Profile with all the options that are needed for skin, font, and color, and then you connect the different skin, font, and color setups to menus, menu lines, POS commands, and different controls.
The Style profile must have:
- As many skin lines as needed to display the different looks.
- As many font lines as needed for the different fonts.
- As many color setups as needed for different backgrounds.
Tip: Each company setup has to have at least one Style profile. For more variety, it is ideal to create more Style Profiles.
Note: There is a new concept of ##DEFAULT Style. The ##DEFAULT Style is explained later in this article.
To set up a style profile
- Click the
 icon, enter POS Style Profile List, and select the relevant link.
To create a new style profile
- From the POS Style Profile List, click the New action.
- Fill in the style’s ID and Description.
- The ID field: max 10 unique alphanumeric characters.
- The Description field: max 30 unique alphanumeric characters.
Note: ID and Code names should not include the & and | characters.
- Fill in the setup parameters on the card's FastTabs.
There are three FastTabs for the setup of skin, font, and color:
Skin Lines FastTab
POS skin lines define everything for the button's look except the text that appears on the button. These are attributes such as shape, curvature, color, border color, gradient mode and more.
To create a new POS Skin line:
- On the POS Style Profile Card, go to the Skin Lines FastTab.
- Click the Manage action, and then click New Line, or use Ctrl+Ins.
- Fill in the Code field, an ID of max. 20 alphabetical characters.
- Click the three dots in the Code field to open the POS Skin Card in Edit mode.
- Use the Assist button (click the three dots) to fill out the other fields.
- Press Close to save the new skin.
Tip: A quick way to enter data is to edit the fields directly in the Skin Lines FastTab in the POS Style Profile Card.
Font Lines FastTab
POS Font lines define how the buttons’ text looks; that is, the font name, font size, font color, and font attributes.
To create a new POS Font line:
- On the POS Style Profile Card , go to the Font Lines FastTab.
- Click the Manage action, and then click New Line, or use Ctrl+Ins.
- Fill in the Code field, an ID of max. 20 alphabetical characters.
- Click the three dots in the Code field to open the POS Font Card in Edit mode.
- Use the Assist button (click the three dots) to fill out the other fields.
- Press Close to save the new font.
Tip: A quick way to enter data is to edit the fields directly in the Font Line FastTab in the POS Style Profile Card.
Color Lines FastTab
Color setup is for defining the POS background color. For each Color Line, in addition to the required Code, you only specify a Description and a Color number.
Note: Color setup has nothing to do with the color on the buttons. This Color Setup is for the background color in different menus and controls.
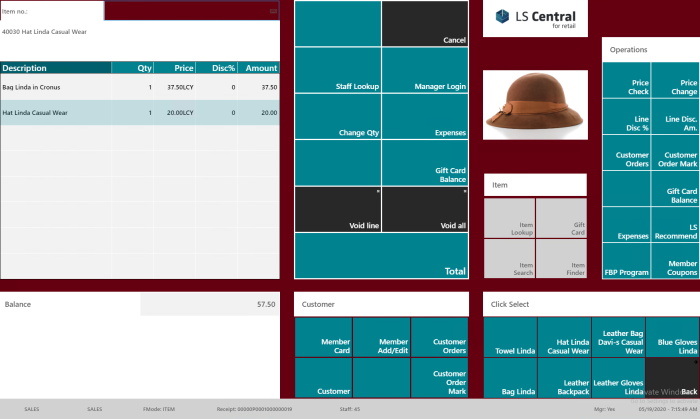
The example below shows how the main POS menu looks when the ##DEFAULT Background color is changed to brown:
To copy skin, font, and color lines
To copy skin, font, or color lines:
- Select the line you wish to copy.
- Right-click the mouse, and select Copy Rows, or use Ctrl+Shift+C.
- Select a new line.
- Use the Paste Rows functions. The data has been put in.
- Edit the Code by changing its name.
Note: Remember to change the Description field and other fields as needed.
To delete skin, font, and color lines
To delete one of the skin, font, or color lines:
- Select the line you wish to delete.
- Click Manage - Delete Line, or use Ctrl+Del.
- The system asks for confirmation. When you click Yes, the line is deleted.
Important: Be aware of the Delete option. It deletes the whole style, not just the individual style line.
It is the Delete Line option that deletes selected lines for skin, font, and color lines.
The ##DEFAULT skin, font, and color setup line
For each part in each Style it is highly recommended to add a line with the code ##DEFAULT.
The POS uses information from the active POS Style Profile to display how the buttons and different parts are displayed on the POS screen. If the system finds no values, it will automatically look for the ##DEFAULT line.
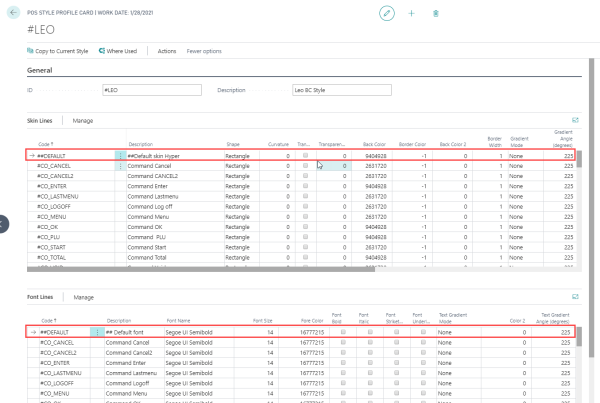
Example: Style Leo in the Demo Data
These are the definitions for the lines ##DEFAULT in the style:
- ##DEFAULT - Skin line is bluegreen.
- ##DEFAULT - Font line is Font POS_FunctionPanel with white color and font size 14.
- ##DEFAULT - Color Setup is set as white color.
Take a look at this part, Menu POS-FUNCTIONS in HYPER:
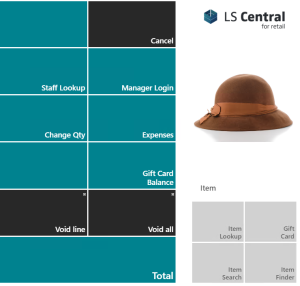
Explanation:
- The blue-green buttons in the above picture do not have any skin or font lines connected to them so they take the skin and font from ##DEFAULT.
- The space between buttons is white since this background has no color line connected so the background is displayed with the ##DEFAULT Color Setup.
- The buttons Void Line and Void All are displayed in black since their POS Commands are connected to a different skin with code #CO_VOID and #CO_VOID_L. Both these codes have black skin color.
Viewing skin, font, and color setup lines
Working with the Skin, Font, and Color Setup lines in the Style Profile is practical when the user is setting up the Style. But sometimes it is good to view all lines from all Style Profiles in a list and then use a filter to view specific lines. This is explained in the following.
This example is for Skin lines, but the same method applies to Font and Color Setup lines.
- Click the icon, enter POS Skin List, and select the relevant link.
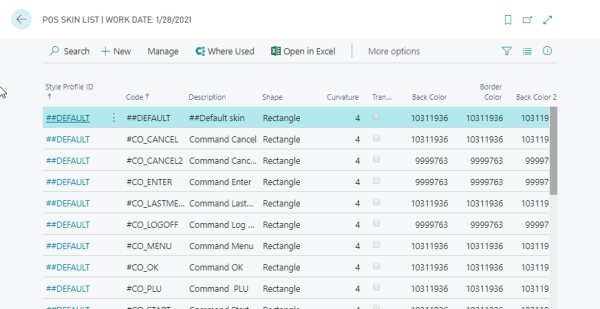
- Click Search , and enter your filter value, for example #DS_TO.
- A list with all skins that comply to this filter value is displayed.
Rules for POS skin, font, and color to be used in the POS
There are rules for how the system determines which Skin, Font, and Color to use in the POS.
The ideal setup is to have:
- One Style with ID ##DEFAULT.
- More Styles when needed to display different looks.
- Each style should have ##DEFAULT line for the Skin, Font, and Color Setup.
- Style ##DEFAULT should have all the setup needed for Skins, Lines, and Color setups.
Note: It can be normal to have a few styles set up even though there is only one store in the company. Then the styles can be different, for example for different departments.
The POS rules to find which Skin, Font, and Color Setup lines to use for the Menu buttons:
- The POS can only have one Active Style Profile. Which Style profile is the Active style is explained in another article.
- When no value is found in the Menu line, Menu Attributes or in the Command setup, the ##DEFAULT value is used.
- A value in the Menu Line overrules what is set up with the Menu Attributes and Command setup.
- The value set up with the Command is used when nothing is set up for the Menu Line.
- A value in the Menu Attributes is used when nothing is set up with the Command or the Menu Line.
- When a found value does not exist in the Active Style:
- The system looks for this value in the Store’s Style.
- If the value is does not exists for the Store’s Style, the system looks for the value in the ##DEFAULT Style.
- If the value does not exists in the ##DEFAULT Style, the ##DEFAULT value in style ##DEFAULT is used.
The default style ##DEFAULT
The ##DEFAULT Style has some Skin, Font, and Color Setup Lines.
These setup lines have then been connected to different Menus, Menu Lines and Controls in the Demo Data profiles.
There is a naming convention for the Default##DEFAULT Style’s skin, font and color lines:
- The first character is #.
- The second and third characters group the lines together depending on their usage.
- The fourth character is a _ (underscore).
- The rest of the characters describe in more detail for what they are used.
- The exception for this is the ##DEFAULT code and some of the Color Lines.
Profile Style ##DEFAULT:
The second and third letters grouping
| Code | Description |
|---|---|
| CO | CO stands for Commands These lines are intended to use to set values for the POS Commands. An example of this is the CO_VOID_L for the command VOID_L |
| DS | DS stands for Default Skin These lines are only for the skin lines. DS_STATUS_BAR is for example intended for the Status bar menu |
| DT | DT stands for Dining Table. These lines are used for the Hospitality program and are fixed values used directly by the program. It is highly recommended that these lines exists in the ##DEFAULT Style and in all Styles that are for Hospitality. |
| JG | JG stands for Journal Grid |
| PA | PA stands for PANEL #PA_HEADER is for Panel Headings |
| PU | PU stands for Pop Up These lines are used in the Pop-up menus |
| SL | SL stands for Sales Line. These values are fixed values and used for the sales lines |
| TA | TA stands for TABLE These lines are in the Skin Lines. The general idea is to use these lines for different tables in the system, tables in wide definitions as data grids and record zoom. |
| DF | DF stands for Default Font These lines exist only for the Font Lines. The general idea is to use these lines for the buttons in menus |
| FO | FO stands for FONT These lines exist only for the Font Lines. The general idea is to use these lines for glyphs and signs which are signs not letters. All the FO lines have a special font like Wingdings and Arial Unicode MS |
| TF | TF stands for Text Font These lines exist only for the Font Lines. The general idea is to use these lines for the different text boxes |
| DI | DI stands for Dialog These lines exist only for the Color Setup |
| GR | GR stands for GRID These lines exist only for the Color Setup |
Copying the Style Profile
It is possible to use the Copy Profile action to copy a Style Profile to an existing profile. The Copy Profile action works only within the company.
To copy a profile:
- Start creating the new profile, give it an ID and Description.
- Make sure the new profile is selected.
- Click the Copy to Current Style action.
- Select the Style that is going to be copied into the field Copy from Style.
- Select the groups of data which are going to be copied.
Here it is possible to select one or all of these options: Skin, Font and Color lines
- When relevant, select the field Overwrite if Code Exists.
- Start the process by clicking the OK button.
Tip: The copy profile action exists for all the profile types.
Warning: When the field Overwrite if Code Exists is selected, the process overwrites the existing lines and puts in new ones.
Style profile benefits
The main benefits of having Style Profiles are:
- It simplifies the implementation and maintenance processes.
- The skin, font, and color values are part of the menus, menu lines and controls and to change the look we only need to change values for the skin, font, and color lines.
- For a company with many stores and many Style Profiles it is wise to have the same names for the skin, font, and color setup lines in the Styles.
This way:
- All the different menus, menu lines and controls refer to the same Style Profile data.
- It is easy to change the color and fonts of the POS by just changing the active Style Profile.