It is now time to finalize the replication and scheduling setup. You start in LS Central on the Scheduler server and then you move on to Azure pipeline triggers.
Complete Analytics Distribution Location Setup
- In LS Central, on the Scheduler server, navigate to Distribution Location List.
- Open the LSINSIGHT distribution location by clicking the code in the list.
- In the Replication FastTab, add the following values:
- Data Director ConnectionType: Database
- Company Name: enter the company name from LS Central, the one you used when setting up Analytics.
- User ID: enter the admin user you created for Analytics.
- Password: enter the password for the admin user you created for Analytics.
- Db Server Name: the name of the Analytics SQL server in Azure.
- Db. Path & Name: the name of the Analytics database.
- Version: LSBC
- If this version does not exist in your data, create it with the following parameters:
- ID = LSBC
- Description = LS Central
- Plugin ID = ms
- Plugin String = bc
- If this version does not exist in your data, create it with the following parameters:
- Driver Type: SQL
- Net Type: tcp
- Enable Active for Replication switch
- Other fields should be disabled or left blank
- Click the Test Connection action.
- A message box asks if you want to test the connection: click Yes.
- If the connection is successful, a message box is displayed with the time it took to test.
- If the connection is not successful, an error is displayed.
The connection should test successfully before you continue. If you get errors, most likely some of the replication parameters are incorrect. Check that your company and database information is correct. This should be the server information from the Deployment summary. The error message should also give an indication of what is wrong.
Open DD Configuration tool to view jobs running
- In your Windows Start menu type Configuration.
- Open the Configuration tool as administrator.
- In the Debugging tab you will find the Job Monitor button.
Run and schedule jobs
Now you are ready to run the jobs you imported earlier. One of the replication jobs only needs to be run once, but the other jobs need to be scheduled to run every day or more often.
Run preload job
The LS Insight Action preload job (INS_ACTIONPRELOAD) needs to be run first and only once. This job will preload data for all tables that will then be updated by the LS Insight Action job. There might be some data that have been loaded or created in the database without actions being created, so this job will get everything.
- Navigate to the Scheduler Job List in LS Central.
- Open LS Insight Action preload job by clicking the Job ID in the list.
- Click the Run Now action. A confirmation message is displayed, click Yes.
- If you get an error about the job not having a receiver, you need to navigate to Related - Job - Receiver Groups and add the All group as a receiver group. If you do not have a store group for all stores, you need to create it and then add it as a receiver group on the job.
- The job is started and a number of normal jobs run as displayed in a message box. For this job it should be 33 normal jobs.
- You can review how the job run is progressing in the Data Director's Job Monitor window. Review the Data Director documentation for more information.
NAS configuration in LS Central
After you have run this first job, it is time to enable the NAS service for the other jobs to start running on schedule.
To enable the NAS follow these steps:
- Navigate to the Scheduler Setup page in LS Central.
- Activate the Enable NAS Scheduler check box.
- Close the Scheduler Setup page to make sure the change is saved.
- Open Service Tier Administrator, and restart the LS Central service.
- When the service is running again, go back to the LS Central web client.
- Navigate to Scheduler Setup, and now the Scheduler is Running check box should be active as well.
The NAS is now ready and will run the other three replication jobs on schedule.
Scheduling
It is a good idea to sync this replication schedule with the other two update schedules, that is the Azure pipeline schedule and the Power BI service refresh dataset schedule.
Our recommendation is to run them in this order with approximately 2 hours between, and to start the first run after closing hours, if possible, so that the replication does not interfere with other usage of LS Central. Here is a suggested schedule:
- Replication jobs from LS Central to Analytics pre-staging tables (start at 11 p.m.).
- Azure Data Factory pipelines (start at 1 a.m.).
- Scheduled data set refresh in Power BI service (starts at 3 a.m.).
When done this way, each part of the data update should be able to finish before the next one starts, and in the morning the Power BI reports have been updated with yesterdays Sales and Inventory data.
We have added a default schedule to the three other jobs, between 11 p.m. and 1 a.m. You can review these schedules and the next run date and time from the Scheduler page in LS Central.
This can easily be changed, if needed, and the jobs will wait until the earlier one is finished before running, so setting the times closer together would also be fine.
If you want to change the schedule, you can navigate to the Scheduler page and change the schedule settings from there and the NAS will pick them up. After NAS has started, you will not be able to change the job schedule from the job card.
If you experience locking errors when trying to change a schedule from the Scheduler page, you can always disable the NAS while you change the jobs, but this will involve restarting the LS Central service, which should not be an issue in our case since we are just using it for replication.
Follow these steps to disable the NAS scheduler:
- Navigate to the Scheduler Setup page in LS Central.
- Deactivate the Enable NAS Scheduler check box.
- Close the Scheduler Setup page to make sure the change is saved.
- Open Service Tier Administrator, and restart the LS Central service.
- When the service is running again, go back to the LS Central web client.
- Navigate to the Scheduler Setup page, and now the Scheduler is Running check box has been deactivated.
The NAS has now been turned off and you can edit the jobs and schedules at will. Just remember to enable the NAS again once you are done to run the jobs on the new schedule.
Run Initial load pipeline
Now that the connection to the LS Central source database is ready you can start running the pipelines.
First, you need to trigger a run of the Initial load pipeline. This pipeline triggers two other pipelines, one after the other. First, the PopulateQueryBase pipeline, which generates the queries to create and populate the staging tables, is triggered, and once that has finished running, the initial load of the Scheduled Run pipeline is run for the first time and performs the initial data load of the data warehouse.
Please follow these steps:
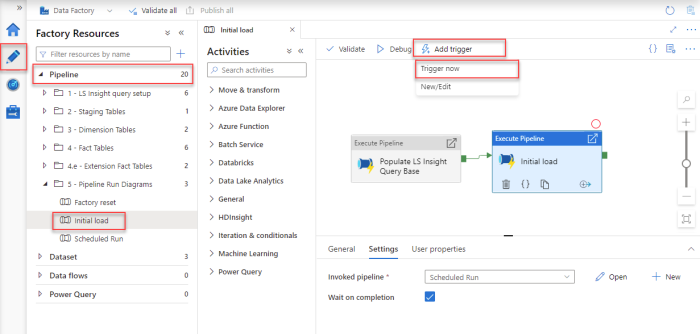
- In the Azure Data Factory, open the Author option, the pencil icon on the left navigation menu. Here you can see the Pipelines section, with all the available pipelines. There should be 15 pipelines.
- Expand the Pipelines section and 5 - Pipeline Run Diagrams folder.
- Select the Initial load pipeline.
- You then need to trigger this pipeline manually by selecting Add Trigger > Trigger now from the top menu.
- The Pipeline run window opens. Click OK to start the run.
- This triggers the pipeline to start running and any notifications will be shown under the notification bell icon in the blue ribbon.
- This run will take a few minutes and you must wait for it to finish before you continue.
To monitor the run of the pipeline, see the pipeline monitoring guideline.
If the initially run pipeline does not complete and has errors, it is always good to inspect the errors to see if you can figure out what went wrong. The most common pipeline errors are connection issues, because the gateways are not working correctly. Solutions to some errors are described in the Troubleshooting Analytics documentation.
If you are unable to find the source of the error, contact Technical Support on the LS Retail Portal to get help solving the problem.
Activate the Scheduled Run pipeline trigger
Now that the initial load of data from LS Central to Analytics is complete, you can activate the scheduled trigger for the Scheduled run pipeline that moves data from your LS Central database to the Azure data warehouse:
- In the Azure Data Factory (ADF), the Manage section, open Triggers from the left menu Author section.
- When the ADF was created, the Daily Scheduled Run trigger was added and set to start at 1 AM the day after Analytics is set up. To edit the trigger just open it by pressing the Daily Scheduled Run link and changing the start date and time and the timezone, if needed. You can also change the recurrence interval, but be aware that this will affect the cost of the service, shorter interval will increase the cost since more actions are run by the ADF. This is explained in more detail in the cost calculations.
- When you have set the schedule start date and time, you can either activate it by selecting Activated - Yes and then pressing OK, or by just pressing OK to close the Edit trigger window, hover over the Daily Scheduled Run trigger in the list and clicking the Play icon.
- Then select Publish all from the top menu to commit the changes to the server.

Now the setup for Analytics Azure Data Factory and Data Warehouse is done and will run as the trigger schedule settings specify.
In the future, if you do not want to wait for the scheduled run, you can manually run the pipeline trigger, and edit the trigger schedule, if needed.
Tip: If you have data issues when you have connected the Power BI reports to Analytics, it is always a good idea to monitor how the pipeline run went.
As mentioned before, it is good that the pipelines run after the replication and before the Power BI report, scheduled refresh.