In this article
The examples below illustrate how to work with the Dining Table List on a POS terminal.
The Table List Startup POS
- Go to the Retail Users page.
- Select store S0005 and POS terminal P0047 for the current user.
- Click the
 icon, enter Run POS, and select the relevant link.
 - Click Logon, and log on with Staff 501.
- The Dining Table List panel appears.
The panel is configured as follows (see also Setting up Dining Table List):
- It runs on POS terminal P0047.
- This POS terminal has interface profile #HOSP-TABL. This interface profile has as POS Startup controller #HOSP-TABLELIST.
Panel Layout and Behavior
- The top menu switches between two hospitality types: Restaurant Downstairs and Upstairs Bar (as defined by the terminal's Sales Type Filter).
- The list shows table caption, status, table information, and alert.
- See Setting up Dining Table List for details on configuring the POS data table behind the list.
- The grid menu contains a button for entering the table number.
- The remaining buttons filter the list by dining table status, alert, staff and Kitchen Status.
- You can also add filters for Kitchen Status Not Sent and Started by adding buttons with POS command HOSP-TABLELIST-FUNC and parameters NOTSEND and STARTED.
- The function menu includes Logon and Logoff and My Kots.
- The bottom status bar displays messages, additional table details, services information, and other context.
Note: You can simplify this panel further by removing both the list grid and the top menu. See Table List Panel Without Grid for details.
Taking an order
To start an order for a table:
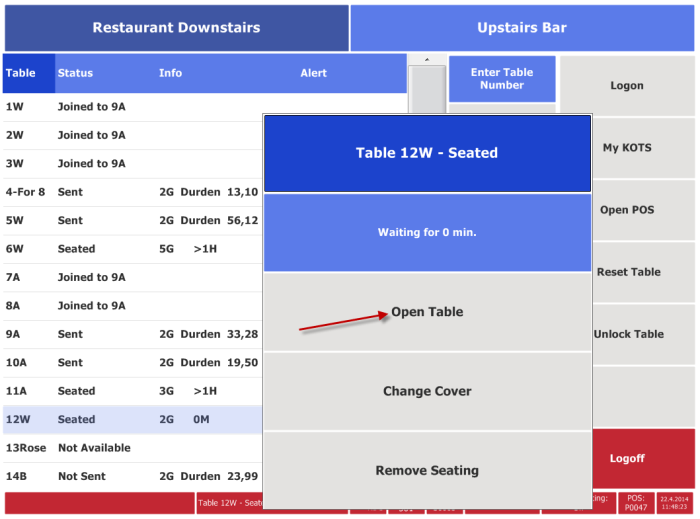
- Click the table. A pop-up menu appears with available actions. Select Open Table to start an order, or press the header button to close the Pop-up menu.
- Press the Enter Table Number (POS Command HOSP-TABLELIST-FUNC and parameters NUMBER or ALPHA).