In this article
Add a store to the LS Central Google Inventory Administration page. You can map multiple stores to different LS Central stores, just add a new line. Each store can have its own setup against Google.
The table below lists available fields on the page:
| Connection | |
|---|---|
| LS Store Code | The LS Central store to assign as Google store. |
| Merchant Id | Target Merchant Center Id. Id can be found in Google Merchant Center site under Local Inventory Ads account drop down on the right side of the header. |
| Google Store Code | Google Store Code to use with LS Central Store. Store Code can be found in Google Business Profile Manager site. Navigate to Google Business Profile Manager - Businesses to obtain the Store Code. |
| Data Source Id | The Data Source Id to assign products to. To see list of available Data Source Ids, click the look-up button (3 dots). Data Sources are set up in Google Merchant Center site. Navigate to Settings - Data sources to manage data sources for Google. |
| Target County | The county where the items may be displayed. Represented as a CLDR territory code. |
| Google API URL | Source URL for Google API. Default https://merchantapi.googleapis.com |
| Google API URL Version | Google API Version id to add to Source URL. Default v1 |
| LS URL | LS Authentication URL for Google. Default: https://lsgoogleaccesstoken.azurewebsites.net |
| Settings | |
| Size Dimension | Variant Dimension to use for Google Size values |
| Color Dimension | Variant Dimension to use for Google Color values |
| LCY Code | Currency code to use at Google store |
| Product Delimiter | Delimiter used to join Item and Variant Code. Default - |
| Replication | |
| Last Price Update | This is the time when LS Central sent Price updates to Google. Tip: If you need to move the Pushing back or reset it, you can change the date and time value here. |
Related
Click Related in the menu toolbar.
Attributes
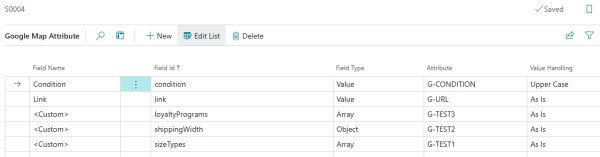
Attribute mapping is used to map LS Central Item Attributes to additional Google product attributes.
-
Field Name: Google product field name
-
Field Id: Google API field id (Json name)
-
FieldType: Type of Json value needed for the field
-
Attribute: LS Central Attribute to assign data to the field
-
Value Handling: Convert the Attribute value to upper or lower case or use as is.
Some Google product attributes are Json array with or without Json Object or Objects. To be able to set those attributes, set the Field Type to type of Json data included in the LS Central Attribute Value and type in correct Google field id for that field. To see what fields are available for Google Products Attributes see here.
Sample on how to set Json data in Attribute Values:
-
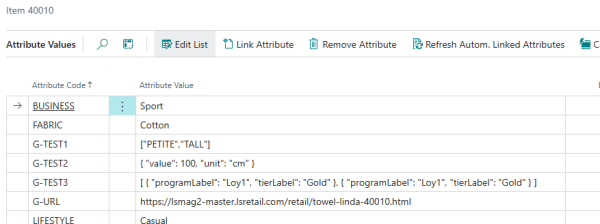
G-TEST1: Json Array with Values
-
G-TEST2: Json Object
-
G-TEST3: Json Array with Objects
Default attributes set by LS Central when sending Item data are:
-
mpn: Item Vendor Id
-
gtins: Item Barcode
-
itemGroupId: Item No
-
offerId: Item No (<seperator> Variant No)
Note: To be able to send Product to Google it has to have physical Url to the product page. Add an Attribute f.ex. G-URL and assign it to each product with an product Url.
Products
Mapping of LS Central Items and Variants to Google product name (id).
Actions
Click Update or Actions in the menu toolbar to see available Actions.
| Action | Description |
|---|---|
| Send Item | Send one Item. Note that if an item is not in distribution for the Shopify store, inventory and prices will not be updated when running Scheduler jobs. |
| Send Inventory | Send inventory update for One Item |
| Delete Item | Delete one item. |
| Validate Product Data | Run validation on all product fitting the Item distribution for the Google store and check if any basic requirements are missing before sending the items. |
| Register Developer | Register Developer email to be able to use Google API interface. |
Note: When running most of the Update and Pull commands, the same code as Scheduler code unit uses is used. Last run time or counter will not be updated.
Requirements
Item Setup
To be able to send Items to Google there are few required data that needs to be available for successful pushing of Items.
-
Items are send by Item Store Distribution. Add all items that should be available in Google to the Item Store Distribution setup.
-
Google products require Product Url and Image Url. Product Url is added with Attribute as descriped under Attribute section here above.
-
Image Url are added to the Image's Location field. Open Retail Image List and open up the Image. Add the Url to Image Location field.
-
Condition is set by Attribute mapping, available values are [CONDITION_UNSPECIFIED, NEW, USED, REFURBISHED]
-
Google can link products to existing product data by GTIN numbers. Barcode for the Item will be used as GTIN number so make sure the Item has valid GTIN type of barcode.
-
Item description can be added by adding text in Item HTML. As Google does not support XML formatted text, which means you can not use your current HTML text, create a language code GOG and assign item description to that code in as standard text.
-
Item must have prices matching the Currency of the store and Google store and have inventory available to be displayed on Google. Send Price and Inventory updates with Send Inventory command or Scheduler Job.
Store Setup
- Select the Web Store check box in the LS Commerce FastTab and assign all values needed in the Web Store fields.
Sourcing Locations
- In the LS Commerce FastTab in the Store Card, enable the Calculate Inventory for Sourcing Locations check box. First, confirm that the Warehouse (W0001) location for the Web Store exists; if it does not, create a new entry in the Customer Order Sourcing Locations table.


Web Service Setup
-
To avoid have to publish and subscribe web services, check Only Local Request.
Debugging
It is possible to debug the communication that goes between Shopify and LS Central.
Open Web Service Setup and in the Logs FastTab, set Server Log Level to All. Then, when LS Central sends a request to Shopify, it will be logged in the Web Request Log which can be found on this page by clicking the Related - Web Service menu. Shopify communications will have the Request ID GLIA-xxxx.