In this article
When the NCR Connector Is Required
This topic describes how to install the NCR Connector, a required component when using the Self-Checkout Connector (SCO) with NCR self-checkout devices.
The NCR Connector is installed as part of the SCO installation process and enables communication between NCR devices and SCO.
What Is the NCR Connector
NCR devices communicate using XML messages exchanged through the NCR PipeServer.
The NCR Connector acts as a bridge between:
- The NCR PipeServer running on the NCR device
- The SCO Connector
It receives XML messages from the PipeServer, forwards them to SCO, and returns the XML responses back to the NCR device.
When the NCR Connector Is Required
The NCR Connector must be installed when:
- The device manufacturer is NCR
- SCO is configured to communicate with NCR self-checkout devices
The NCR Connector is installed directly on the NCR device.
Installing the NCR Connector
During the SCO installation process, you are prompted to select which components to install.
When the NCR Connector component is selected, the installer automatically launches the NCR Connector installation at the end of the SCO setup.
- Start the SCO installer.
- Select the NCR Connector component when prompted.
- Complete the SCO installation.
- When asked whether to install the NCR Connector, select Yes.
- Follow the NCR Connector installer by clicking Next until the installation completes.
No configuration values are required during installation.
Installation Result
After installation:
- The NCR Connector runs as a background application.
- An NCR Connector icon appears in the Windows system tray.
- The application starts automatically with Windows.
The NCR Connector provides two windows:
- Settings – Used to configure communication parameters
- Tests – Used to send XML messages for troubleshooting
Configuring the NCR Connector
After installation, the NCR Connector must be configured to communicate with both the NCR PipeServer and the SCO Connector.
The NCR Connector runs as a system tray application and provides two menus: Settings and Test.
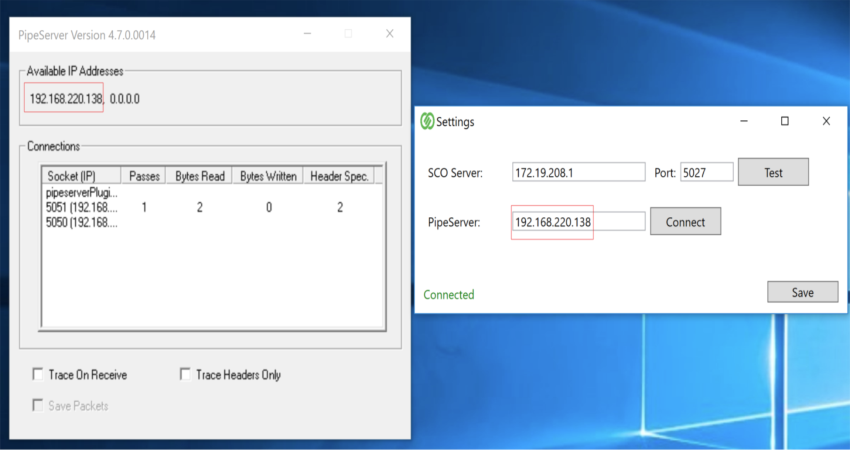
Settings
- Configure the SCO Server IP and Port.
- Configure the PipeServer IP.
- Test – Sends a ping to SCO to verify connectivity.
- Connect – Connects to PipeServer. A green Connected status appears in the lower-left corner when successful.
- Save – Saves all configuration values.
Test
- Provides a text area where XML messages can be manually sent to SCO or NCR POS for troubleshooting purposes.
Logs and Configuration Files
NCR Connector logs and configuration files are stored in:
C:\ProgramData\LSRetail\LS Self-Checkout Connector\NCR Connector
Inside this folder:
- ncr – Logs received from NCR POS.
- sco – Logs received from SCO.
- general – Combined logs.
- appsettings.json – Current NCR Connector configuration.
Verifying the Installation
- Save the configuration in NCR Connector.
- Start or restart NCR POS.
- Restart the SCO Connector.
- Verify that XML messages are exchanged between NCR POS and SCO through PipeServer and NCR Connector.
Next Steps